Automated Animations
Note that since I've taken over the module, there will be no updates or fixes to the V12 version, as v13 is close i will start developement with that foundry version. For any issues\help with the v12 version, see https://discord.com/channels/772596237605011466/1067667886191149176 (opens in a new tab) in the JB2A (https://discord.gg/mehvR2WD (opens in a new tab)) discord channel
Automated Animations provides an interface to build out simple Sequencer macros and ties those directly to items. Any animations can be used, but by default, the module assumes you have a JB2A module installed (free or Patreon).
Module Overview
Automated Animations is separated into two main sections:
Global Automatic Recognition
The Global Automatic Recognition menu is located in the Module Settings. If you are a new user, this is where you want to start. The list is prepopulated with approximately 35 animations based on D&D 5e.
- This menu sets the "default" animation for an item based on name recognition.
- For example, setting "Sword" in the Melee menu will apply animations to any item with "sword" in the name.
- More specific names like "Greatsword" will override general matches like "Sword."
Custom Item Settings
Each item can be customized with its own animation settings. Access this menu via the "A-A" button on the item's title bar.
Automatic Recognition
Name Matching
Item names in the Global Automatic Recognition menu are matched to the closest match during use:
- Example: "Sword" will match "Longsword," "Shortsword," etc.
- Name search is sorted from longest to shortest, ensuring specific matches like "Greatsword" take precedence over general matches like "Sword."
- Avoid duplicating names across multiple menus, as the first match will take priority.
Animation Categories
Categories Overview
Animation menus are separated into 7 categories:
- Melee
- Range
- On Token
- Templates
- Aura
- Preset
- Active Effects
- All categories except Preset and Active Effects include these animation sections:
- Source Animation: Optional - Plays directly on the item user.
- Primary Animation: Required - Plays based on the selected category.
- Secondary Animation: Optional - Plays on targets (if any) or the source if no targets exist.
- Target Animation: Optional - Plays directly on a targeted token.
- Each section supports sound assignment and configuration options.
Tip: Click the info icon in option sections for detailed explanations.
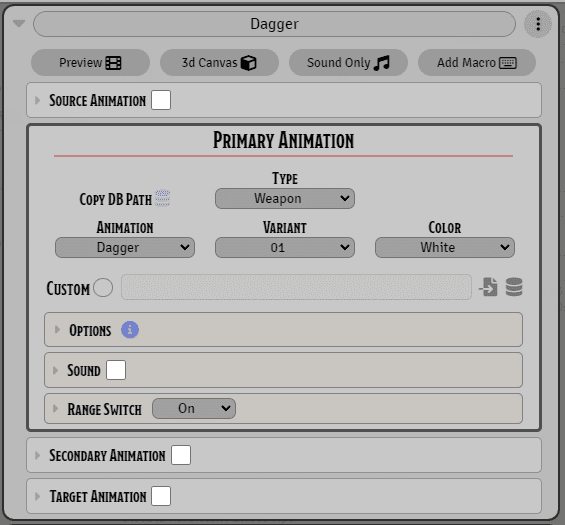
Section Header Buttons
Each category includes Sound Only and Macro buttons:
- Preview: Opens a video preview of selected animations.
- 3D Canvas: Displays configuration options for the Canvas3D module to use particle effects on 3D maps.
- Sound Only: Assigns a sound to play without animation.
- Add Macro: Adds a macro to run alongside the animation.
Global Automatic Recognition Menu
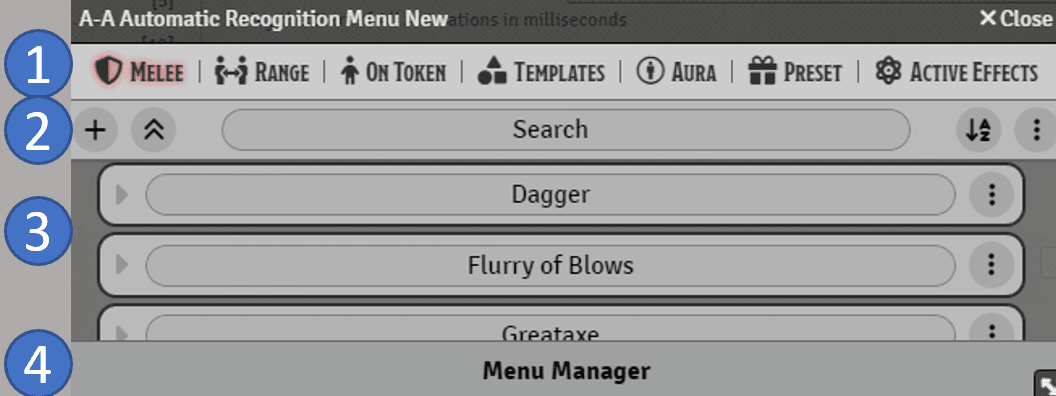
Menu Features
- Category Select: Choose the menu to view or edit.
- Category Control: Options for managing the active menu, including adding sections, searching, sorting, and deleting.
- Main Area: Displays configured sections for the active menu. Each section includes options to delete or duplicate.
- Menu Manager:
- Restore Default Menu: Reverts to the default state.
- Merge Menus: Combines multiple menus.
- Overwrite Menu: Overwrites menus with selected settings.
- Export Menu: Saves the menu as a JSON file.
Item and Active Effect Menus
Note: By default, all items are considered enabled unless manually disabled in the item's A-A menu.
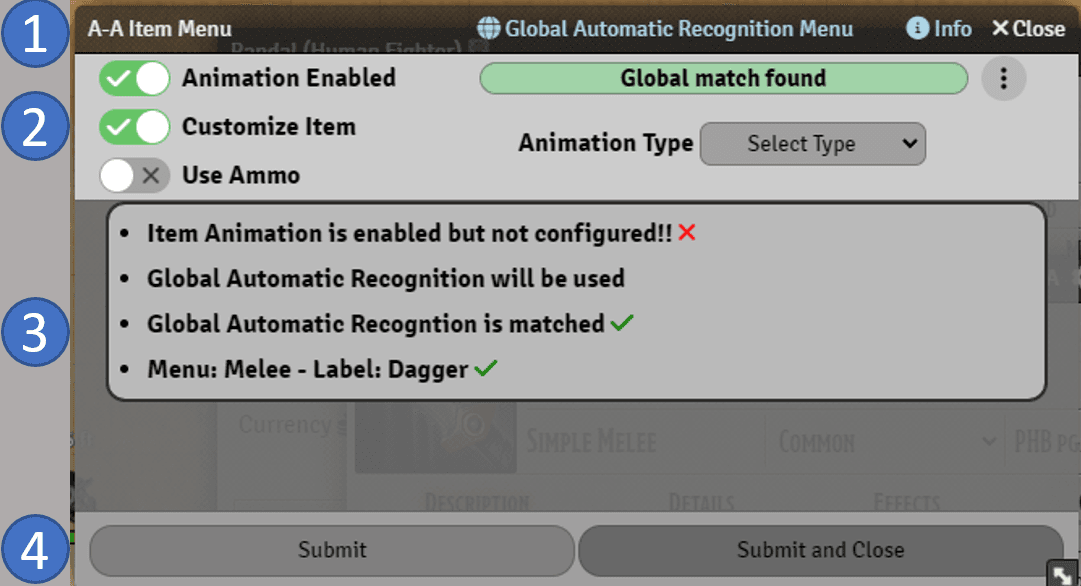
Features
- Title Bar: Shortcut to the Global Automatic Recognition Menu and info button.
- Header:
- Animation Enabled/Disabled: Toggles animations for the item.
- Customize Item: Disables global settings to customize the item's animations locally.
- Use Ammo: Enables animations based on matching ammunition names.
- Animation Type: Selects the animation menu to use.
- Top Right Section:
- Indicates if a match is found in the Global Automatic Recognition Menu.
- Allows copying settings between global and local menus for further customization.
Animation Types
Each category denotes how the Primary Animation section will play its animation.
Melee

Melee Animations function in two ways and require a target to function:
- Mimics the swing of a melee attack when in close quarters.
- Allows setting a "Range" style attack in the Range Switch section for use when outside melee distance.
Range

Range Animations are intended for all ranged attacks and require a target to function.
On Token

On Token Animations can be configured to play on targets, self, both, or default to self (if no targets are selected). This animation type plays directly on the specified token.
Templates
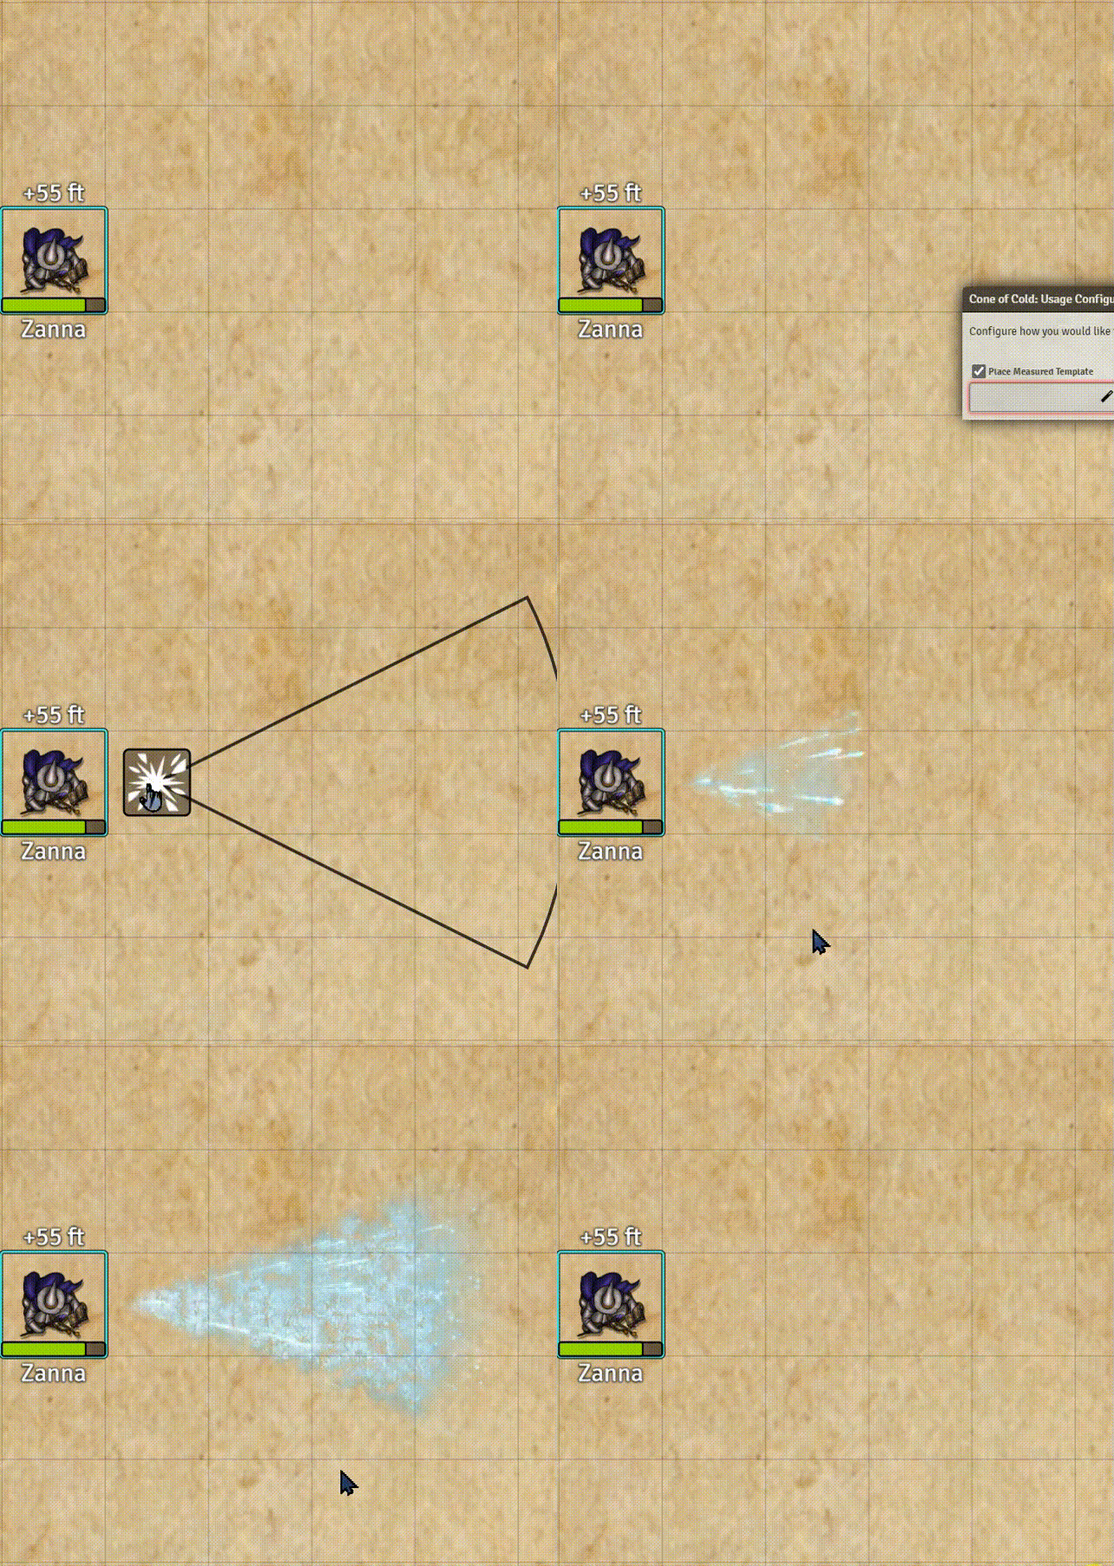
Template Animations require a template to be placed as part of the item use (or placed manually before item use for systems that do not automate this).
Aura
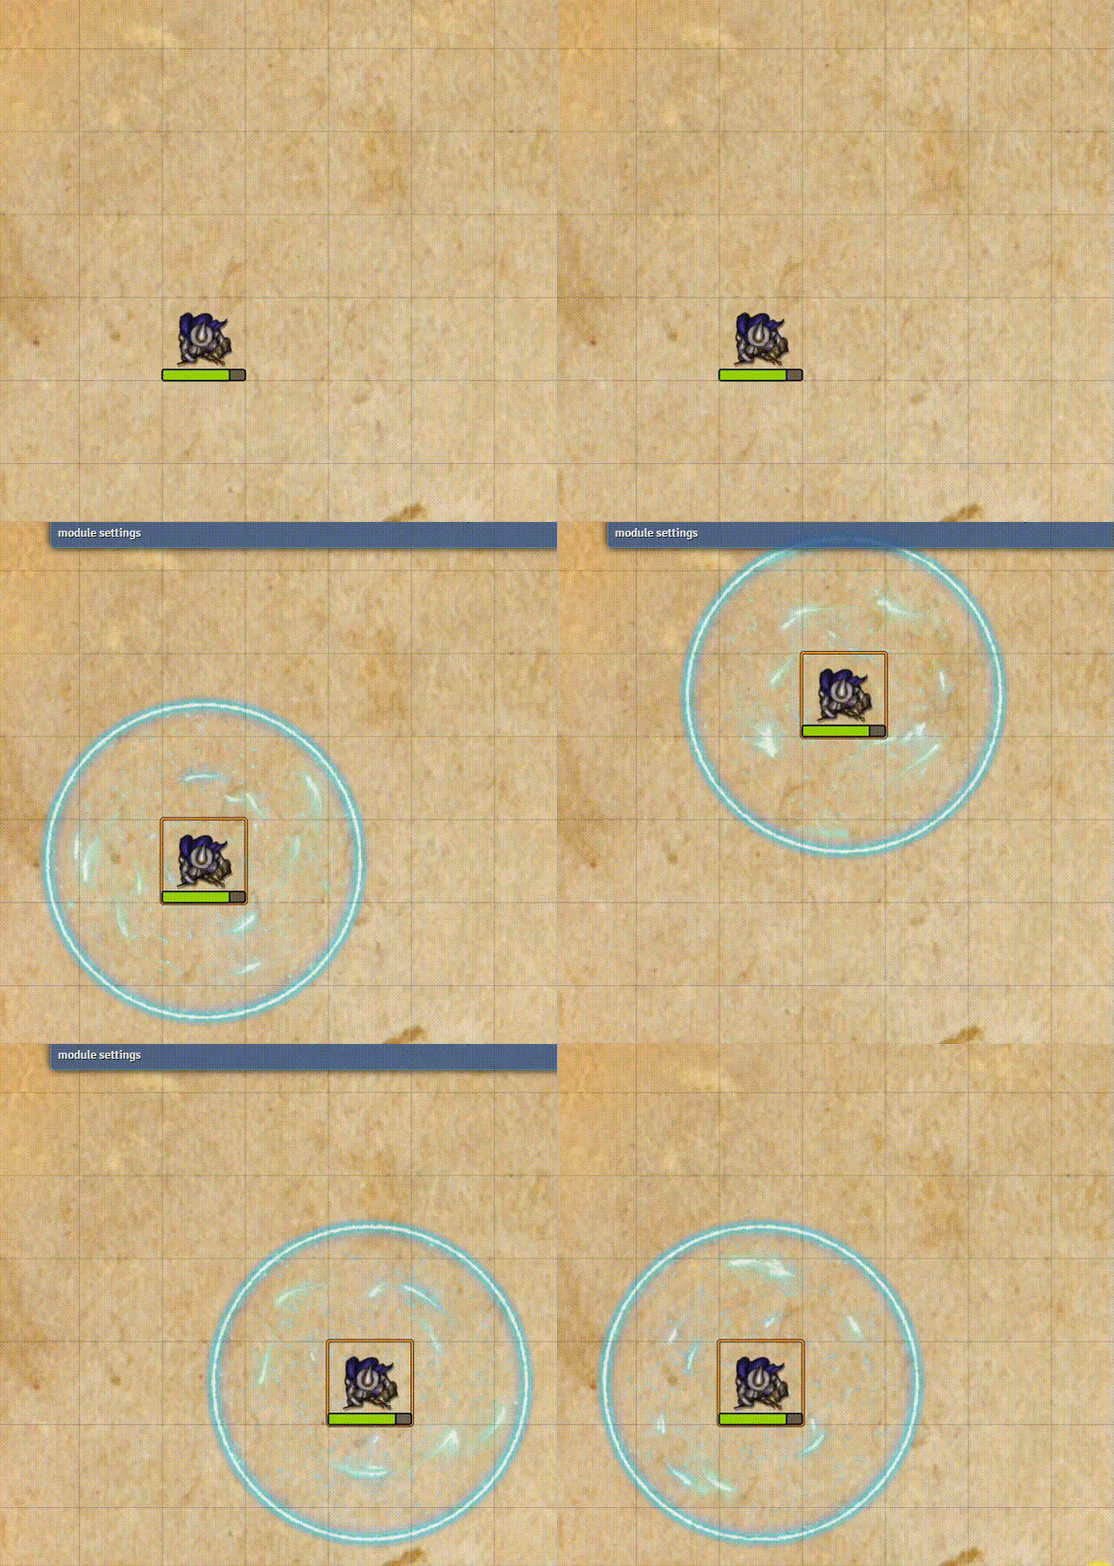
Aura Animations are persistent animations that stick to the token. They are intended for emanating effects outward from a location.
Configuring Animations
Animations in this module utilize Sequencer Macros and are configured through a user-friendly interface. Each animation section offers a variety of options to customize how animations play. In the Melee, Range, On Token, Templates, and Aura menus, there are four main sections for configuring an animation:
- Source Animation: Optional, plays on the user of the item.
- Primary Animation: Required, defines the main animation.
- Secondary Animation: Optional, plays on targets or the source if no targets exist.
- Target Animation: Optional, plays on the selected target.
Only the Primary Animation field is mandatory; all other sections are optional.
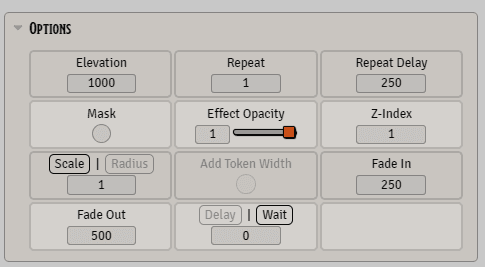
For detailed information about each option, click the blue Info icon within the interface.
Chaining Effects with Delay/Wait
When chaining multiple effects, you can manage their timing using the Delay or Wait options:
- Delay: Adds a time offset (in milliseconds) to the start of the animation. All animations begin simultaneously, but their start times are staggered based on the delay values.
- Wait: Ensures the next animation starts only after the current one finishes, using Sequencer’s
waitUntilFinished()method.
For example, in the image below, WAIT is applied to the Source FX and Primary sections. This option accepts both positive and negative values, determining when subsequent animations should start relative to the current animation.

When paired with persistent effects (e.g., Aura or On Token), WAIT allows "end" animations to play after the effect is removed. For example, if a persistent Primary Animation uses WAIT, a Secondary Animation will play only after the Primary effect ends.
Scaling Effects with Scale/Radius
The size of an animation can be adjusted using the Scale or Radius options:
- Scale: Automatically adjusts the animation size to be slightly larger than the token.
- Radius: Allows manual configuration of the animation size in grid units. Enabling the Add Token Width checkbox includes the token's dimensions in the calculation.
Sounds
Sound effects are synchronized with animations by default but can be adjusted using two key options:
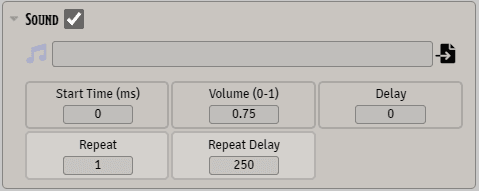
- Start Time (ms): Specifies when the sound should begin, relative to the animation's start time. For example, entering
1000delays the sound by 1 second. - Delay: Adds an additional time offset (in milliseconds) before the sound plays.
Custom Animation Files
For animations not included in the module's dropdown menus, use the Custom selection field. This field allows you to specify direct file paths or use the Sequencer Database viewer to find animations.
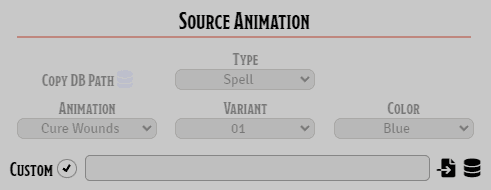
This field supports direct file paths and Sequencer Database paths.
Adding Macros
Options
When to Play
Macros on Items can be played in one of 2 ways.
- Concurrent with Animation: The Macro will play alongside the Animation Sequence (at the same time)
- Await Macro Completion: The Macro will be played "inside" the Sequence. This means the Macro will finish running before the Animation Sequence begins.
- Macro with No Animation: If this option is used, the Animation Menu options will be ignored and ONLY the Macro will be used.
Macro Name
The Name field for the Macro accepts 3 types.
- The EXACT Name of the macro that exists in the Game world
- The Compendium reference for a Macro stored in said compendium. Noted as
Compendium.[module name or just the word "world"].[compendium name].[macro name or ID]. A-A provides an Autocomplete datalist to help quick add macros, even from compendiums - From the Item Macro module. Set the Name EXACTLY to
ItemMacro, and the stored Item Macro will be used.
Sending Data to the Macro
In the Send Args field, you can send your own data to the macro in one of two ways.
- Strings can be sent separated by commas. This will be provided in
args[2]as an array of the string elements. - You can send an Object to the macro simply by writing out the data in Object format. This is a
textareainput so there is no formatting checks until the workflow starts.
Available Data
Data passed to the Marco includes the following: [Workflow, SystemData, ...UserData]
Workflow
- args[0]
The Workflow is the originating data that triggered Automated Animations. Typically this is the Chat Message data, but can also be specific Hooks. For example, if you are on DnD 5e and using Midi-QOL then most workflows (except items with Templates) will be the Midi-QOL data.
System Data
- args[1]
The compiled Data from Automated Animations includes the following:
- sourceToken : The originating Token on the canvas that used the item
- actor : The actor to which the sourceToken belongs.
- allTargets : All targets of the User as an Array
- hitTargets : an Array of "hit" targets if the item used was an attack roll. (Currently only works on DnD5e with Midi-QOL and PF2e)
- item : The Item that was used
There is more data passed, but the majority pertains solely to Automated Animations and may be subject to change. Log the args from a macro to see all available data
User Data
- args[2]
User Input data is passed using the Send Args field of the Macro section. This field accepts strings separated by commas, and sends them to the Macro as an Array`` in args[2]`.
- For example: The following is input into the Send Args field - red axe, 3, true. When the data is passed to the Macro, the args will read
args[2] = [red axe, 3, true]
Example use of the Macro Field
Lets say we are completely disabling an animation on a single Item and wish to use a Macro in its place. For a sample, let's replace the Fire Bolt Animation on an item.
First, lets set the macro name to newFireBolt and the type to Script, then in the command line type `console.log(args)``. Then on our item we will put the exact macro name into the Macro Name field.
Next, target a token and roll your Fire Bolt item with the Attack and Damage. In the console (F12) you will now see what you have available to you. The output is an Array of items as noted in the Sections above. For this exercise we will now set a constant in our Macro as const data = args[1]. This will give us access to the compiled Data structure from Automated Animations.
Now let's write our code. I'll use a simple macro to recreate an attack using Sequencer:
const data = args[1];

let fireBolt = new Sequence();
for (let target of data.allTargets) {
fireBolt.effect()
 .file("jb2a.fire_bolt.blue")
 .atLocation(data.sourceToken)
 .stretchTo(target)
}
fireBolt.play()
Now, when you attack it will execute the macro and play the animation Sequence as defined above.
Let's take this a step further and say you have a single macro that is used across multiple items and you want to change the color of the Fire Bolt without writing separate Macros. For this, we can use the Send Args field to send even more data to the macro. In this example let's dynamically set the color of the animation with a variable and send that from the Item.
In the Send Args field I will type purple to send that to the Macro. Using our console.log(args)`` statement you will see that args[2] = purple``. We can now change our Macro above to accommodate this.
const data = args[1];
const color = args[2] !== undefined ? args[2] : "blue";

let fireBolt = new Sequence();
for (let target of data.allTargets) {
fireBolt.effect()
 .file(`jb2a.fire_bolt.${color}`)
 .atLocation(data.sourceToken)
 .stretchTo(target)
}
fireBolt.play()
I have set a constant as color and assigned it to the data in args[2], there is also a fallback in case args[2] was left blank. Now when we use the item a Purple fire bolt animation will play.
Active Effect Macros
An exception to the args passed to the Macro is with Active Effects:
args[0]in Macros for Active Effects will be eitheronofoff, depending on the status of the Active Effect.- Example Macro: This example Macro will fade the Token Opacity to
0when the Active Effect is created, and return it toOpacity 1`` when the Active Effect is removed. The workflow normally inargs[0]can still be accessed fromargs[1]`
if (args[0] === "on") {
 let data = args[1];
  new Sequence()
   .animation()
    .on(data.sourceToken)
    .fadeOut(500)
    .opacity(0)
   .play()
}

if (args[0] === "off") {
 let data = args[1];
  new Sequence()
   .animation()
    .on(data.sourceToken)
    .fadeIn(500)
    .opacity(1)
   .play()
}
Active Effect Animations
- Animations configured from the Global Automatic Recognition menu Active Effects Tab, or those configured directly on an Active Effect
Animations for Active Effects are tied directly into the Foundry Active Effects system. These animations are for Source (originating) tokens only, and do not deal with Targets.
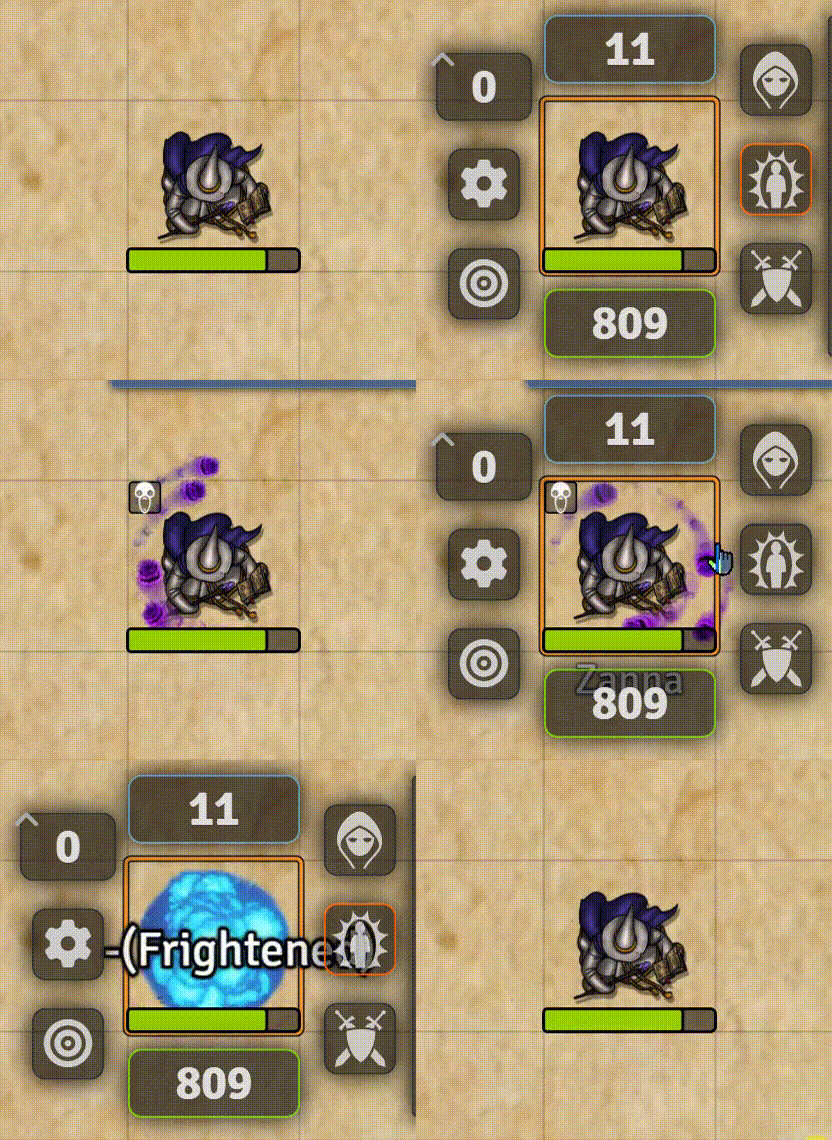
When an Active Effect is applied to a token, if the Active Effect label matches a Global entry, or if an animation is defined on the Active Effect itself, the animation will play on that token. If the animation is set to `Persistent``, it will automatically remove the Animation when the Active Effect is removed.
In the example below, Frightened is configured to be a Persistent effect, with WAIT set at -250, followed by a Secondary effect. Notice when the Active Effect is removed, then the Secondary animation plays due to choosing WAIT
NOTE: The PF2e System Rules Elements can be configured as Active Effects for the same utilization
External Animation Calls
Note: Previously, this was AutoAnimations.playAnimation(), which has been deprecated in favor of the option below.
Automated Animations provides the AutomatedAnimations class to access the Automatic Recognition menu or play animations from an external source.
AutomatedAnimations.playAnimation(sourceToken, item, options)
-
sourceToken:
Object- The token using the item. -
item:
Object- The item being used or a pseudo item object with a name for Automatic Recognition as{name: "Dagger"}. -
Options:
- playOnMiss:
Boolean- Determines whether "miss" type animations should play for melee or range attacks. - targets:
ArrayorSet- Targets for the animation. - hitTargets:
ArrayorSet- Tokens that were "hit" during an attack. - template:
Object- An optional parameter to send a Template object or document to the handler. - reachCheck:
Number- Additional range a token/item has for reach in melee attacks.
- playOnMiss:
Global Automatic Recognition - Menu Manager
AutomatedAnimations.AutorecManager
.getAutorecEntries(): Returns an object containing all Global Automatic Recognition menus and their version..addMetaData(metaData, options): Allows for setting ametaDatafield on Global Automatic Recognition menus.- metaData:
Object- Contains any metaData to tag entries in a menu. - options:
Object- Controls which menu to tag with metaData, default is all menus.- Available menus:
melee: Melee menurange: Range menuontoken: On Token menutemplatefx: Templates menuaura: Aura menupreset: Preset menuaefx: Active Effects menu
- For example, if you only want to tag Melee menu entries, pass:
{ melee: true }
- Available menus:
- metaData:
.exportMenu(): Used to export your current Global Automatic Recognition menu..mergeMenus(menu, inObject): Merges an incoming menu with the current
Persistent Effects
A variety of effects in Automated Animations can be set to be persistent. This is accomplished in one of several ways:
- Overhead Tiles
- Ground Tiles
- Sequencer Effect
To remove any tile effect, you will need to use the Foundry Tile layer to select and delete it. If this is an overhead tile, make sure you select the Foreground Layer tool.
If the effect was placed as a Sequencer Effect, you should use the Sequencer Effect Manager to remove it.
Sequencer Effect Manager

The GM can delete all persistent Sequencer effects on the canvas. Players can delete their own if they have at least Trusted Permissions.
Audio/Sound
Each Audio section provides a file picker to choose the file path, a Sequencer Database viewer button, and the following options:
- Volume: 0 - 1
- Delay: Delays the start of the audio in milliseconds
- Wildcard: Placing an asterisk (
*) symbol in place of the file name for sound effects will randomize sounds played from that folder, as long as they share the same file type. See the Sequencer WIKI for more information.
Adding System Support
In most Instances Automated Animations only needs access to the Item being used. As well as a way to differentiate between Attack and Damage rolls if the system rolls those separately.
Automated Animations access to a few key pieces of information for the module to work.
Required Data
- Item: The Item instance that is being used
- Source Token: The Token that is using the Item
- Target(s): The current targets when the Item is used/rolled
For MOST systems, this data is obtained using the createChatMessage hook. Other systems, such as Warhammer, provide system specific hooks that can be used to grab the information.
Furthermore, many systems roll separately for Attack and Damage. The Chat Message needs to be evaluated in these cases to determine if the player is rolling an Attack or Damage, OR in some cases the item has neither an Attack OR Damage roll, so that would need to be evaluated as well.
To check if your system has this data, you can start by putting CONFIG.debug.hooks = true into the dev Console (F12). Now, every time you use an Item Hook calls will display and you can investigate and search for the data. Generally the createChatMessage hook will contain some of the data. Using the DnD5e CORE system as an example:
- The
createChatMessagehook has theItem IDin the HTML. Reference thestatic async dnd5e(input, isChat)function, line 49, insrc/system-handlers/getdata-by-system.js. Using this I attempt to extract the Item ID. Then the following line first checks to see if theItem IDwas logged in the Chat Message data, then falls back to the HTML. - From there you will need to get the Token that is using the item, and then the list of Targets (if any) that are targetted.
Registering Settings and Hooks in A-A
-
Specific settings can be created in the
initSettings.jsfile under thesrcfolder -
Hooks should be registered for the game system by creating a new file in the
src/system-supportfolder. Reference theaa-dnd5e.jsfile as a template for registering the hooks and parsing relevant data. This should provide an exported function namedsystemHooks()that contains all the necessary Hooks to register. Be sure to add this to theindex.jsfile in this folder to export as the game system id.
If you are using the createChatMessage hook it is important to be able to separate out Attack and Damage rolls if your system has those and rolls them separately. Otherwise animations will fire every time something is rolled. At the start of the function you should also use if (msg.user.id !== game.user.id) { return }; to prevent animations being created from every connected client.
Compiling System data
After registering the Hooks, and sending the hook data to a function, you'll need to call const handler = await systemData.make(message or hook data here). This then sends the data to system-data.js in src/system-handlers. The next step requires creating a static async function in getdata-by-system.js in the same folder location. Use the existing ones as an example of what should be returned.
The full workflow goes something like:
-
index.js
Hook calls and sends the data to the function. The function then separates out attack/damage if needed and callsconst handler = await systemData.make(message or hook data here) -
system-data.js
Sends the received data to -
getdata-by-system.js
This compiles all the data to get the Item, Source Token and any Targets and sends the data back to compile all the relevant A-A data. This is then returned to the handler constant in -
autoAnimations.js
After compiling the Handler, a quick check to ensurehandler.itemandhandler.sourceTokenboth exists before sending it totrafficCop(handler)