Mastercrafted
A crafting system that works with any game system. Write recipes in recipe books, let your players craft from their own inventory or a shared stash, and add as much as you like on top: skill checks, crafting stations on the map, minigames, crafts that take in-game time, multi-step crafting chains and item upgrades.
Want to start with some ready-made recipes and gathering spots? Install the D&D 5e Potion Crafting & Gathering (opens in a new tab) module by Action_Jay (opens in a new tab). It uses both Mastercrafted and Gatherer.
Getting Started
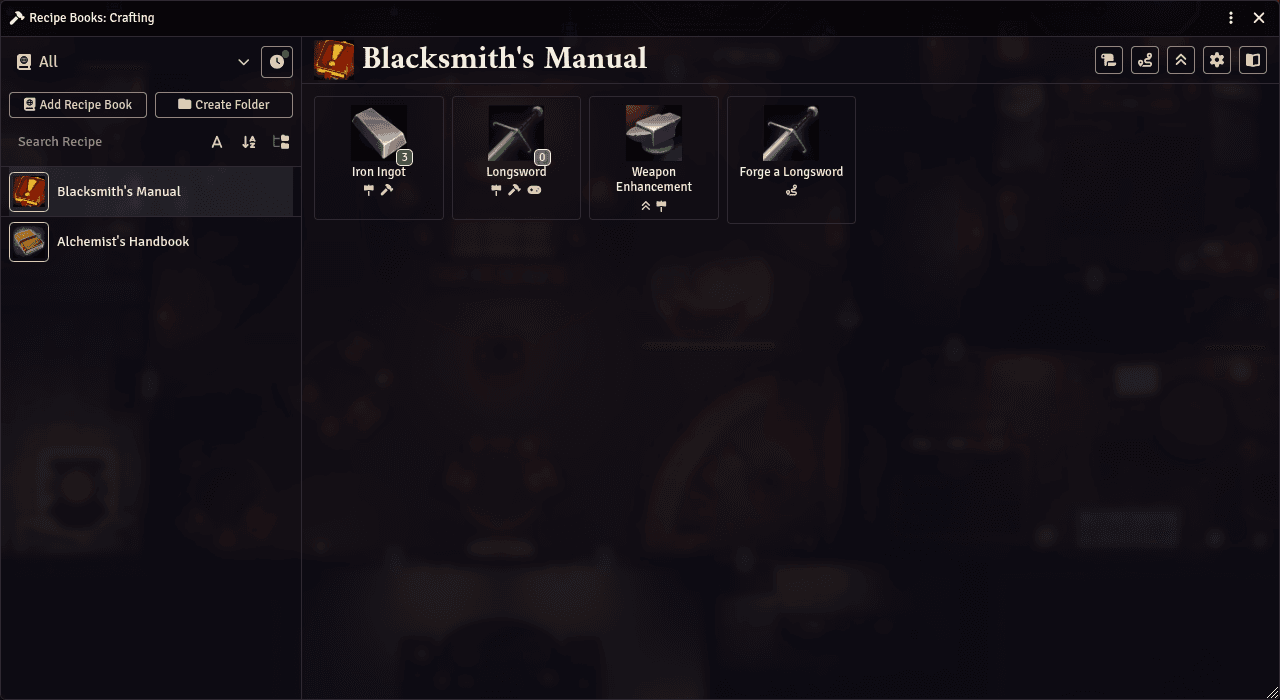
Everything happens in the Recipe Manager. Open it with:
- the
Recipe Managerbutton at the top of the Items sidebar tab, Craftingin the menu (⋮) of a character sheet's title bar: the Recipe Manager opens with that character selected,Show Recipesin the menu of an item sheet, when that item is used in a recipe: the list is filtered to those recipes.
On the left you find:
- Crafting type (top): a drop-down that filters the list.
Allshows every book,Processesonly the Processes, then there is one entry for each crafting type your recipes use (Alchemy,Smithing, ...). - Timed Crafting (clock button, next to the drop-down): appears while a timed craft is in progress. Click it to see the crafts in progress, click it again to go back.
- Add Recipe Book and Create Folder: create a new book, or a folder to group books.
- Search Recipe: filter by name. The buttons next to it switch between
AllandOnly Craftablerecipes, sort alphabetically and collapse all folders. - The list of books: click a book to open it.
On the right you see the open book, with a button for each recipe. The green number on a recipe is how many times the selected character can craft it. The buttons at the top right add a Recipe, a Process or a Modification to the book, open the Configure Recipe Book window, or open the book as a normal journal.
Recipe books are normal journal entries and recipes are journal pages. You can import, export, duplicate and set
their permissions like any journal. Players only see books and recipes they have at least Observer permission on.
By default, the module guesses which journal folder holds your books: to choose one yourself, write its name in the
Main folder name setting.
Your first Recipe
- Click
Add Recipe Book. A new book with an empty recipe appears in the list, and its configuration window opens. - Give the book a
Nameand clickSave Changes. - Click the book, then click the recipe.
- Tick the
Editcheckbox at the top right of the recipe. - Drag one or more items from the sidebar or a sheet onto the + box under
Ingredients. - Drag the item you want to make onto the + box under
Result. - Untick
Edit.
You have created your first Recipe! To rename it, change its picture or description, use the Edit Page button
(top right of the recipe).
Craft your first Item
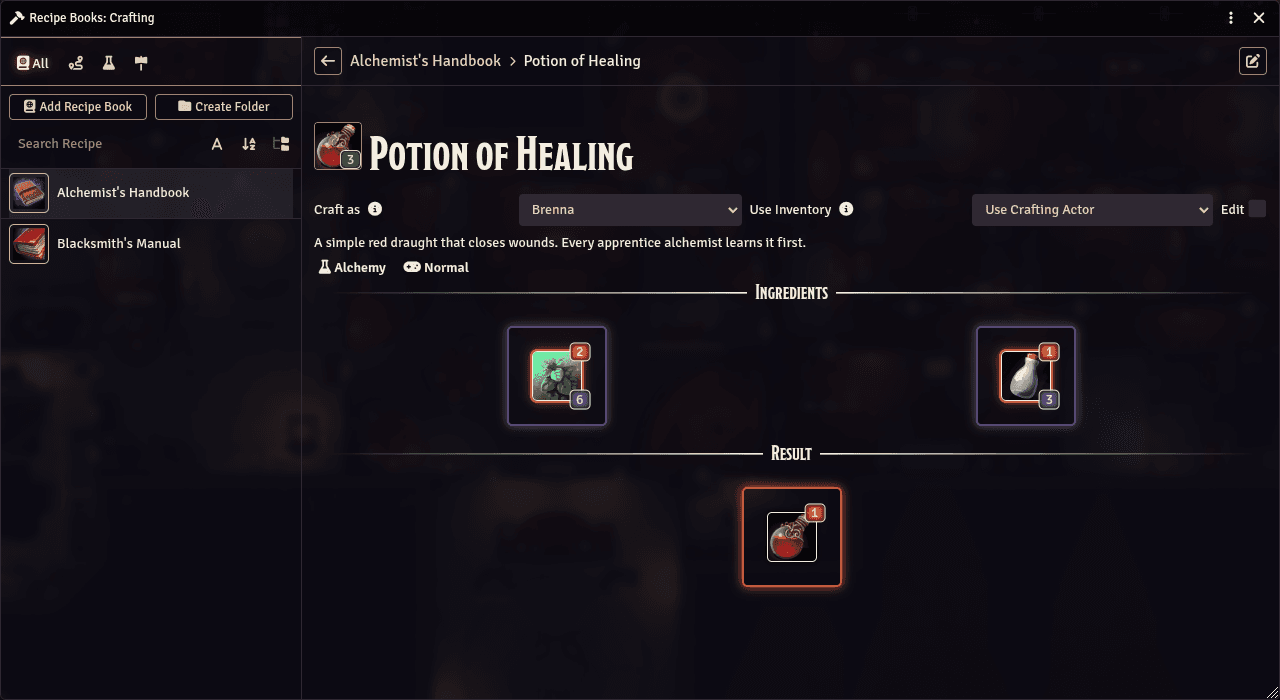
- Make sure a character owns the ingredients.
- Open the recipe and pick the character in
Craft as. LeaveUse InventoryonUse Crafting Actor(see Choosing who crafts). - Each ingredient shows how many you need (top right) and how many you have (bottom right). Ingredients you don't have enough of are red.
- Click the recipe picture at the top left: that is the Craft button.
- Check what will be used and made in the
Craftingwindow, then clickCraft.
You have crafted your first Item! It is added to the inventory and a message is posted in the chat.
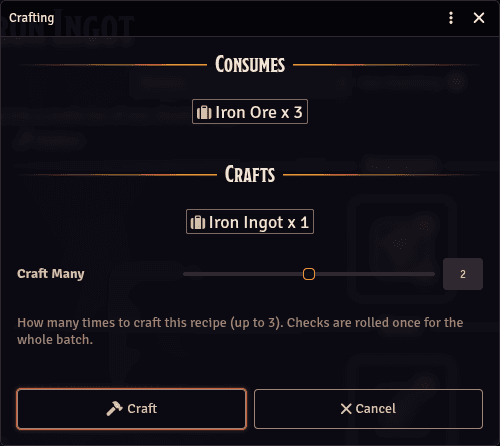
- Hold
Ctrlwhile clicking the Craft button to skip theCraftingwindow. - With
Craft Manyyou craft the recipe several times at once (up to as many as you can afford). Checks are rolled only once for the whole batch. - If several different items in the inventory can be used for the same ingredient, the window lets you choose how many of each to use.
Recipe Books
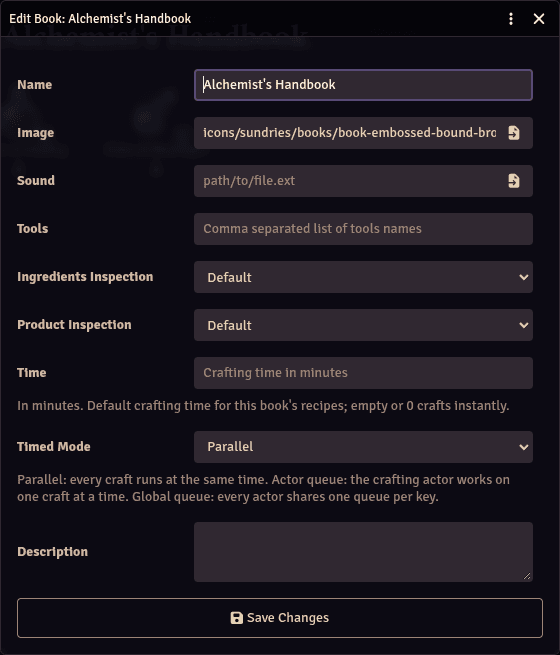
Open a book and click the gear button (Configure Recipe Book) to change:
Name,ImageandDescriptionof the book, and theSoundplayed when crafting from it.Tools: tools every recipe of this book needs (see Tools).Ingredients Inspection/Product Inspection: whether players can right-click an ingredient or a result to open its item sheet.Defaultfollows the book,AllowandDenyforce it. The GM can always inspect.TimeandTimed Mode: the default crafting time of the book's recipes (see Timed Crafting).
Click Save Changes when you are done. Recipes can override most of these settings for themselves.
Recipes
Ingredients and Results
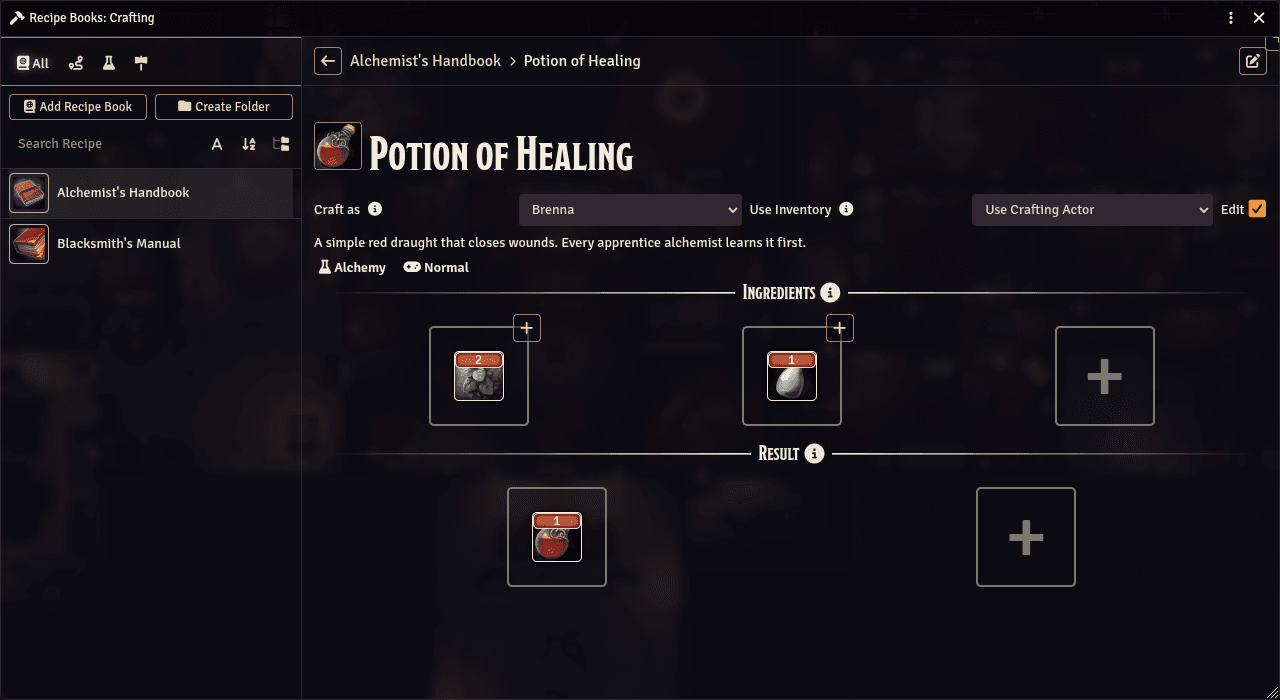
With Edit ticked, each box of the recipe can be changed:
- Ingredients: every box is one ingredient, and the character needs all of them. Drop an item on the empty + box to add a new ingredient.
- Alternatives: drop more items on the same box (or click its small +) to accept any one of them. When crafting, the player clicks the item they want to use.
- Results: the items in a result box are all given together. If you make more than one result box, the player picks which box they get by clicking it.
- Quantity: the number on top of each item. Type a new value to change it.
- Right-click an item to
Inspectit,Editit (name, picture, quantity, tags, currency or resource) orDeleteit.Editopens theComponent Configurationwindow: clickSubmitto save your changes.
You can also drop an item on an open book in the Recipe Manager to create a new recipe that makes that item.
Ingredients are matched by name, then by tags. The item linked to an ingredient is only used when someone inspects it.
Recipe Settings
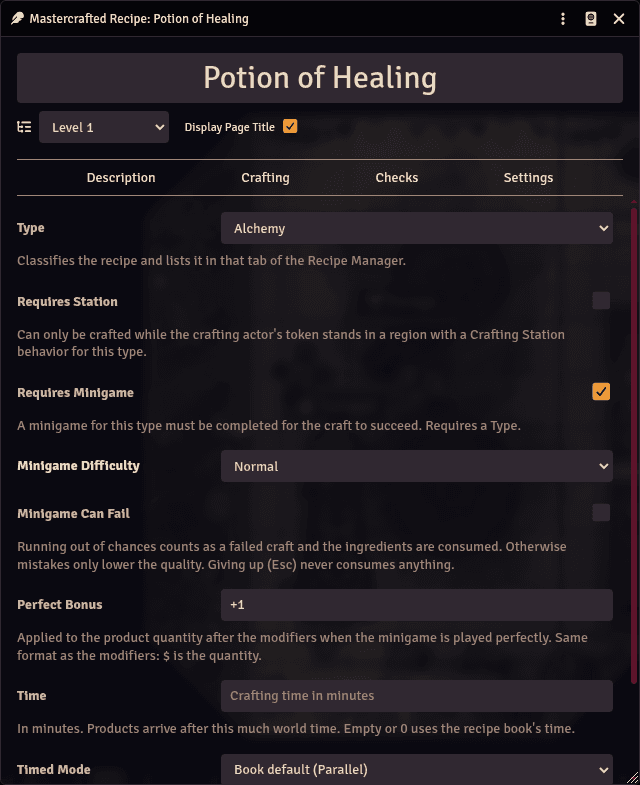
Click Edit Page (top right of the recipe) to open the recipe's settings. They are split in tabs:
- Description: the text shown above the ingredients.
- Crafting:
Type: the kind of crafting (Alchemy,Smithing,Cooking,Woodworking,Tailoring,Enchanting,Jewelcrafting,Scribing). The recipe is listed in that tab of the Recipe Manager.Requires Station: the recipe can only be crafted at a Crafting Station.Requires Minigame,Minigame Difficulty,Minigame Can Fail,Perfect Bonus: see Minigames.Time,Timed Mode: see Timed Crafting.Tools: see Tools.
- Checks: rolls the character must pass, see Checks and Modifiers.
- Settings:
Image,Sound,Ingredients Inspection,Product InspectionandCondition(a macro, see Condition Macros).
Hiding Results
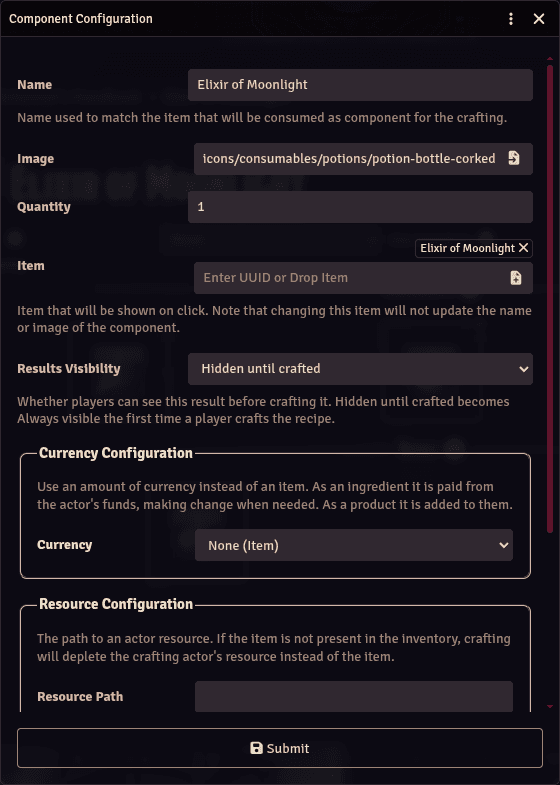
You can keep what a recipe makes a surprise. With Edit ticked, right-click a result, choose Edit and set
Results Visibility:
Always visible: players see the result (the default).Hidden until crafted: players see a ? namedUnknown resultuntil one of them crafts the recipe. From then on it is visible to everyone.Always hidden: players never see the result on the recipe, even after crafting it.
A hidden result is also hidden in the book, in the search, in Processes and in minigames. If the recipe uses the result's picture as its own, that is replaced too. The GM always sees everything.
Tools
Write tool names, separated by commas, in the Tools field of a recipe or of a book (for example
Smith's Tools, Tongs). The crafting character must own at least one of them to craft. Tools are never used up.
A Crafting Station can also provide tools.
Checks and Modifiers
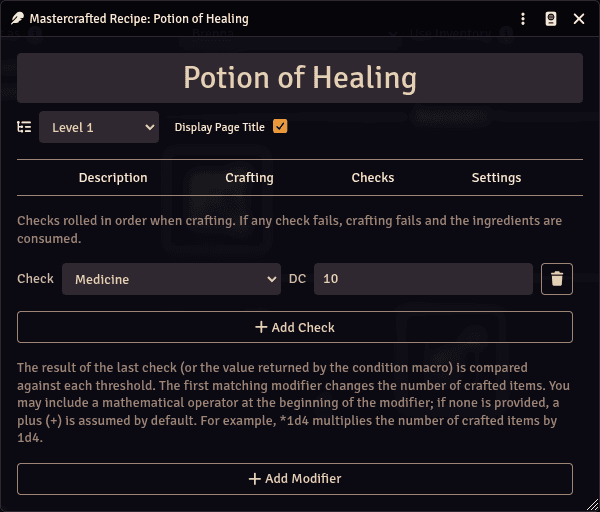
In the Checks tab, click Add Check, pick an ability, skill or tool check and set the DC. Checks are rolled in
order when crafting: if one fails, the craft fails and the ingredients are used up anyway.
Checks work in any game system supported by TheRipper93's System Abstraction (opens in a new tab).
Modifiers reward a good roll with more products. Click Add Modifier, write a modifier and a threshold: if the
last check's result reaches the threshold, the number of crafted items changes.
- Start the modifier with
+,-,*or/(+if you write none).$stands for the base quantity. - Example: modifier
*2withResult ≥ 20doubles the products on a roll of 20 or more. - When several modifiers match, only the one with the best threshold is used.
- Depending on the game system, the threshold compares the total, the number of successes, a roll-under result or the level of success.
Using Tags
Tags let different items count as the same ingredient. For example, any gem for a "Precious Gem" ingredient:
- Open the item sheet of a
Diamond, thenMastercrafted - Item Configurationin its title bar menu (⋮). - Add the tag
gemand clickSave. Do the same for aRubyand aSapphire. - In the recipe, right-click the ingredient and choose
Edit. - Add
gemunderTagsand set its quantity to5.
A character with 2 Diamonds, 2 Rubies and 5 Sapphires can now craft the recipe.
- Items and ingredients can have several tags. With
Requireset toSome, one matching tag is enough; withEvery, the item needs all of the ingredient's tags. - An item with the ingredient's exact name is used before tagged items.
- Dropping a tagged item on a recipe copies its tags to the new ingredient.
Currency and Resource Ingredients
Right-click an ingredient or result and choose Edit:
- Currency: pick a coin type in
Currencyand set the amount inQuantity. As an ingredient it is paid from the character's money (making change when needed); as a result it is added to it. - Resource: write the path of a character value in
Resource Path, relative to the actor's system data, for exampleattributes.hp.valueto pay with hit points. If the character has no item with the ingredient's name, the resource is used instead.
Choosing who crafts
Two drop-downs at the top of each recipe decide who crafts:
Craft as: the character who crafts. Their tools, checks and resources are used.Use Inventory: whose items are used as ingredients and who receives the results. Pick a party chest, a kitchen pantry or a loot stash, or leave it onUse Crafting Actor.
Crafting Stations
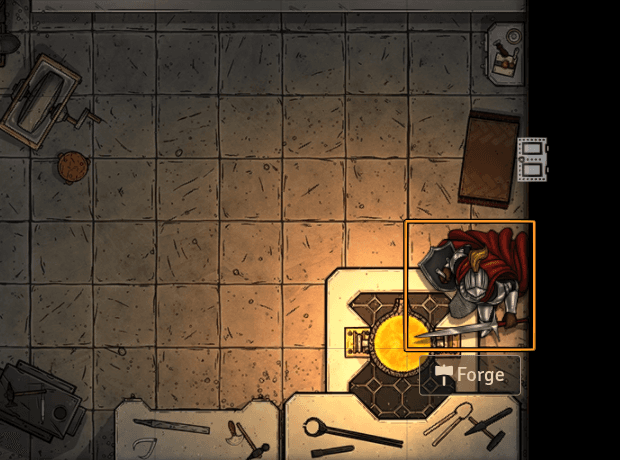
A Crafting Station is a place on the map where some recipes can be crafted, like a forge or an alchemy lab.
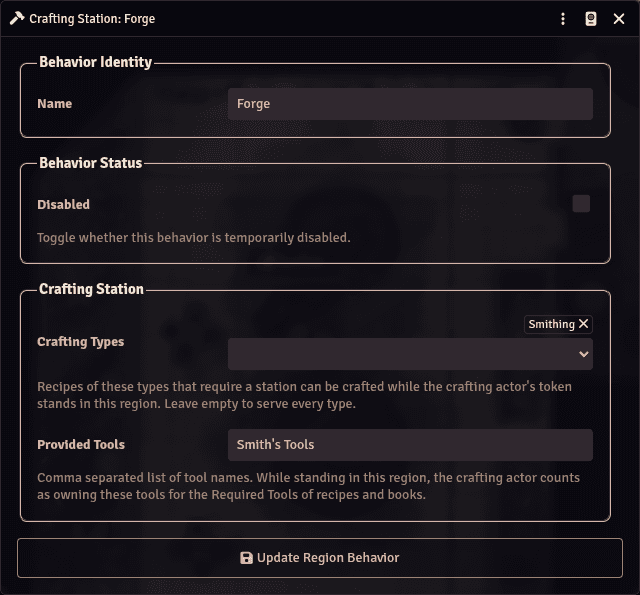
- Draw a Region over the area of the map (Regions tool in the scene controls).
- In the region's
Behaviorstab, add aCrafting Stationbehavior. - In
Crafting Types, choose which types of recipes it serves (leave it empty for all). - Optionally list tools in
Provided Tools: a character standing there counts as owning them. - In the recipes that need the station, tick
Requires Stationand set theirType.
When a player selects a token standing in the region, a button appears under it. It is named after the behavior (or the crafting type) and opens the Recipe Manager on that type's tab. Recipes that require a station can only be crafted while the crafting character's token is inside a matching region.
Minigames
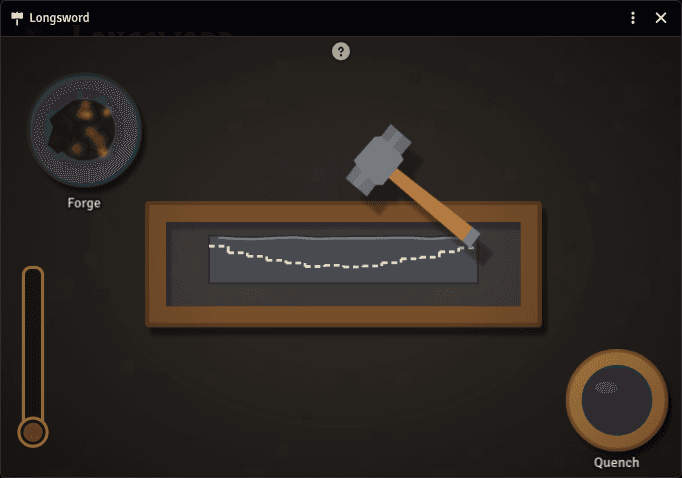
A minigame turns crafting into a short skill game for the player. Each crafting type has its own:
- Alchemy: add reagents until the brew matches the target, stir to cool it, then bottle it.
- Smithing: work the bellows to keep the bar hot, hammer it down to the outline, then quench it.
- Cooking: flip and plate the food in each pot at the right moment, without burning anything.
- Woodworking: spin the lathe and carve the wood down to the outline.
- Tailoring: click each glowing hole on the beat to stitch the seam.
- Enchanting: memorize a rune, then redraw its strokes in the same order and direction.
- Jewelcrafting: cut the turning gem along its dashed edges.
- Scribing: type the words before the burning runes spread.
To use one, set the recipe's Type and tick Requires Minigame in its Crafting tab:
Minigame Difficulty:Easy,NormalorHard.Minigame Can Fail: running out of chances fails the craft and uses up the ingredients. When off, mistakes only lower the quality.Perfect Bonus: extra products for a perfect game, written like a modifier (+1,*2).
The game starts after the checks. The ? button shows how to play, and pressing Esc gives up without using anything.
The Disable Minigames setting turns all minigames off without losing their settings.
Timed Crafting
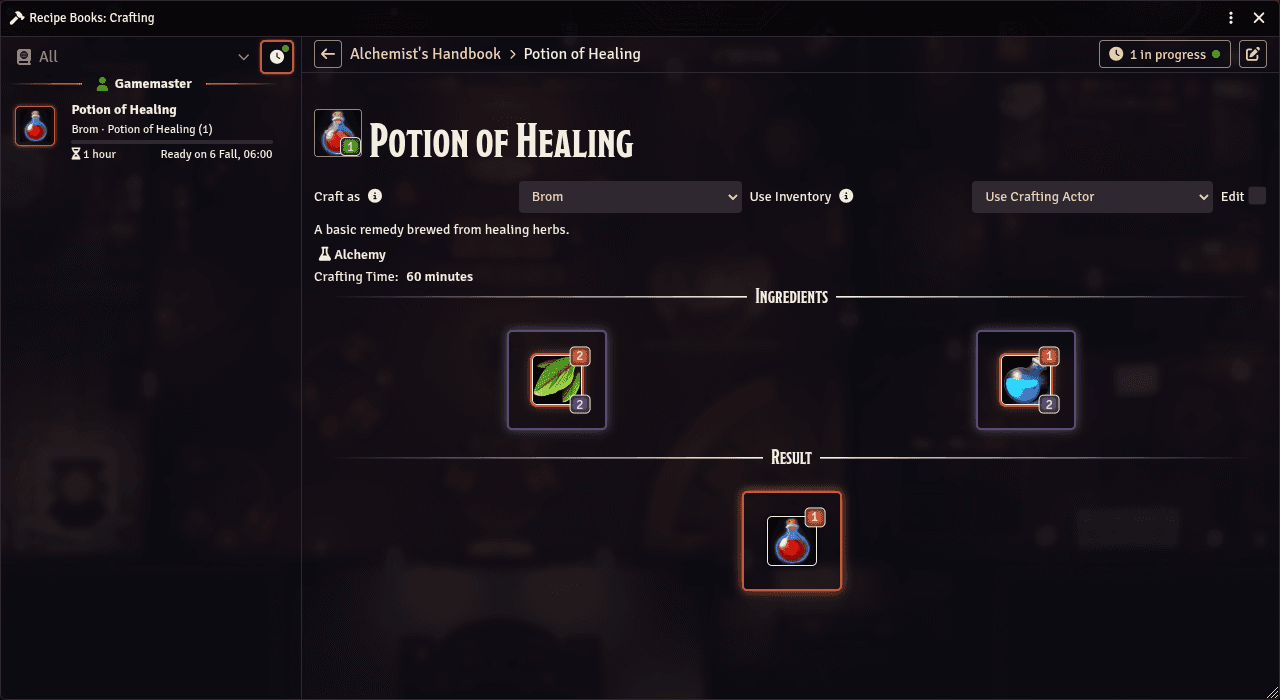
Timed crafting needs a character that is linked to its token (Link Actor Data in the token's settings). With an
unlinked token, like most NPCs, the craft is refused: pick a linked character in Use Inventory instead.
Set a Time (in minutes) on a recipe, or on its book, and its products arrive only after that much in-game time has
passed. The ingredients are used up right away.
- A button with the number of crafts
in progressappears on the recipe, and a clock button (Timed Crafting) at the top left of the Recipe Manager. Click either to list every craft in progress, with the time left and when it will be ready. - Products are delivered automatically when world time advances, and the owners of the character are notified. You need a way to move time forward, like Simple Timekeeping & Calendar (opens in a new tab).
- The GM can right-click a craft to
Finish all,Finish next,Pause,ResumeorCancel crafting(cancelling does not give back the ingredients).
Timed Mode decides what happens when several crafts are started:
Parallel: all crafts run at the same time.Actor queue: a character works on one craft at a time.Global queue: everyone shares one queue. Crafts with the sameQueue Key(by default the recipe type) wait for each other, for example a single forge for the whole town.
Processes
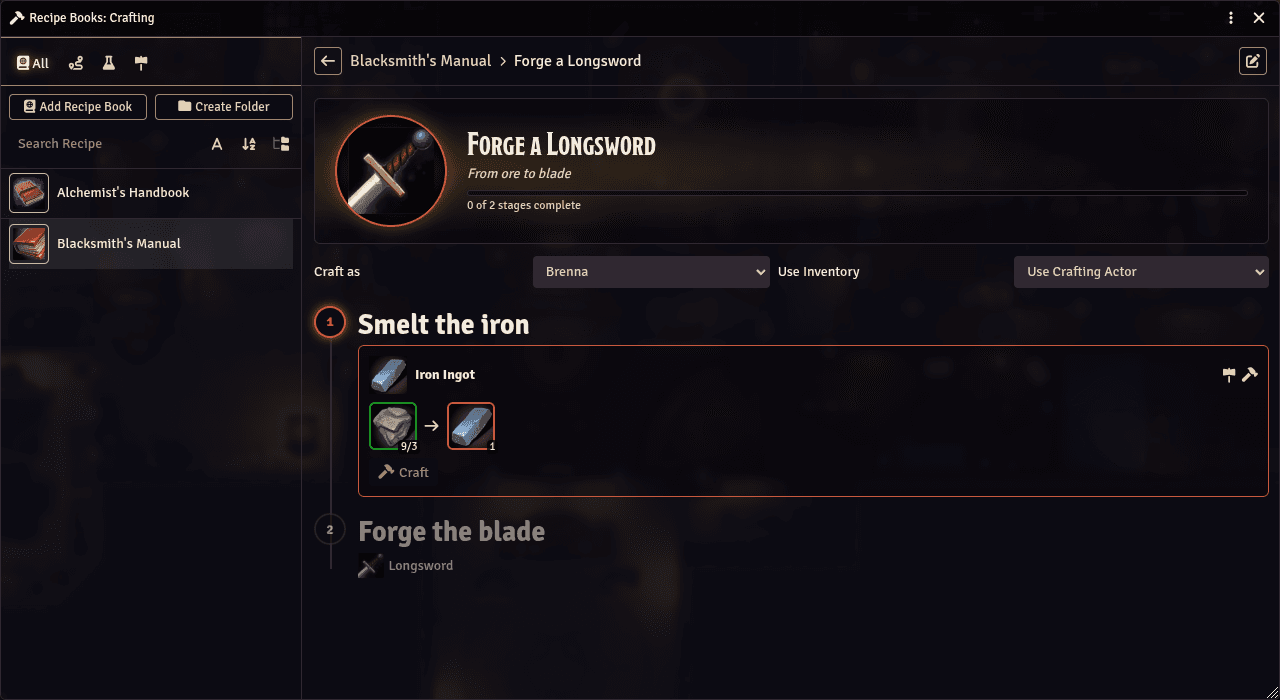
A Process is a crafting chain: several recipes done in stages, like smelting ore into ingots before forging a sword. It shows the player what to do next and tracks their progress.
- Open a book and click
Add Process. - Click
Edit Page, open theStagestab and clickAdd Stagefor each step. Give stages a title if you like. - Drag recipe pages from the book onto each stage.
- In
Settings, choose anImage(by default the last stage's product), aSubtitleand aCompletion Sound.
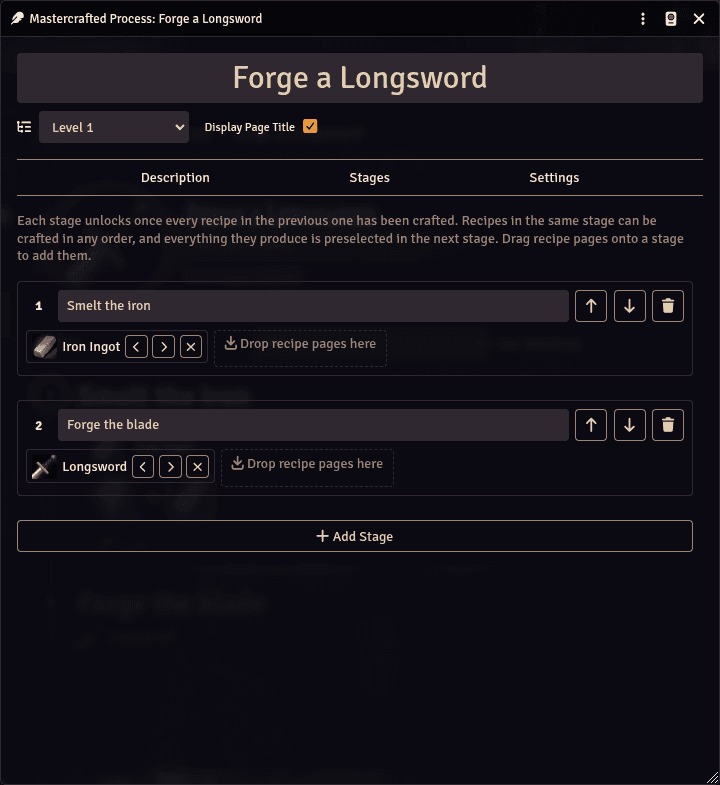
- A stage unlocks once every recipe of the previous one has been crafted. Recipes in the same stage can be done in any order.
- Players craft directly from the process with the
Craftbutton of each recipe. What earlier stages produced is picked automatically as ingredient. - A stage counts as done when the inventory holds its products, so a character who already owns them can skip ahead.
- When the last stage is done, a message is posted in the chat.
Modifications
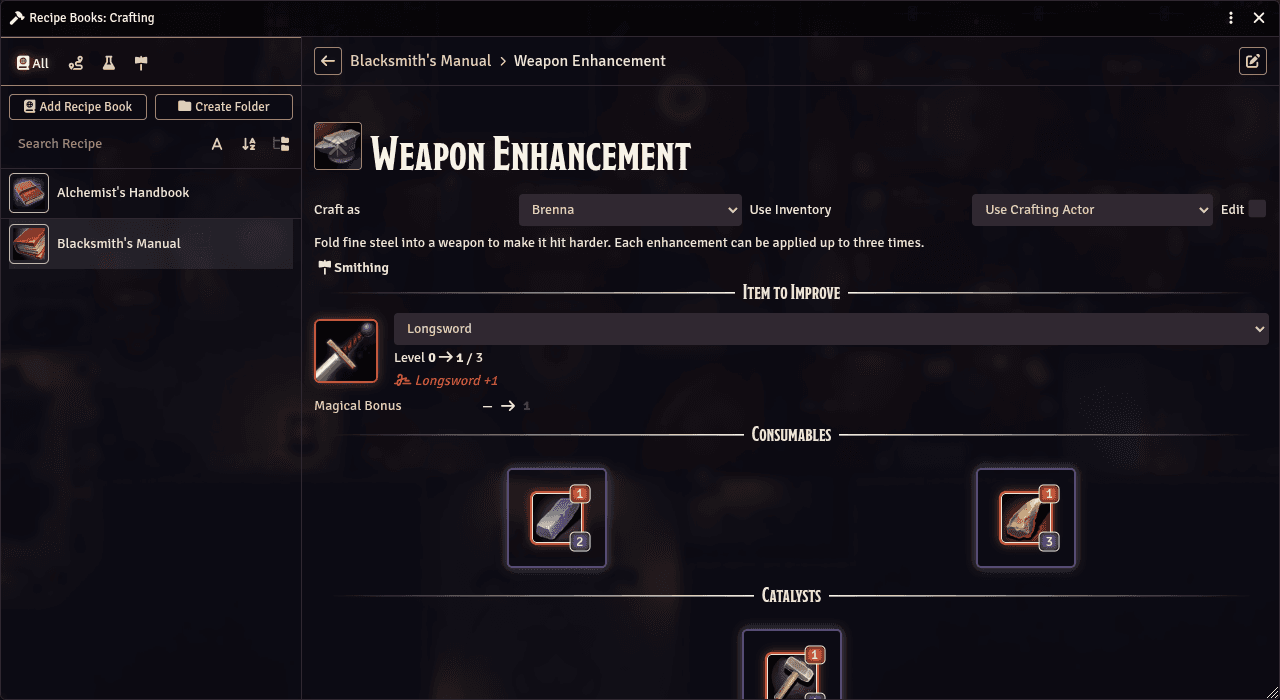
A Modification improves an item the character already owns instead of making a new one, for example sharpening a
sword to make it a Longsword +1, then +2.
- Open a book and click
Add Modification. - Tick
Editand drop the materials used up each time underConsumables. Items underCatalystsare needed in the inventory but are never used up or changed. - Click
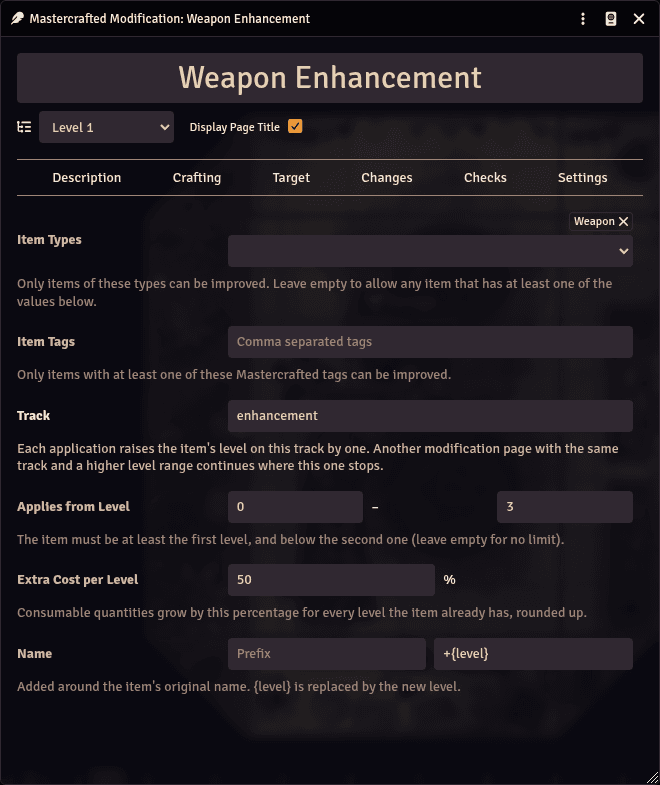
Edit Pageand set it up:Targettab: which items can be improved (Item Types,Item Tags), theTrack(the name of the upgrade path), the levels it works on (Applies from Level), theExtra Cost per Leveland theNameprefix or suffix ({level}is the new level, e.g.+{level}).Changestab: clickAdd Change, choose a value of the item (likeMagical Bonus), how to change it (Add,Multiply,Set to, ...) and by how much.
To apply it, choose the item in Item to Improve (or drop it from the inventory). The page shows the new level, the new
name and how each value changes. Then click the modification picture and confirm.
- Each application raises the item's level on its track by one. Another modification with the same
Trackand a higher level range continues where this one stops (for example, a different recipe from+3onwards). - With
Extra Cost per Levelat50, the consumables cost 50% more for each level the item already has. - Modifications also support types, stations, minigames, checks and conditions, like recipes.
The Cauldron
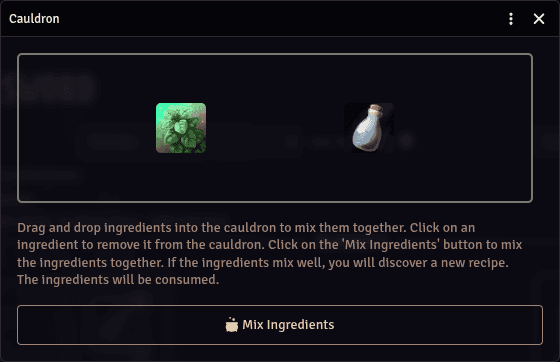
The Cauldron lets players discover recipes by experimenting with ingredients.
- Turn on the
Enable Cauldronsetting. - In the Recipe Manager, open the title bar menu (
⋮) and chooseCauldron. - Drag two or more items from the character's inventory into the Cauldron (click one to take it out).
- Click
Mix Ingredients.
All the items are used up (one of each), and the result depends on how close the mix is to a recipe:
| Match | Shakes | Message |
|---|---|---|
| Exact match | 4 | A chat message asks the GM to confirm the discovery |
| One extra item | 3 | It was so close! You almost had it! Maybe you added a little too much. |
| One missing item | 3 | It was so close! You almost had it! Maybe it needs a little bit more. |
| Two extra items | 2 | It looked like it was going to work, but it didn't. Maybe you added too much. |
| Two missing items | 2 | It looked like it was going to work, but it didn't. Maybe it needs more of something. |
| One extra, one missing | 2 | It looked like it was going to work, but it didn't. Maybe you added too much of something and not enough of something else. |
| Anything else | 1 | Brewing failed! Your concoction did not mix well. The ingredients were consumed. |
When the GM confirms a discovery, the player gets Observer permission on the recipe and its book.
- Only recipes the player can't see yet can be discovered, including recipes needing tools they don't have.
- Discovering a recipe does not give its results.
Settings
Disable Minigames: turns every crafting minigame off.Batch Crafting: showsCraft Manyin theCraftingwindow.Enable Cauldron: turns on the Cauldron.Custom Quantity Path: where your system stores item quantities. Leave it blank unless your system is not supported.Main folder name: the journal folder holding your recipe books. Leave it blank to detect it automatically.Hide button in NPC header: hides theCraftingbutton on NPC sheets.Migrate on Startup: converts recipes from older versions again the next time the world loads, then turns itself off. See Updating from older versions.
Advanced
Updating from older versions
Mastercrafted needs the TheRipper93's System Abstraction (opens in a new tab)
module. If it is installed but turned off, the GM is asked to turn it on when the world loads: click
Enable and Reload.
The first time a GM opens a world after updating, recipes made with older versions are converted automatically. If
something needs your attention, a Mastercrafted - Migration Report window lists it: recipes whose checks could not be
converted, and locked compendiums that were skipped.
To convert recipes you import later, or the ones in a compendium that was locked:
- Unlock the compendium (right-click it ->
Unlock). - Turn on the
Migrate on Startupsetting. - Reload the world.
Condition Macros
A condition adds your own rule to a recipe, for example a check from a system Mastercrafted doesn't support. Write a
macro name (or the code itself) in the Condition field of the recipe's Settings tab. The code runs when crafting,
before the products are made, and returns an object:
success(Boolean): whether the craft succeeds.consume(Boolean): whether the ingredients are used up when it fails.checkResult(Number, optional): a roll result compared with the modifiers. If the recipe also hasChecks, their result replaces it.timeMultiplier(Number, optional): multiplies the crafting time of a timed craft.
To pass arguments to a macro, add them after |: MyMacro|5 gives macroArgs[0] === "5". If you paste code directly
in the field, end every line with ;: it is collapsed to a single line.
The code can use:
actor: theCraft ascharacter.inventoryActor: theUse Inventorycharacter.componentsToConsume: the ingredients that will be used up (read only).consumedItems: the inventory items that will be used up.product: the chosen result (read only).productData: the data of the items that will be created. You can change these objects (but not add or remove entries); items are merged by name, so rename an item to make it unique.macroArgs: the arguments written after|.
Example: D&D 5e Tool Check
Rolls an Herbalism Kit check against DC 12. The ingredients are used up either way, and the result is used for the modifiers and to shorten the crafting time.
const rolls = await actor.rollToolCheck({ tool: "herb" });
const total = rolls[0].total;
return {
    success: total >= 12,
    consume: true,
    checkResult: total,
    timeMultiplier: 12 / total,
};
Example: Pathfinder 2e Crafting Check
Rolls the Crafting skill against DC 12.
const roll = await actor.skills.crafting.roll();
return {
    success: roll.total >= 12,
    consume: true,
    checkResult: roll.total,
};
Macros and API
Open the Recipe Manager, optionally for a character, on a tab (general, processes, timed or a crafting type like
smithing) and with a search filter:
game.modules.get("mastercrafted").API.RecipeBookApplication.open(actor, "general", "Potion");Open the Cauldron for a character (by default the selected token or your assigned character):
new (game.modules.get("mastercrafted").API.CauldronApp)(actor).render({ force: true });Deliver the timed crafts that are due (this also happens automatically when world time changes):
game.modules.get("mastercrafted").API.processDelayedCrafting();Convert recipes from older versions by hand:
game.modules.get("mastercrafted").API.migration.showManualMigrationDialog();Hooks
mastercraftedCrafted fires after every successful craft with the recipe and an object holding actor,
inventoryActor, product, timed, perfect (the minigame was perfect), count, consumedItems and processUuid:
Hooks.on("mastercraftedCrafted", (recipe, data) => {
    console.log(`${data.actor.name} crafted ${recipe.name} x${data.count}`);
});
Embedding Recipes
Recipes, Processes and Modifications can be embedded in any journal page with @Embed[<page uuid>]. The embedded page
works like the original: players can craft from it.