Simple Quest
A simple and clean quest management interface with personal and shared notes.
Getting Started
Players should not be Owners of the journal pages - if you make them Owners they will be able to edit them but they will also see hidden objectives. Give them Observer ownership to let them see the pages.
You can open the Simple Quest interface with the J hotkey. A button in the Journals sidebar tab is also added for convenience.
Setting up Simple Quest
When you first enable the module, basic journals will be created automatically. If you want to create a new page:
- Open Simple Quest
- Click on the Quest tab
- Click on a Journal or create a new one with the
Create Entrybutton in the left sidebar - Click on a Page or create a new SQ Quest Page with the
Create Pagebutton on the Journal Entry - Enter a name for the quest and add the text you desire.
- Save the Journal Page and you are done! You created your first quest.
Navigation bar and Tabs
Here you can select which tab you want to view. Each folder inside the Simple Quest Root folder will be a different tab.
You can designate the Simple Quest folder by right clicking on it in the Journal Sidebar, clicking Edit and selecting Root as Special Directory.
All folders are equals but some are more equals than others: you can designate any folder inside the Root folder as a
Special Directory. These are Timeline, Achievements, Quests and Party.
Timeline
Use this tab to organize key events in your campaign.
All SQ Era and SQ Event journal pages contained inside it will be displayed as a vertical timeline and ordered by date.
Achievements
Use this tab to create and award achievements to players!
Every page type can be shown in this tab, but SQ Achievement journal pages can be shown as a single all-comprehensive list
using the Show All button in the sidebar.
You can award an achievement to players by clicking on their icon in the achievement page.
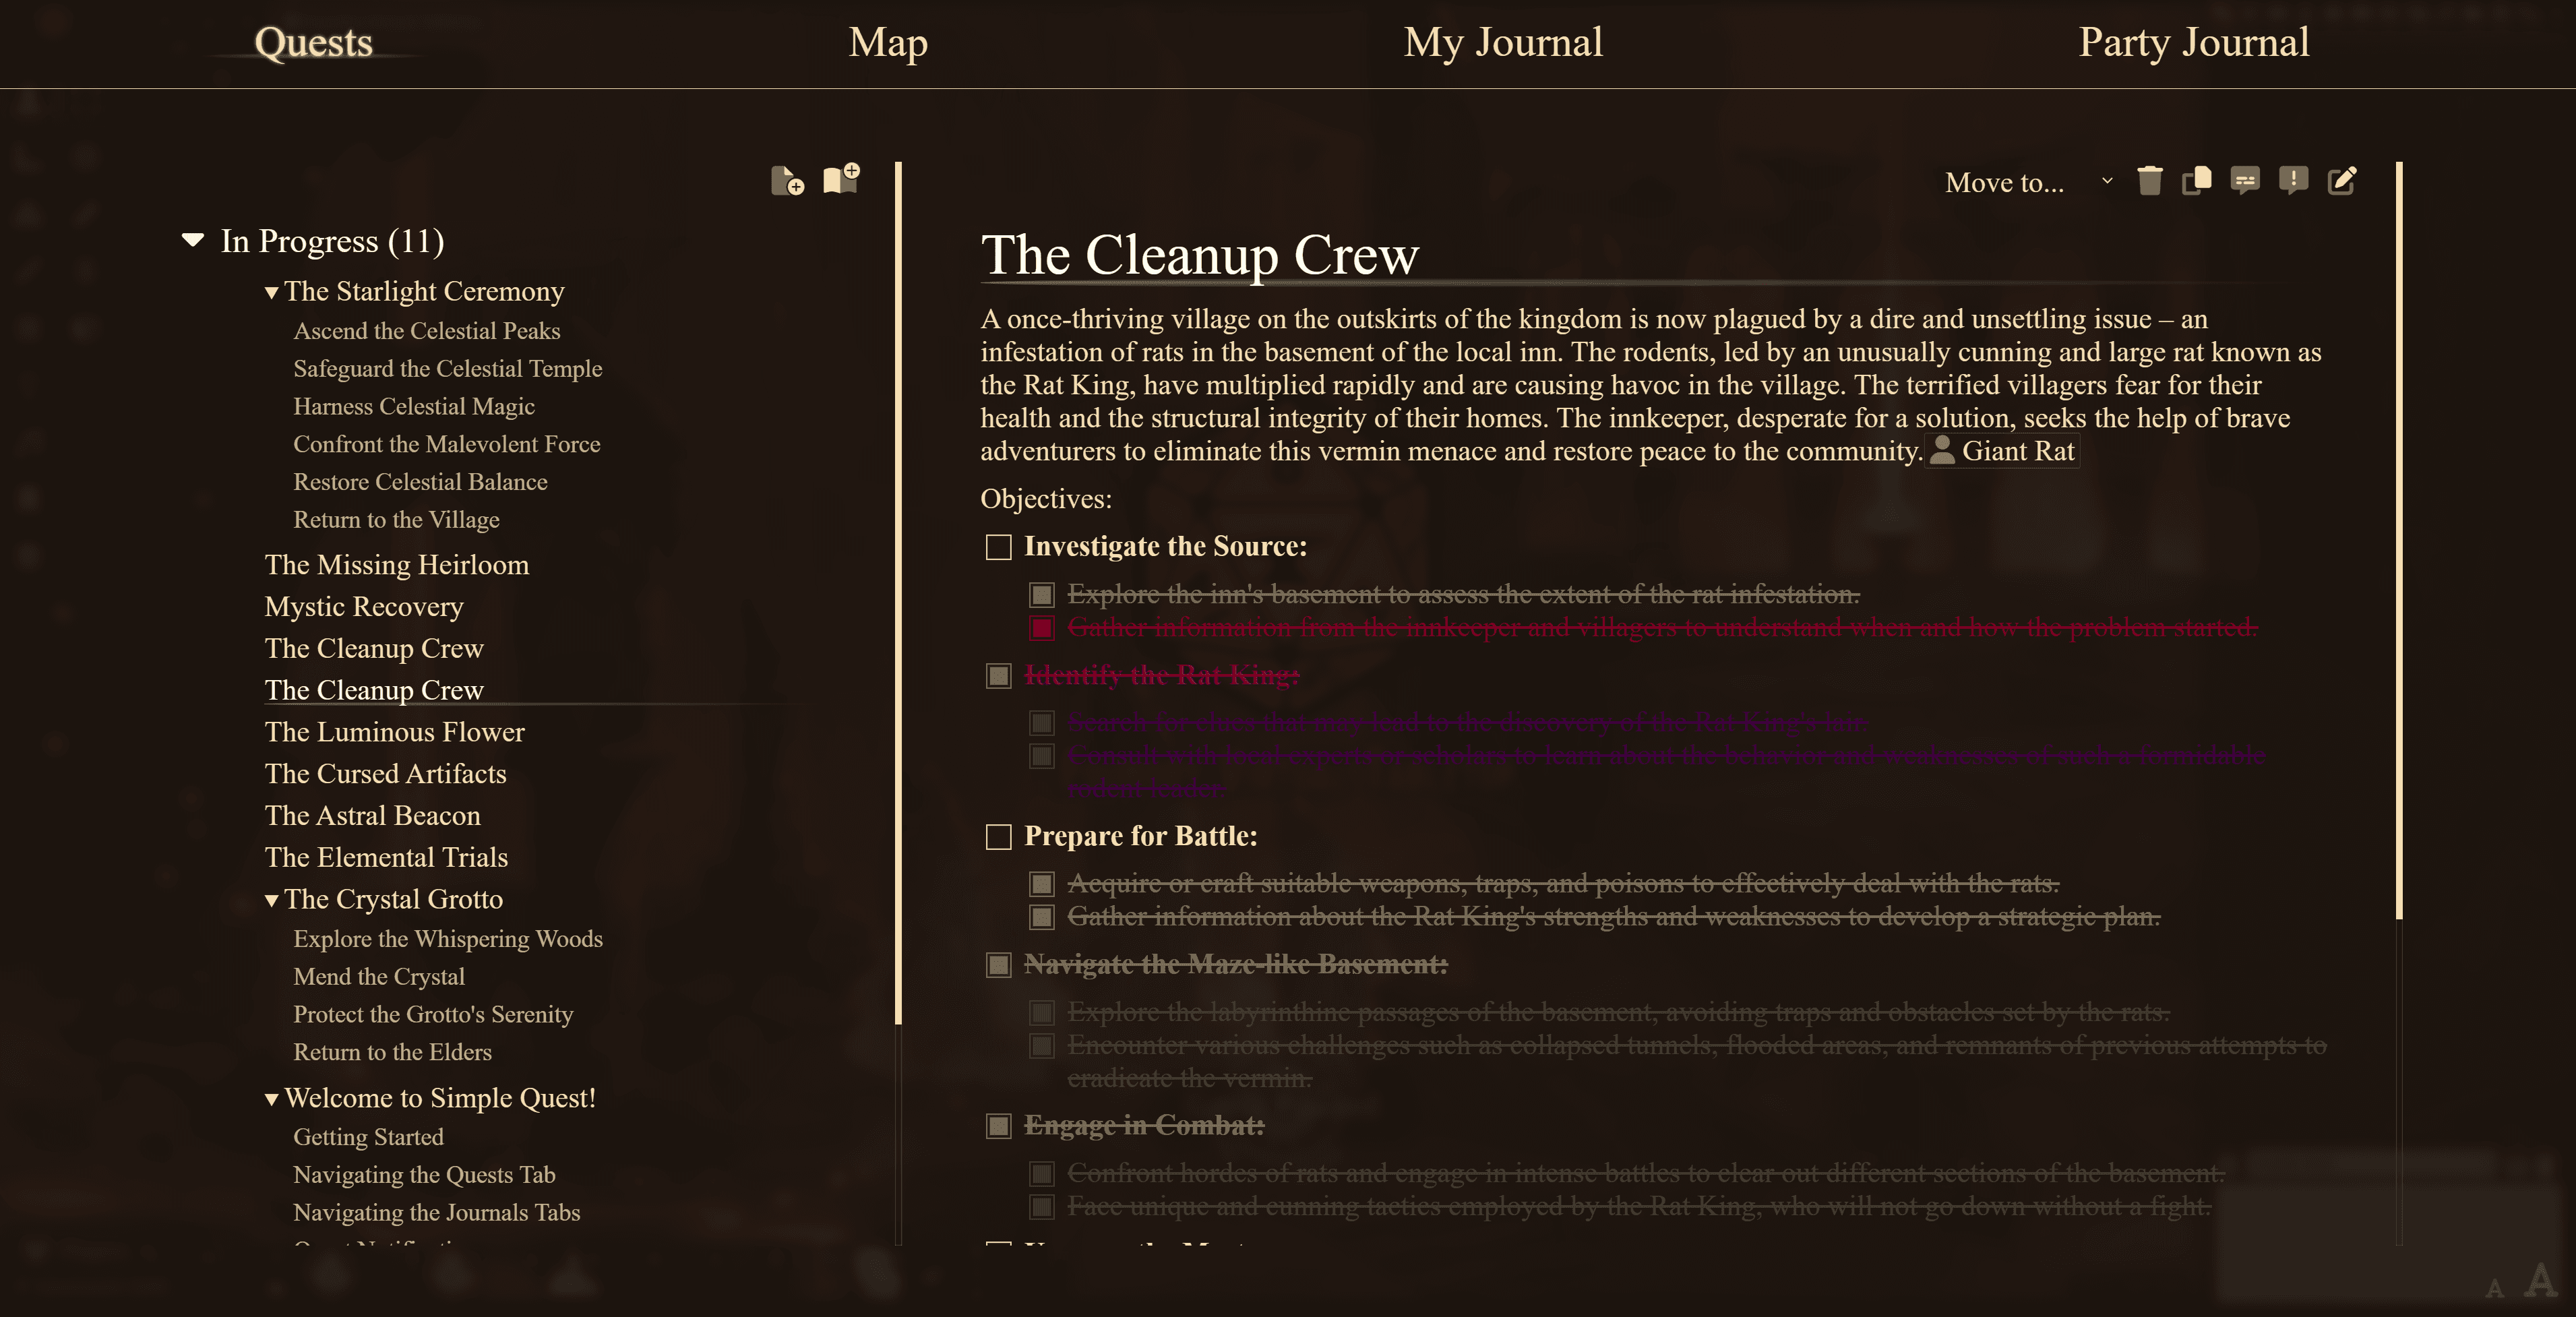
Quests
Use this tab to create and manage your quests.
Every page type will be displayed in this tab, but SQ Quest pages can be organized using the Quest Recap
in the sidebar: this will group all SQ Quest pages by completion status.
Objectives
If the text content of your quest has a list, it will be automatically shown as an objectives checklist. You can check or uncheck items by clicking on them.
- Left click to check or uncheck an item
- Right click to check as failed
As the GM you can also hide a quest objective by clicking the Hide located to the Left of the checkbox.
Party Journal
This tab will display the Party folder. You should keep all shared resources inside this folder.
It also contains each personal party members' folder. Every player can see its own folder inside the My Journal tab.
My Journal
This tab will display the folder contained in the Party folder that has the same name as the player.
Maps Tab
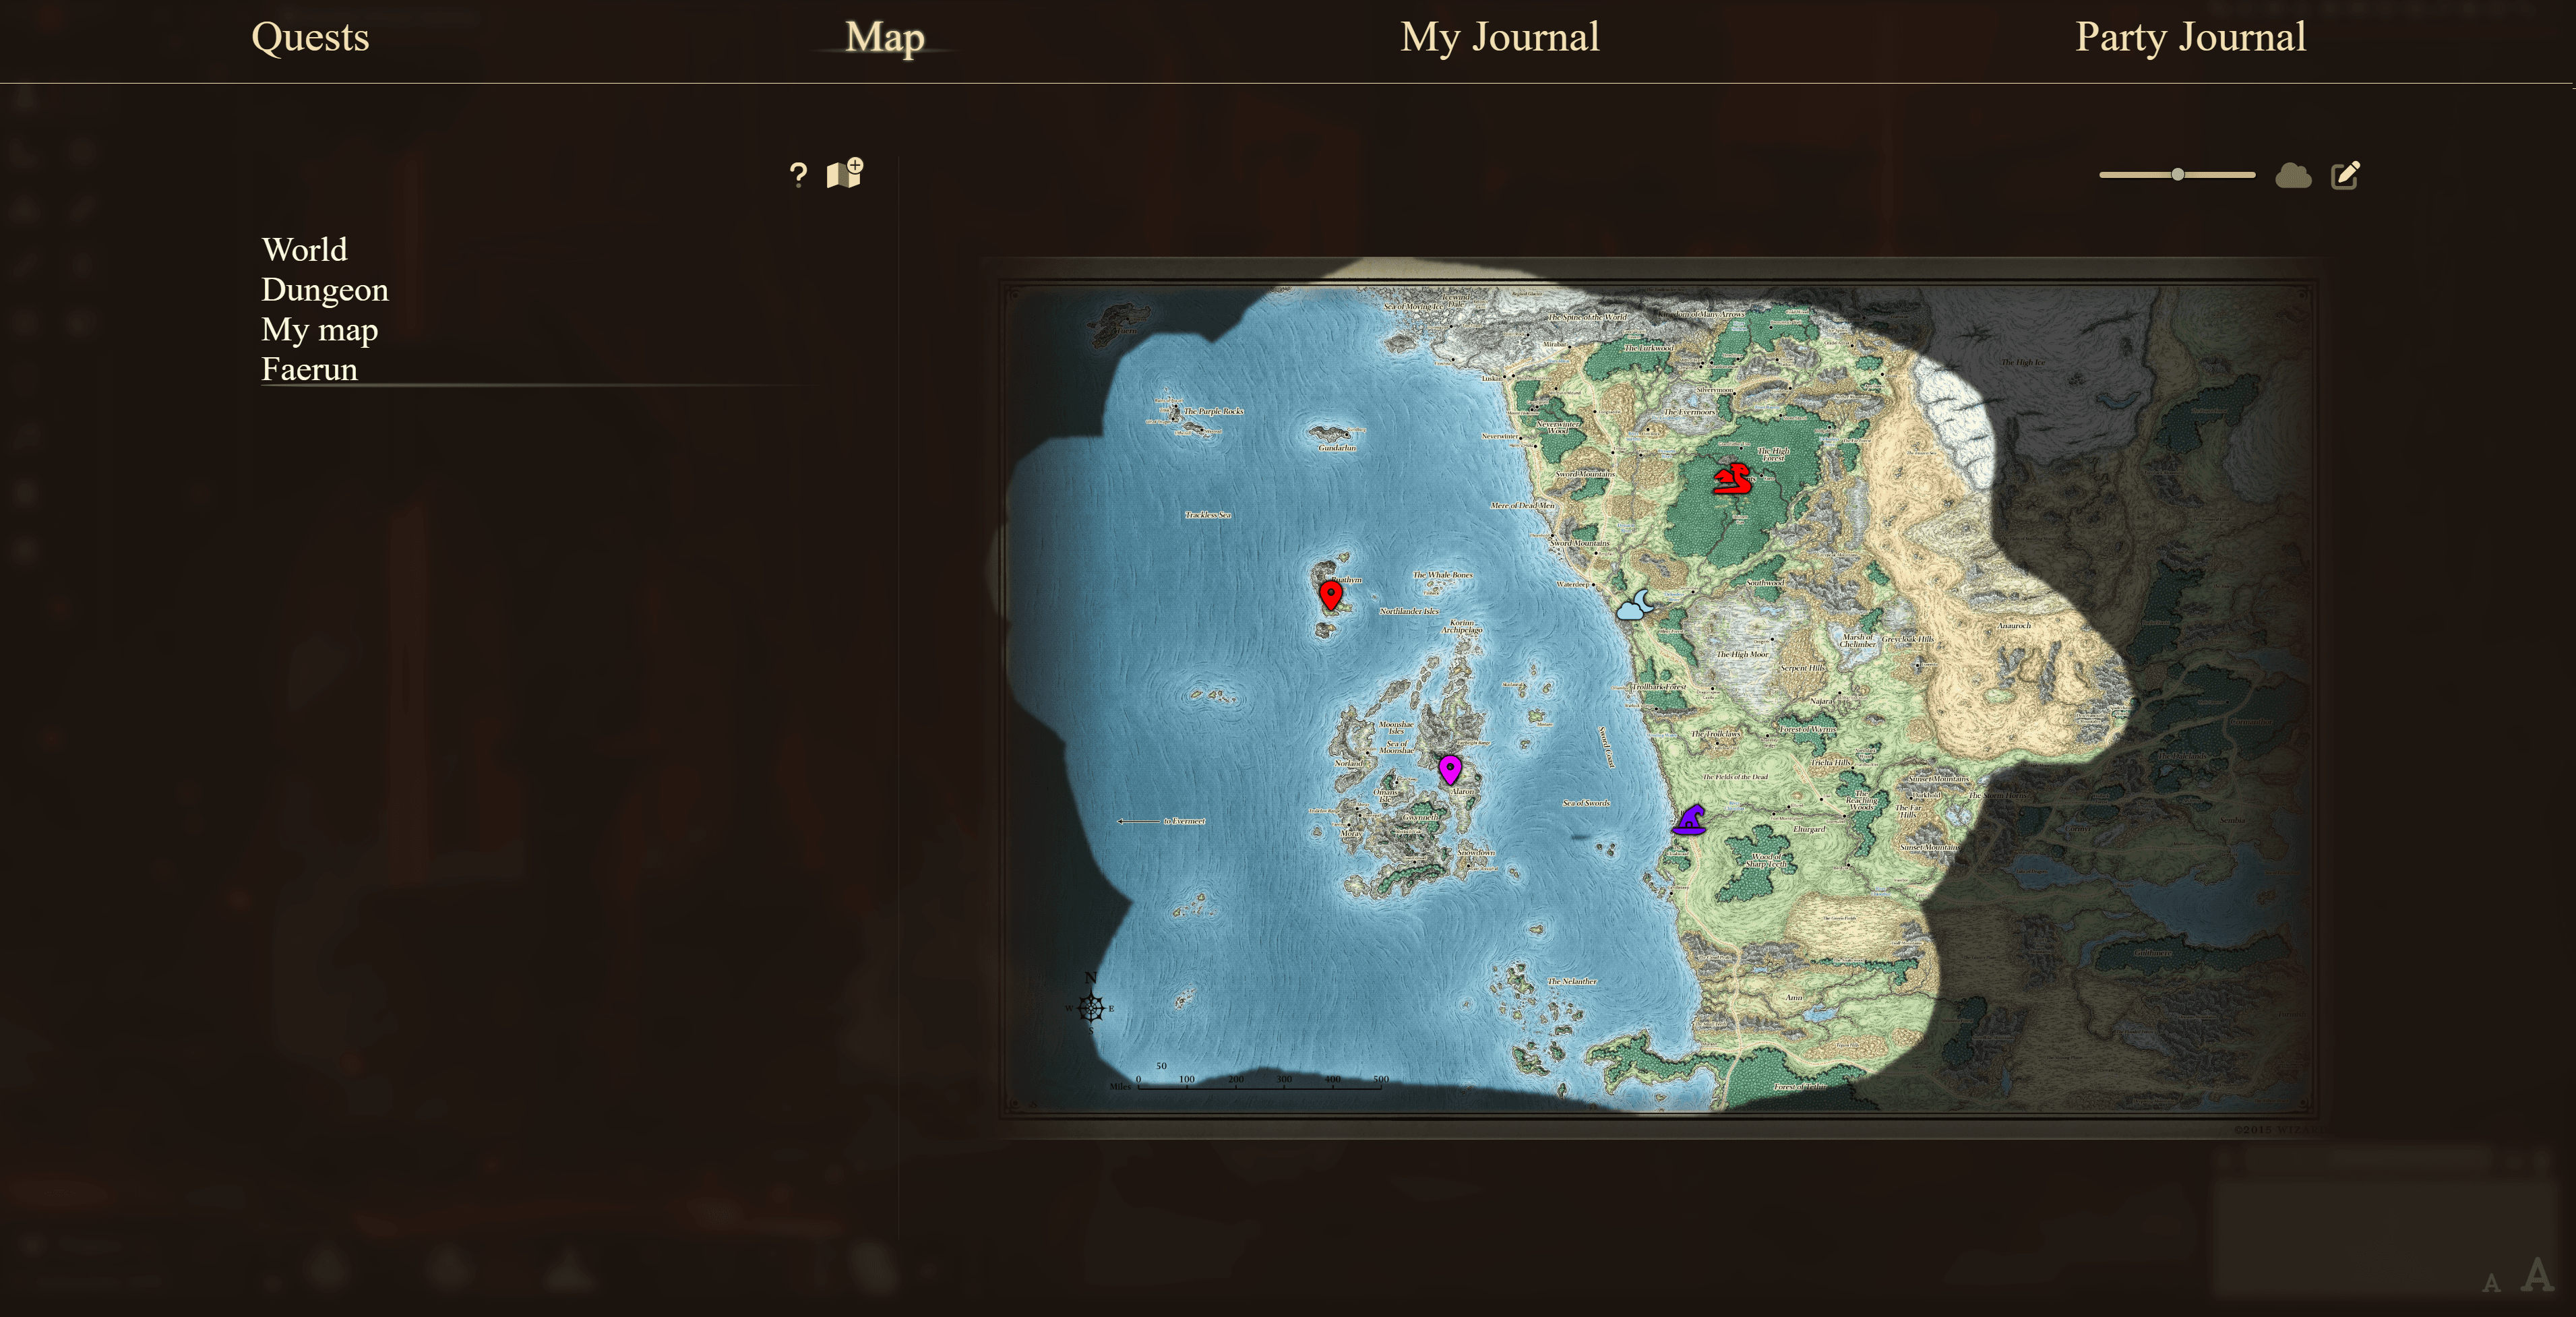
Welcome to the Maps Tab! This feature is designed to enhance your navigation experience and help you keep track of important locations in a user-friendly manner. The Maps Tab provides various functionalities, making it a valuable tool for organizing, annotating, and exploring maps.
Basic Navigation
-
Pan the Map: Click and drag on the map to move around and explore different areas.
-
Zoom In/Out: Use the scroll wheel on your mouse to zoom in and out of the map for a more detailed or broader view.
Configuring Markers
-
Add Marker: Right-click on the map to add a marker at the selected location.
-
Edit Marker: Right-click on an existing marker to edit its details.
-
Move Marker: Hold the Right-click button on an existing marker to drag it to a different location.
Interacting with Markers
-
Open Marker: Left-click on a marker to open its associated notes or quest details. If you associated a Scene to the marker, the scene will be viewed by the user.
-
Toggle Hidden Status: Hold the Alt key and Left-click on an existing marker to toggle its hidden status.
Fog of War
Markers will be visible through the Fog of War, make sure to hide them if you want to keep them hidden from players.
The Maps Tab also supports the Fog of War feature, allowing you to hide certain areas of the map from players. This feature is especially useful for revealing new areas as players explore the map. To use the Fog of War feature, follow these steps:
- Click the
Reset fog of warbutton to initialize the fog of war for the current map. - Shift + Left-click on the map to hide areas on the map.
- Shift + Right-click on the map to reveal areas on the map.
- Use the brush size slider or Shift + Mouse Wheel to adjust the size of the brush used to hide or reveal areas on the map.
Super Resolution Maps
This is an advanced feature, click to expand
Even though the process requires some work, it's possible to get very high resolution maps working smoothly with the Multi Resolution Feature.
In this instance we are talking about maps that are 10000x10000 pixels or more. If you attempt to use a map of this size without the Multi Resolution Feature, you will experience a lot of lag and stuttering when moving around the map.
In order to create a Super Resolution map, follow these steps:
- Get your source image split into a power of 2 grid (2x2, 3x3, 4x4 etc.). You can do so using image editing software or with an online tool (opens in a new tab).
- Make sure the order of your images is left to right, top to bottom. The above online tool will do this automatically.
- Create a new Journal Page of the type
SQ Mapfrom the Journal interface or from Simple Quest. - Add every image in order to the Journal Page, you can do so with the
Insert Imagebutton in the toolbar. - Save the Journal Page.
- Open Simple Quest and head to the Maps tab, you should see your map there.
For Very large maps (16k+)
For maps this large, you can take an extra step to make the experience even smoother.
After following the steps above, create a low resolution version (4K or less) of your map and set it as the first image in the Journal Page. This image will be used when the zoom level is low and will be replaced by the high resolution version when zooming in.
If you are technical enough, you can also use this Python script to automate the process of splitting the image into a grid and creating the low resolution version.
Python script
Note that the script requires the Pillow (opens in a new tab) library. You can install it with:
pip install Pillowfrom PIL import Image
import os
Image.MAX_IMAGE_PIXELS = None
def split_and_resize_image(image_path, num_splits):
original_image = Image.open(image_path)
width, height = original_image.size
sub_image_width = width // num_splits
sub_image_height = height // num_splits
output_folder = 'sub_images'
os.makedirs(output_folder, exist_ok=True)
shorter_side = min(width, height)
new_width = 2048 * width // shorter_side
new_height = 2048 * height // shorter_side
low_resolution = original_image.resize((new_width, new_height))
low_resolution.save(os.path.join(output_folder, 'sub_image_0.png'))
for i in range(num_splits):
for j in range(num_splits):
left = j * sub_image_width
upper = i * sub_image_height
right = left + sub_image_width
lower = upper + sub_image_height
sub_image = original_image.crop((left, upper, right, lower))
filename = f"sub_image_{i * num_splits + j + 1}.png"
sub_image.save(os.path.join(output_folder, filename))
if __name__ == "__main__":
image_path = input("Enter the image file name - The image should be in the same folder as this script: ")
num_splits = int(input("Enter the number of splits (same vertically and horizontally): "))
split_and_resize_image(image_path, num_splits)Investigation Board
An infinite canvas for your adventures. You can use it to keep track of clues, notes, friends, foes and more.
To start using it, create a new SQ Investigation journal page and open it.
Commands
Left Clickon the canvas and drag: pan around to see the board.Right Clickon the canvas: open a context menu with some presets for board items.Wheel Scrollon the canvas: zoom in and out.Left Clickon an item and drag: move the item.Alt + Clickon an item: hide/reveal the item to the players.Ctrl + Left Clickon an item and drag: start a new connection starting on the item. ReleasingLeft Clickwill create a permanent link if the mouse is over another item.Right Clickon an item: open a context menu with some options like:Create Connection: starts a new connection starting on the item. The creation is finalized by clicking on another item.Edit Item: opens the configuration window for the itemDuplicate Item: creates a copy of the itemDelete Item: deletes the item
Items
Items can be anything and can be fully configured. Some of the options are:
- Title
- Caption (subtitle)
- Description
- Image
- Background color
- Rotation
Some presets are just preconfigured to look a certain way, some have special properties. Try them to see what they do!
Connections
Connections are the links between items on the board. After creating a connection, you can move it by dragging one of its handles.
Right Click on a connection handle will open a context menu that allows for locking/unlocking the handle (prevents unintended movement), configuration or deletion.
Connections that start or end on a hidden item will be hidden as well.
Action Menu
The action menu is opened by clicking on the floating button in the bottom right corner of the canvas.
It contains the option to save the current canvas position (Save Viewport). This will make it so opening the canvas for the first time for each session will center the view on the saved position, for GM and players alike.
It also contains some stamps that you can place on items. After clicking on a stamp, you can:
Left Clickon an item to place a stamp on it.Escapeto cancel the placement.Ctrl + Wheel Scrollto rotate the stamp.Alt + Wheel Scrollto scale the stamp.
Settings
Simple Quest Permission Handling
Foundry's journal pages are not visible if players don't have permission on the journal that contains them.
When revealing a page that's contained in a hidden journal, Simple Quest will ask the GM if they want to reveal the journal too with a Permission Handling dialog.
This will also change all the other pages that were set to Inherit to None, as revealing their journal would reveal them too.
This setting skips the Permission Handling confirmation dialog and automatically adjusts the revelant permissions. Additionaly, it creates all new pages with None permission, so they are not incorrectly revealed when revealing their journal.
Notifications
By default, Simple Quest will send a toast notification to all users whenever a non secret quest or objective is updated. You can disable this in the module settings.
Custom Enrichers
@time (Requires Simple Timekeeping & Calendar)
Simple Quest adds a custom enricher to display time left on a journal. Simply use the time enricher as in the example:
@time[1430/02/05, 03:29]
@time[yyyy/mm/dd, hh:mm]
@QUEST / @LORE / @MAP
The quest enricher will, instead of opening a journal page, open the Simple quest interface on that specific quest.
To create this enricher, the easy way is to drag the quest journal page onto anything then replace the UUID part of the content link with QUEST.
For example, if your quest journal page has the following content link:
@QUEST[UUID]{Quest Name}Clicking on the link will open the Simple Quest interface on that specific quest.
The other enrichers work the same way, just replace QUEST with LORE or MAP.
@COUNT
Creates a counter within the Journal page that can be incremented or decremented by left and right clicking on it.
Create this enricher using the following syntax:
@COUNT[counterId]{maxValue}Where counterId is a unique identifier for the counter and maxValue is the maximum value the counter can reach. Note that you can use the same id for multiple counters, they will all share the same value. Using same IDs on different pages will not share the value.
@REPUTATION
Creates a counter within the Journal page that can be incremented or decremented by left and right clicking on it.
Basic
Create this enricher using the following syntax:
@REPUTATION[counterId]{maxValue}or (Color can be any valid CSS color)
@REPUTATION[counterId,color]{maxValue}Icons
If you wish, you can also use (font awesome) icons instead of the default boxes by using the following syntax:
@REPUTATION[counterId,color,icon]{maxValue}Examples:
@REPUTATION[reputation]{10}
@REPUTATION[thebadguys,red]{20}
@REPUTATION[thegoodguys,green,fas fa-thumbs-up]{30}
@REPUTATION[affection,pink,fas fa-heart]{100}
@REPUTATION[stars,,fas fa-star]{5}
@REPUTATION[stars,fas fa-star]{-20,20}- Note how you can leave the color blank to use the default gradient color.
Bar
If you wish, you can also have a single bar instead of multiple pips by using the following syntax:
@REPUTATION[$barcounterId,color,color2]{maxValue}Examples:
@REPUTATION[$barreputation,green,red]{10}
@REPUTATION[$barmyrep,green]{20}
@REPUTATION[$baraffection,pink,blue]{100}
Note that the second color is optional and will create a gradient, the whole $bar part is required for the bar to work, $somethingelse will not work.
Customizing text and borders
If you wish, you can also customize the text and border colors by wrapping the enricher in a div. Enter html editing mode in the journal editor and add the following:
<div style="color: white;">
@REPUTATION[$barmyrep,green]{20}
</div>
in the same way you can limit the bar to a specific width
<div style="width: 200px;">
@REPUTATION[$barmyrep,green]{20}
</div>
Where counterId is a unique identifier for the counter, maxValue is the maximum value the counter can reach, color is the color of the counter and icon is the font awesome icon to use. Note that you can use the same id for multiple counters, they will all share the same value. Using same IDs on different pages will not share the value.
@TTM
Note that the TTM enricher has a couple quirks due to how enricher parsing works: Files that are in the root folder (eg @TTM[myImage.png]{Title}) will not work, you need to put them in a subfolder (eg @TTM[images/myImage.png]{Title}). Remote URLs, such as @TTM[https://example.com/myImage.png]{Title} will not work, you need to remove the https:// part. (eg @TTM[example.com/myImage.png]{Title})
Crates a Theater of the Mind display button:
- Left click to open the Theater of the Mind display for all users, this will display a fullscreen image above the canvas but under the UI.
- Left click the image to minimize it or maximize it.
- As a GM, you can right click the image to close it for all users.
Create this enricher using the following syntax:
@TTM[imageUrl]{Title}or
@TTM[imageUrl]{Title|Visible title}Where imageUrl is the path to the image you want to display, Title is the title displayed in the button and Visible title is the title displayed in the Theater of the Mind display (optional).
Custom Journal Elements
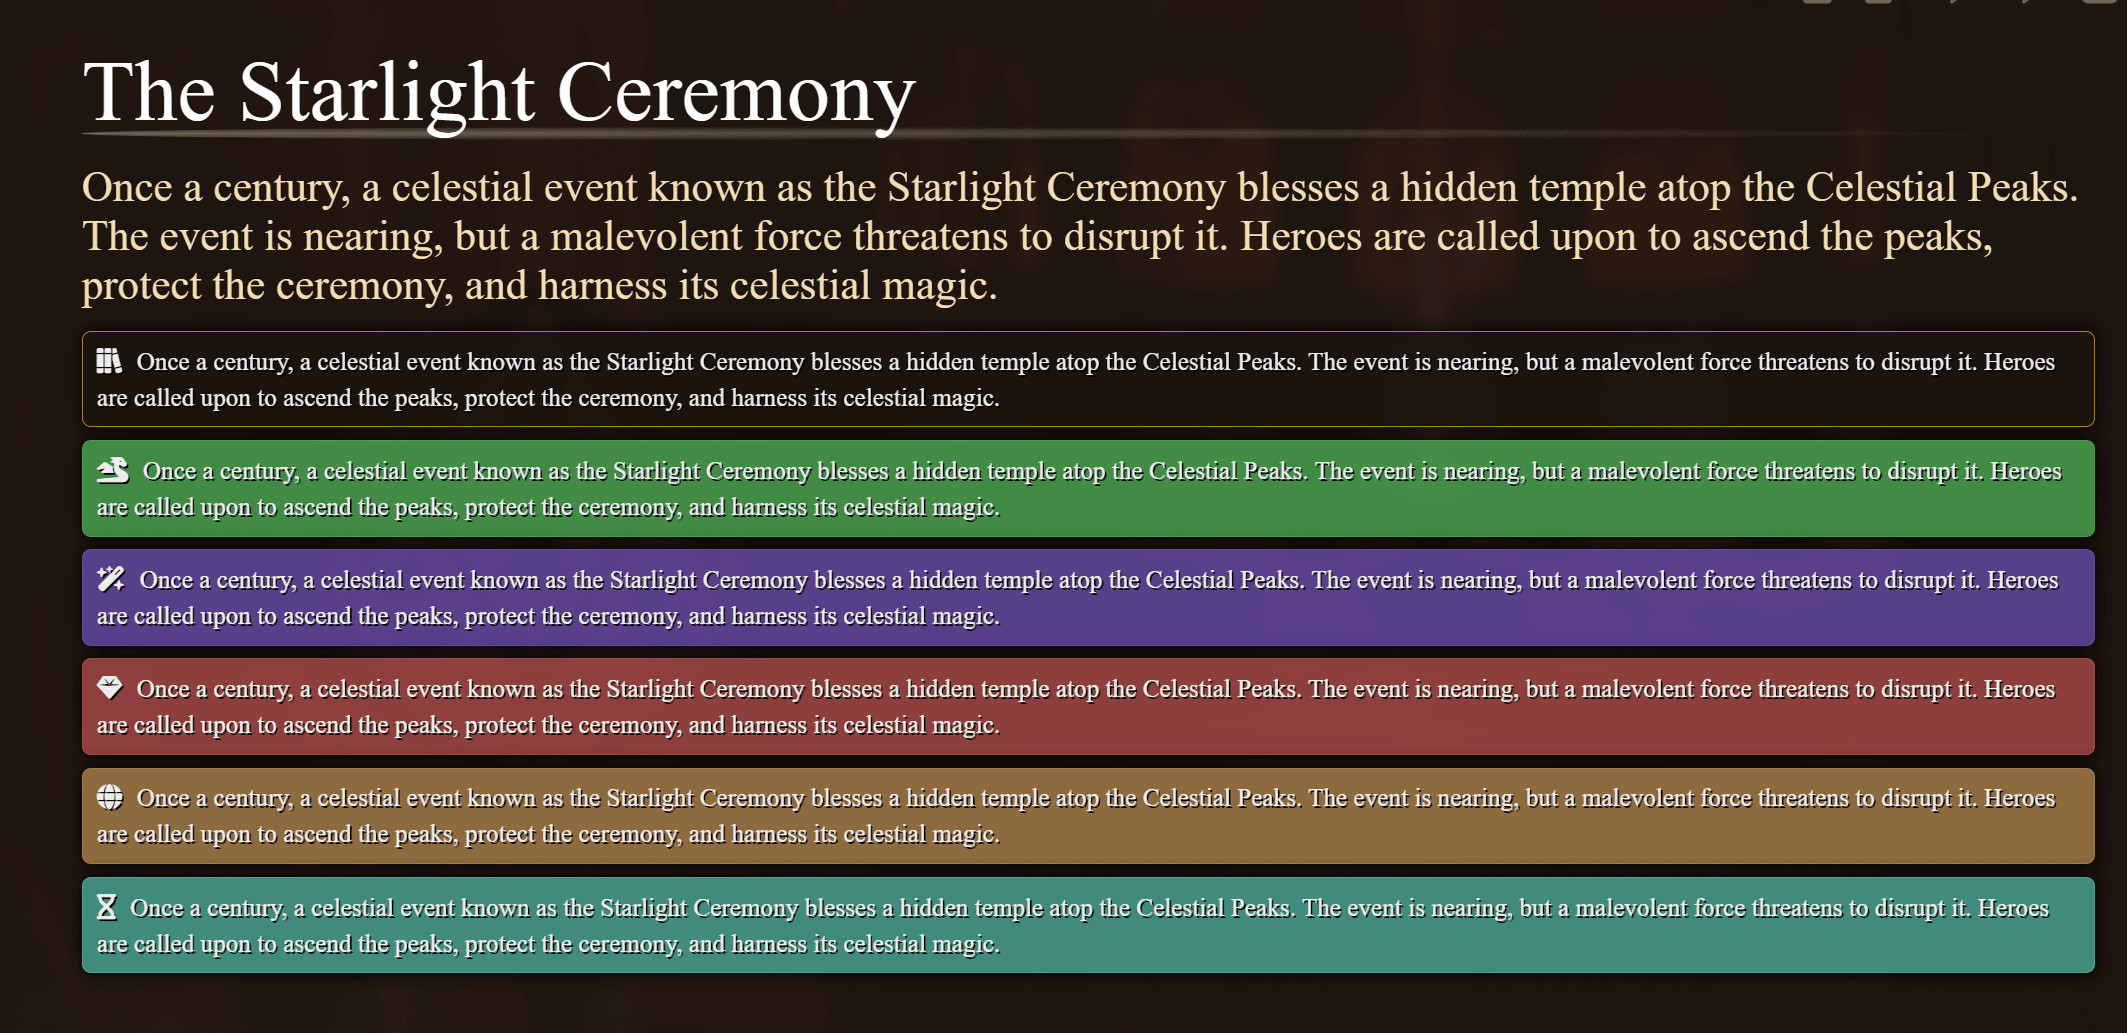
Simple Quest adds custom Journal Elements you can use to style your quests. You can find them in the Journal Editor toolbar under the Format dropdown.
- Callouts: Callouts are used to highlight important information in your quests.
- Inserts: Inserts are used to frame paragraphs with a Parchment, Scroll, or Book style. It will dynamically scale to fit the content.
- Large initial letter: This will make the first letter of a paragraph larger and more prominent.
3D Portraits Integration
If you have 3D Portraits enabled, 3D Models can be rendered within Quests, to do so, follow these steps:
- Create an image element in your quest, you can use any image (for example a static image of the model)
- The size of the image will determine the 3D view port
- Click the Edit HTML button in the journal page toolbar
- Add the data-model3d attribute to the image element and set it to the path of the model
Your image element should look like this:
<img data-model3d="path/to/3dModel.glb" src="path/to/static/image.png" />Macros
Toggle the Simple Quest interface:
ui.simpleQuest.toggle();Open Simple Quest on a specific quest or map
ui.simpleQuest.openToPage(uuid);Example:
ui.simpleQuest.openToPage("JournalEntry.h3kmFH5VX3Ih1zHa.JournalEntryPage.C78y2NpARuZijpG2");Open Simple Quest on a specific tab
ui.simpleQuest.openToTab("quests");Valid tabs are quests, timeline, myJournal, partyJournal, achievements.
You can also use any tab name or folder ID.
Convert Scene to Map
You can convert the currently viewed scene to a map by running the following macro:
ui.simpleQuest.sceneToMap();Notes on the map will be converted to Markers.
Macro-Linked Markers
If a marker is linked to a macro, the macro will be executed when the marker is clicked. The macro will receive the marker data as an argument.
/*log the marker data*/
console.log(scope);
/**
* Represents a marker used in a mapping or journaling system.
* @typedef {Object} Marker
* @property {string} title - The user-defined name for the marker.
* @property {boolean} displayLabel - Determines whether to display a label for the marker.
* @property {string} description - A brief description providing additional information about the marker.
* @property {string} journal - Identifies the entity associated with the marker. (in this case the Macro being executed)
* @property {string} color - Specifies the color of the marker.
* @property {boolean} hidden - Indicates whether the marker is hidden.
* @property {number} scale - Defines the scale of the marker.
* @property {string} icon - Specifies the icon or image used to represent the marker on the map.
* @property {number} x - The X coordinate of the marker's position on the map. 0 to 1 in relation to the map size.
* @property {number} y - The Y coordinate of the marker's position on the map. 0 to 1 in relation to the map size.
* @property {string} id - A unique identifier for the marker.
* @property {JournalEntryPage} map - The map journal page associated with the marker.
*/Auto Import (legacy)
If you are a content creator and want to include Simple Quest quests in your adventures/content you can do so by giving a special name to the journal entry.
- Create a journal entry, add pages as you wish, these will be imported into Simple Quest.
- Give the journal entry a special name as follows:
SimpleQuestAutoImport$My Quests. - This special key is required for the import to work
SimpleQuestAutoImport$it's then followed by the name of the category. - If the category does not exist it will be created, otherwise the pages will be added to the existing category.
- If you wish to skip the confirmation prompt on the import, you can add the special key
SimpleQuestAutoImport$My Quests|silentto the name of the journal entry. - When the journal entry is added to the world (such as when it's created by an adventure import) the import will be triggered automatically.