Levels
Levels is a Foundry VTT module for creating maps with multiple vertical levels.
Thank you for using the Levels Module! After 5 years, its functionality has been implemented into core Foundry VTT as the Scene Levels feature, and the module is now being retired. The V14 version will attempt to migrate your scenes automatically, though some manual adjustments may be needed as the two implementations do not match 1:1.
Support discontinued
Levels is now retired and support beyond this wiki's content is no longer offered. Patreon Supporters (opens in a new tab) can still receive support for legacy versions of the module in the Priority Support discord (opens in a new tab) channel until the release of Foundry VTT V15.
Legacy Documentation
Modules
These modules are required for Levels to run.
Your First Levels Map
While Levels is capable of handling full multilevel maps, we will start with something simple: Adding a multilevel barn to an existing map.
This approach is scalable to any map you might want to build in the future.
- Open any scene or create a new scene and set a background. This tutorial assumes you have a standard grid size of 5ft, if that is not the case adjust the Levels size accordingly (usually 2 times the size of 1 square). Setting a background is not strictly required and you can use a blank map if you prefer.
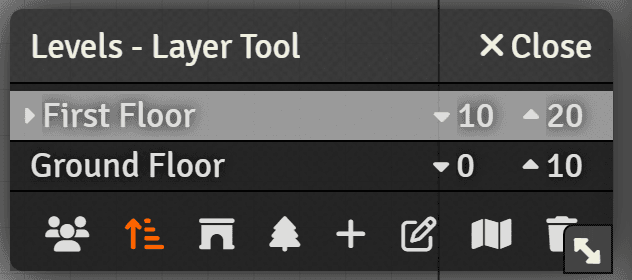
- Open the Levels UI (also known as the Levels Layer Tool) by pressing the button.
- Press the button to go into edit mode, extend the window vertically to have some extra space
- Press the button two times to add two levels.
- Set the bottom one at 0/10 elevation and the top one at 10/20. Name
your Levels
Ground FloorandFirst Floor. Giving a name to your Levels is not strictly required. - Head out of edit mode by pressing the button again and select the 0/10 Level by clicking on it. Your UI should now match the Levels UI screenshot below.
- While you have a Level selected in the UI, anything you place will
be placed on that Level. Now head to the
Tiles Layer. - Open the
Tile Browserand navigate tomodules/levels/sample-maps/baileywiki/, drag and drop thebarn-lvl1.webpfile onto the scene. - Head to the
Walls Layerand wall this ground floor tile appropriately. - Now select the First Floor (10/20) in the Levels UI. In the
Tile Browsergrab thebarn-lvl2.webpfile from the same folder and drag it on top of the other tile aligning them correctly. As before, head to theWalls Layerand wall this floor appropriately. - We will enable an additional settings on this floor so we can see it
when we are on the Ground Floor. Double click the First Floor tile
to open it's configuration, head to the Levels Tab and enable
Show Even When Below?and save your changes - Let's add a roof! Toggle roof view/placement by clicking
- Drag and drop the roof tile
barn-roof.webpis in the correct position - Head back to the Ground Floor with the Roof mode still enabled and
place
barn-shed-roof.webpon top of the shed on the left side of the barn. - Last step is connecting the floors. Toggle the Roof View/Placement
off, and on the ground floor head to the
Regions Layer - Place a region where the ladder is located on the top of the barn. This will create a stair that will toggle between the current floor and the one above it, you don't need to create two stairs.
- Done! Place a token and move around to explore the barn.
Remember to use Tokens with vision and have vision enabled in the scene settings! Feel free to play with multiple tokens (selecting one at a time) to see how floors block vision.
While we don't have stairs to connect us to the roofs, you can manually change the elevation of your tokens to 10 or 20 to explore them.
Maybe experiment by creating your own star connections to the roofs!
Basics
When using Levels it's important to understand the concept of Wall Height's Token Height make sure to read the documentation about it before using Levels.
Levels UI
Open the Levels UI (also known as the Levels Layer Tool) by pressing the button.
You will see a small semi-transparent black box open in the top-right of Foundry.
Layers can be manually created with the button on the bottom of the row or automatically generated from entities with elevation values with the button on the bottom row.
While the Levels UI is open, the view will show all tiles and entities in the elevation range of the layer. Any tiles or tokens added to the scene while on a layer in the UI will automatically set the tile or token to its height.
To rename or change the elevation values of a layer, press the
button. You will now be in edit mode for the Levels UI window. Click on the layer you wish to edit, then modify the name or values. The downwards arrow represents the lowest elevation and the upwards arrow represents the highest for the layer. Click the button again to confirm and save your edit.
There are 3 additional toggles at the leftmost of the bottom row:
Show Players in the UI
Shows icons of the players in the UI, the icons will be placed in the corresponding level. You can click the icons to select the corresponding player.
Place Drawings as Stairs
While toggled on, place drawings as stairs, toggle it off to create labels or descriptions to place in your levels.
Enable Levels Roofs View/Placement
Displays roofs above the current level. Placing tiles while this toggle is active will place them as roofs above the current level.
Place Tiles as Overhead Tiles Inside the Current Level
Tiles placed with this toggle active will be placed as overhead tiles inside the level. For example you could use this to place a chandelier inside the current level.
To view every tile and token or exit the layers view, close the Levels UI. You can also clear all levels layers with the button. This will not delete tiles or tokens.
If you create a drawing while the Levels UI is active, the drawing will be set automatically as a Stair and it will be set as Hidden. The Stair will be configured to move you from the current Level to the one above it and vice versa.
The Levels UI is a tool to help you place and visualize your Levels setup. Levels does not require levels in the UI to be defined to work, for example if you deleted all your levels in the UI after building your map, the map will still work exactly the same. Removing levels from the UI or changing their range will not modify or remove entities in the scene.
Scene Dropping\Merging
You can drop a scene from the sidebar onto the Levels UI to automatically copy all elements from the dropped scene to the currently selected level.
Tiles
Keep in mind that tiles with Occlusion Mode set to 'None' will not block vision.
Tiles are a core aspect of Levels. Every tile can be assigned an elevation and sight is based on tile transparency. Note that the image itself needs to have transparent areas. Use your preferred software to export transparent images or cut out the areas afterwards with software like GIMP.
It is generally recommended for Levels tiles to be overhead tiles. Tiles not set as overhead will all be placed at the background elevation.
The background is counted as a solid plane (i.e. a single overhead tile at a defined elevation) with a default elevation of 0. The elevation of the background can be adjusted in scene settings. Keep in mind that the background layer and it's tiles will not account for transparency and will count instead as a solid scene sized plane.
Tokens
Token height is handled by Wall Height.
It's highly suggested to read the Token Height section of the Wall Height page
before using Levels.
Regions
As of V12 when a region is created while the Levels UI is open, it will be set up as a stair for you.
The region will toggle between the two exact elevations of the region. For example, a 0\10 region will set a token to be at elevation 10 if it enters the region at elevation 0, and vice versa.
By default the region will be set up as a stair. You can change this by editing the region behavior and setting the following macros:
Two-way Stair
The region will toggle between the two exact elevations of the region. For example, a 0\10 region will set a token to be at elevation 10 if it enters the region at elevation 0, and vice versa.
CONFIG.Levels.handlers.RegionHandler.stair(region,event)Stair Up
When a token enters the region, if it's within the range of the region, it will be set to the top of the region.
CONFIG.Levels.handlers.RegionHandler.stairUp(region,event)Stair Down
When a token enters the region, if it's within the range of the region, it will be set to the bottom of the region.
CONFIG.Levels.handlers.RegionHandler.stairDown(region,event)Elevator
When a token enters the region, if it's within the range of the region, it will trigger the elevator dialog.
CONFIG.Levels.handlers.RegionHandler.elevator(region,event,elevatorData)Where elevatorData is the same as the string you would input in a drawing elevator.
example:
CONFIG.Levels.handlers.RegionHandler.elevator(region,event,"0,Ground Floor|10, First Floor")Migration script
This script is experimental and will convert all drawings set as stairs or elevators to regions with the appropriate behavior. You should backup your scene before running it.
CONFIG.Levels.helpers.migration.migrateDrawingsToRegions()Drawings
In Levels, drawings are used to create stairs and elevators. Their purpose is to allow travel between elevations. However, how they handle travel between elevations is handled differently.
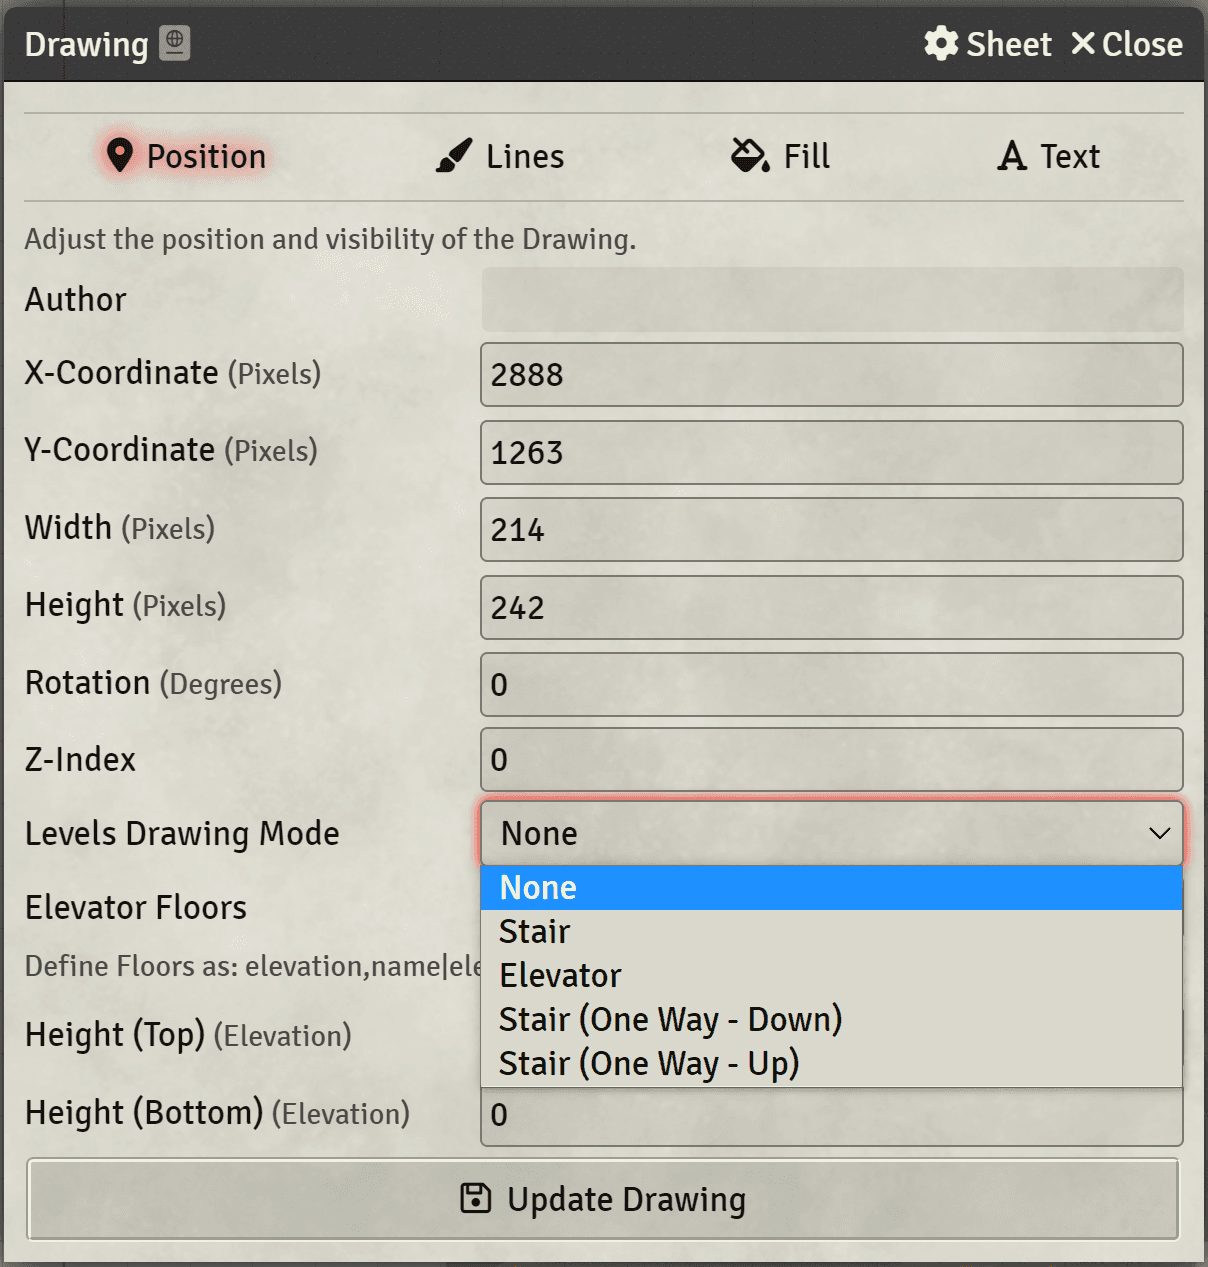
To create or edit a stair or elevator, double click on an existing drawing to open the drawing configuration menu.
You will see a few settings added by Levels.
Levels Drawing Mode determines the purpose of the drawing. None
treats it as a vanilla Foundry drawing, Stair sets it as a stair, and
Elevator sets it as an elevator.
One Way Stairs follow the same rules as regular Stairs but work only
One Way
Before V10, there was the Hole option as well. However, holes have
been deprecated from V10 onwards in favour of tile transparency. While before you needed BOTH a hole drawing and a transparent tile to see through, now you only need a transparent tile.
Elevator Floors set the floors an elevator can transport entities
between. The syntax for it is elevation,name|elevation,name (e.g.
0,Ground Floor|10, First Floor).
Height (Top) sets the top height (i.e. highest point) of the drawing.
Height (Bottom) sets the bottom height (i.e. lowest point) of the
drawing.
Stairs
Stairs allow tokens to travel from and to two set elevations.
- Stairs can only move tokens to its set elevations
- The token must be on one of the two elevations exactly (e.g. 0 or 10) to trigger
- Stairs will move tokens one value higher than its top elevation if entering from below
For example: a stair with a bottom of 0 and a top of 9. A token at an elevation of 0 that enters the stair will now have an elevation of 10. If they re-enter the stair while at an elevation of 10, they will then have an elevation of 0. Any other elevation will not trigger the Stair.
One Way Stairs
One way stairs function the same way as regular stairs but don't allow two-way movement.
For example: a one way stair with a bottom of 0 and a top of 9.
If set to One Way - Down will bring any token that enters it while at an
elevation of 10 to 0,
and entering with an elevation of 0 will do nothing. One Way - Up will do the opposite
Elevators
Elevators allow tokens to travel between multiple set elevations.
Tokens that enter an elevator can freely travel between the elevations
set in Elevator Floors via a pop-up menu.
Elevators will trigger on any elevation in the range of the drawing. For example an elevator set to 0 / 40 as it's top and bottom values will trigger on any elevation between those (e.g. 25). The options you define in the elevator don't affect the triggering range.
Vision
Levels heavily relies on vision. If vision is disabled on the map or you have selected a token without vision, you might experience undesired effects!
Remember that the Background layer is a solid plane that will block vision even with transparency read more.
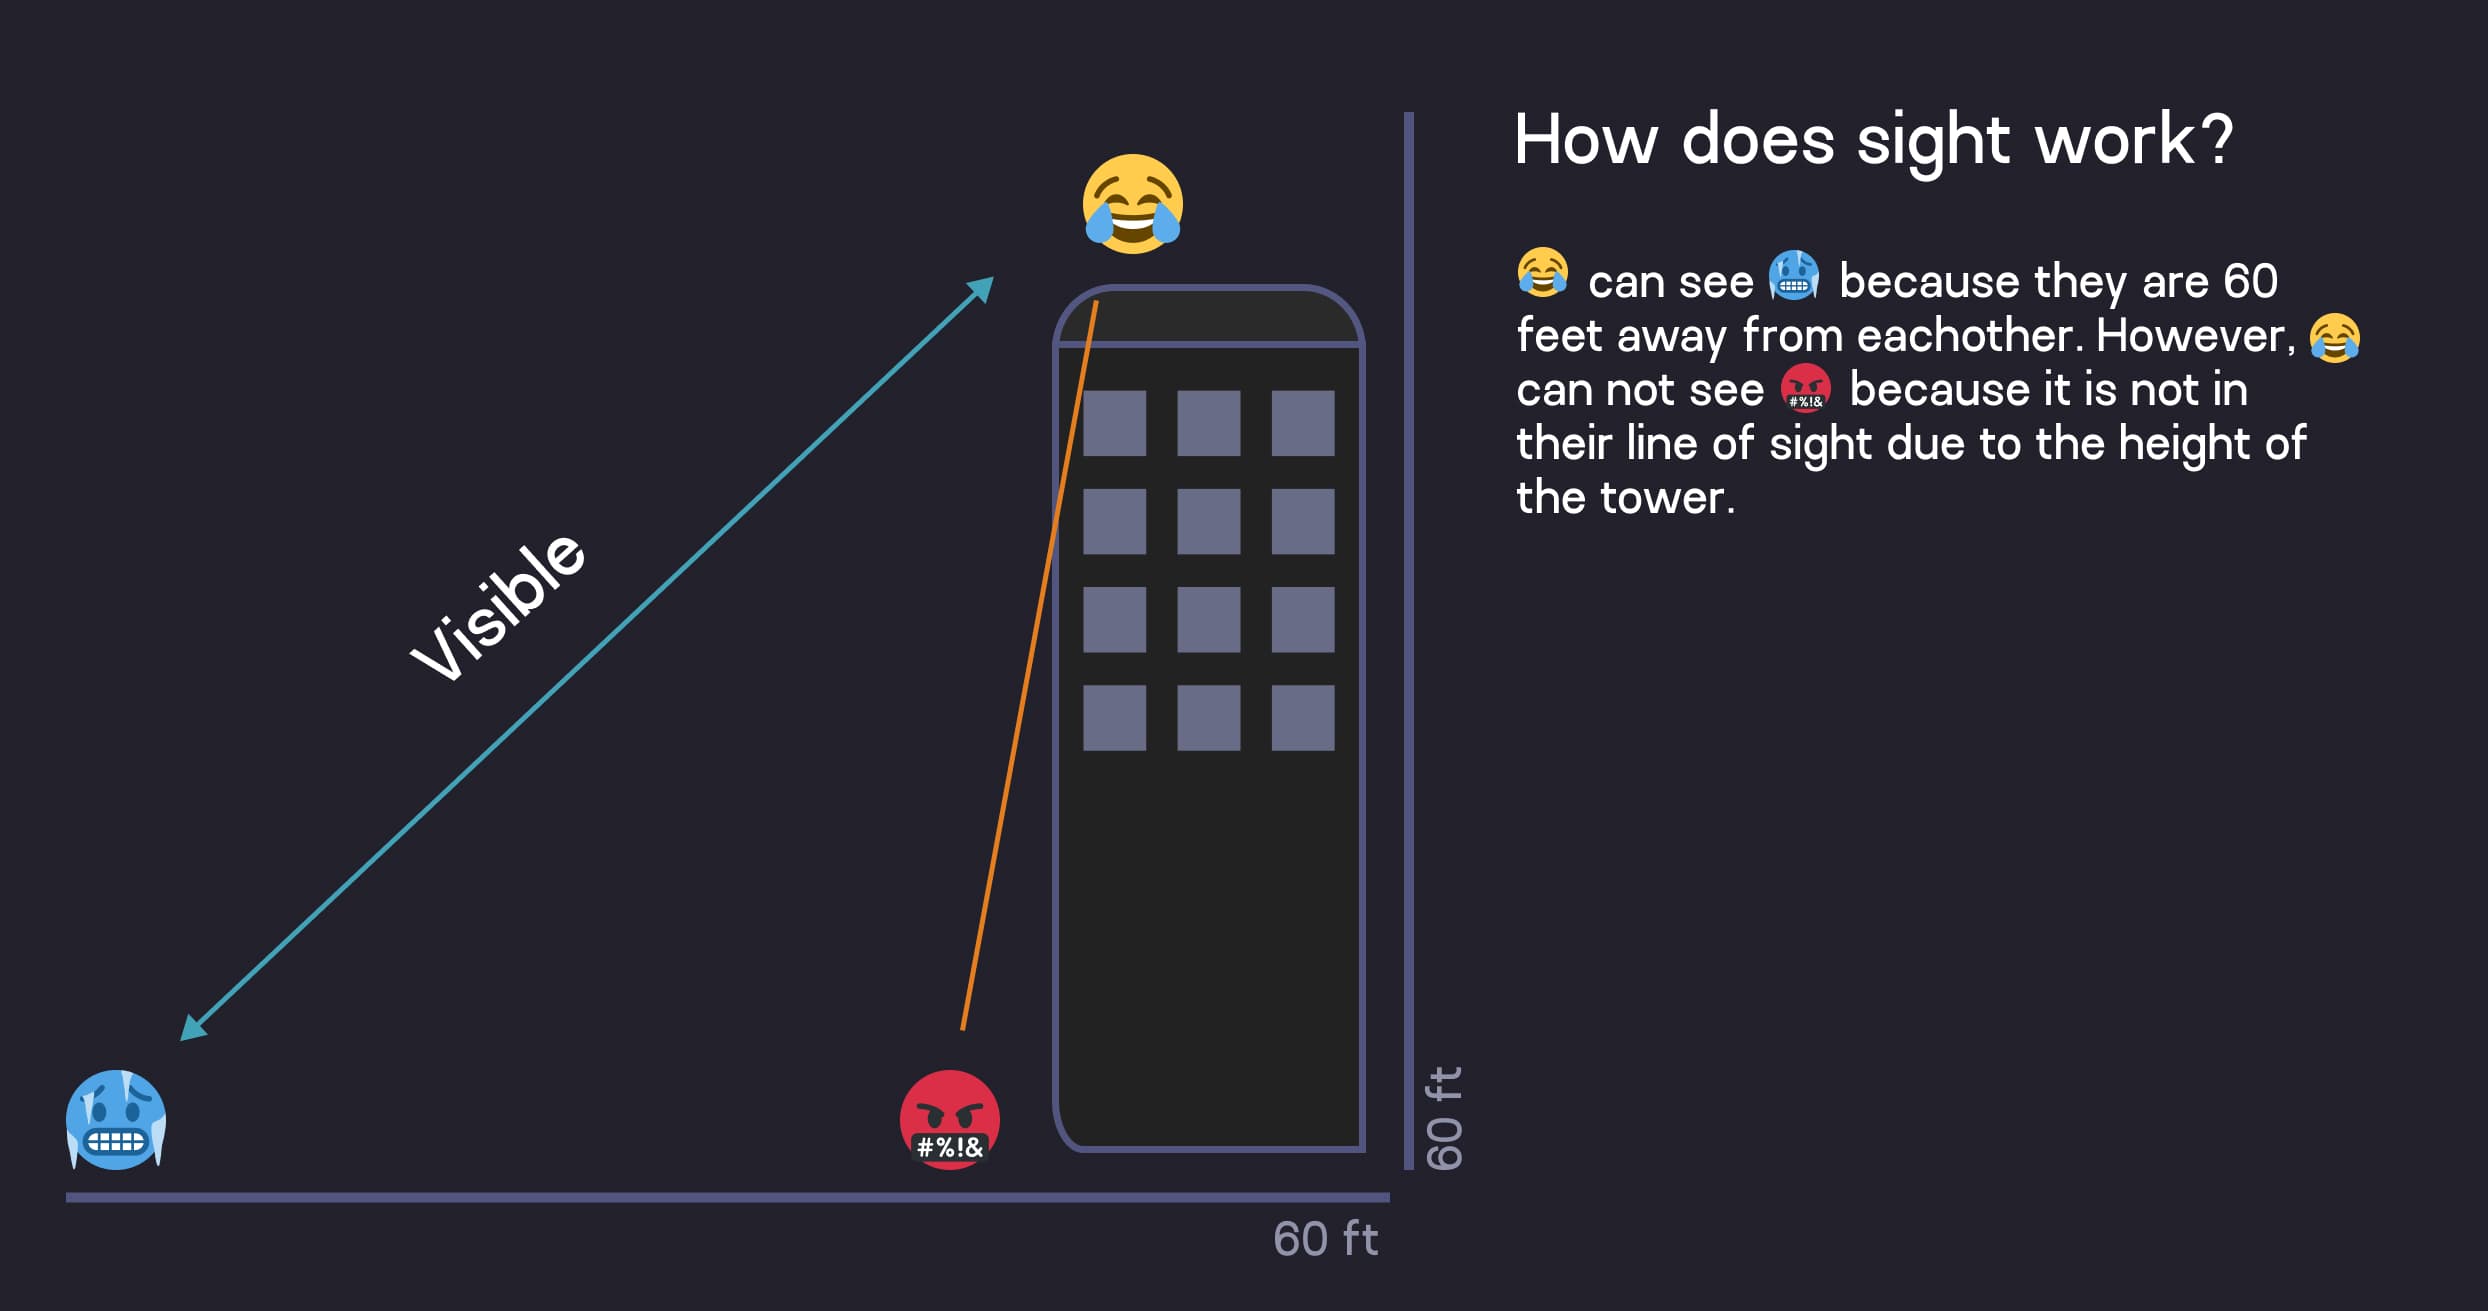
Token vision is best understood three dimensionally ala our own physical world.
Imagine 3 tokens. Let's call them Token A, B, and C. Token A is on top of a tower that is 60 units high. Tokens B and C are at an elevation of 0.
However, Token B is 60 (horizontal) units away from Token A and Token C is 10 (horizontal) units away from Token A.
Token A can see farther outwards than Tokens B and C because it is viewing from a higher vantage point. It will also be able to look over any tiles at an elevation of less than 60. In addition, Token A and Token B can see each other.
However, Token A and Token C cannot see each other. This is because the line of sight between Token B and Token C is blocked by the tower. If Token C moves farther away from Token A and the tower, then the two tokens will be visible to each other.
What if i have a balcony i want to prevent tokens in the bottom floor to se the ones on the balcony?
You can use one way walls to cover the edge of the balcony if you wish to force vision in a certain direction. Note that this solution might not be perfect in all situations.
Darkness Sources
If you have any darkness sources in your scene, levels will need to fall back to a stricter vision system due to the impossibility of reconciling the darkness system with the levels 3d vision.
Example (no darkness sources):
You have 2 tokens on 2 sides of a wall, the observer is at 0 ft, the wall is set to 0\10 ft and the other token is at 20ft
- With just Wall height, the observer will not see the other token
- With Levels, the observer will see the other token even though it's outside of it's vision polygon
Example (with darkness sources):
You have 2 tokens on 2 sides of a wall, the observer is at 0 ft, the wall is set to 0\10 ft and the other token is at 20ft
- With just Wall height, the observer will not see the other token
- With Levels, the observer will not see the other token
Note that it doesn't matter where the darkness source is, the mere presence of a darkness source will cause levels to fall back to a stricter vision system.
Multilevel Fog of War
This feature is still in beta and is not recommended for use in live games.
Levels now has a multilevel fog of war system. In order to test this feature, do the following:
- In the Levels module settings, disable the
Advanced Fog Explorationsetting or, alternatively, disable it on every tile. - Make sure your scene is setup with multiple levels, in this example we will assume you have a
0,10level and a10,20level. - Make sure the scene is currently active.
- Click on the
Setup Fog of Warbutton in the Levels UI (Cloud icon). - You should now be able to explore the
0,10level and the10,20level separately.
How does it work?
Each fog of war layer is stored on a separate scene. You can ignore these scenes. In order to reset the fog of war on a particular level, head to that specific level's scene and reset the fog of war. Deleting the scenes will disable the multilevel fog of war and reset it.
Fog of War & Advanced Fog Exploration
Fog in foundry is unidimensional, the system itself is not build to handle multiple layers of fog, for that reason, by default, if you explored any elevation, all areas in that zone (independent of elevation) will also be explored. For example if a player explored a first floor of a building then went to the second floor, it would be already fully explored.
Since the only way to make it work correctly would be to completely rewrite the fog exploration system and even then there would be issues of storing multiple fogs (as it would take up load time on startup). Outside of this problem there would be even more issues because 'fog layers' could not be completely separate as exploring an area open to the sky would make it dark once you changed elevation.
Due to all this issues that currently have no solution levels implements what's called 'Advanced Fog Exploration'.
What this does is simple, when a player is in the elevation range of a tile, levels imposes a black shape of that tile onto the fog layer which basically means that it disables fog exploration for that tile only.
Unfortunately there is no solution currently to solve this problem.
This is enabled by default, but you can globally disable it or even toggle it per tile.
Settings
Scene Settings
Don't disable lights
Due to V11 changes that locked down some APIs and Methods, the old Light Masking is no longer working as of V11.
The setting has been replaced with a new Don't disable lights setting.
If you don't wish to read below or you find it confusing, the short version is: In scenes that use Levels, you should disable this setting, otherwise leave it as is (enabled by default).

In this example the lighting looks correct at first glance. Don't disable lights can
be toggled in the Lighting tab in the scene settings. By enabling this feature
all lights will be visible and pass through all levels.
Disabling this setting will only show lights on the current level. Here we can see, by moving the roof slightly, that while the roof is covering the "green" coloration of the light, the vision portion of the light is still visible.
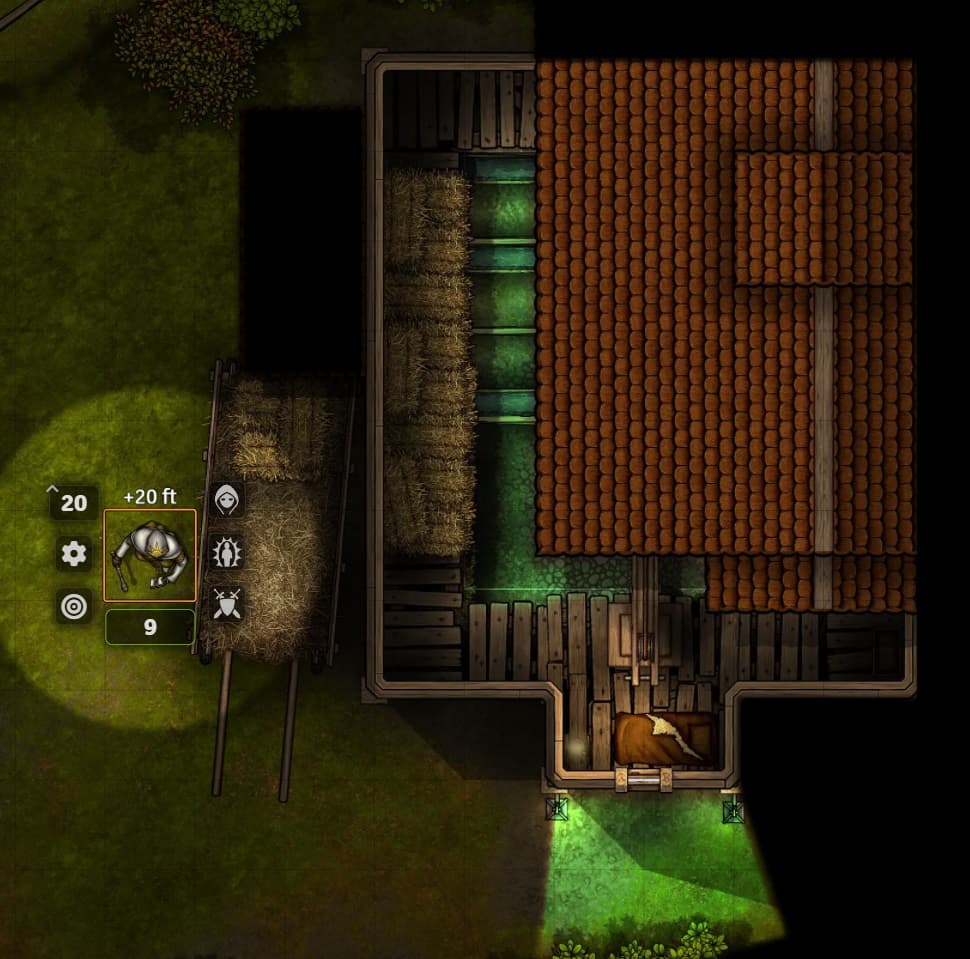
- With this option enabled, lights will be visible and pass through all levels.
- While this visual "glitch" will reveal the map in those locations, it will not reveal tokens.
Weather Elevation
Elevation for weather can be adjusted
Background Elevation
You can set the elevation for the background layer in the scene settings. Default is 0.
Keep in mind that due to limitations and performance issues, the whole Background layer will disregard any transparency vision calculations, and count as a scene-sized vision blocking plane.
Example: If you make a blank new scene with no tiles or background image, then place a token at 0 elevation and one at -10 you will notice that they cannot see each other.
This works well for most use cases (e.g. have your map as the background of the scene, then add floors above and\or basements below) but might be a problem in some specific scenes that require transparency at 0 elevation.
In these cases, simply set the Background Elevation to an arbitrary large negative number (e.g. -99999), ignore the background layer and just use overhead tiles placed through the Levels UI. For example, after creating your scene with your background image (so that the scene is auto sized properly) remove the background image from the scene configuration and set the background elevation to -99999. Then place your "background" image through the Levels UI at 0 elevation.
Handling Multiple Tokens
When having multiple tokens selected, Levels needs to decide a single point of view, for this reason, multiple tokens handling is not supported.
While having multiple tokens selected will still merge their vision, Levels will not be able to decide which floor to show if the tokens are at different elevations. At the moment there is no solution to this so stick with one selected token at a time if you have multiple at different elevations.
Guides
Importing a Universal VTT (UVTT) Multilevel Map
This guide assumes all the different levels of the map are the same size, if this is not the case, you will need to manually import and re-wall each level.
-
Import all the levels of the map as separate scenes. For this example, we will assume you have the following levels, but it will work the same way for any number of levels:
Ground Floor,First FloorandSecond Floor -
Create a new scene, set it's
Grid Size,Scene DimensionsandPadding Percentageto match your other maps (which should all have the same values). This scene will be used as a container for all the levels. -
Activate this scene, this will be our working space.
-
Open the Levels UI (also known as the Levels Layer Tool) by pressing the button.
-
Create the levels in the UI as you did in the Your First Levels Map guide. You should have 3 levels, one for each floor.
-
Select the
Ground Floorlevel by left clicking on it. -
From your
Scenes Directorydrag and drop theGround Floorscene onto the Levels UI. This will import the scene as theGround Floorlevel. -
Repeat the previous step for the other levels, first selecting the level in the UI, then dragging and dropping the corresponding scene from the
Scenes Directoryonto the Levels UI. -
If you have any
Roofsyou will need to manually set them up in the same way you did in the Your First Levels Map guide. -
You should now have all the levels imported into the Levels UI. You can delete the per-floor scenes now.
Setting existing scene objects to a level
It's highly recommended to make a backup of your scene before doing this. If you have a scene with existing objects that you want to set to a specific level, follow these steps:
- Select all the objects you want to set to a level.
- Delete them.
- Open the Levels UI (also known as the Levels Layer Tool) by pressing the button.
- Select the level you want to set the objects to.
- Press
Ctrl + Zto undo the deletion. - The objects should now be set to the selected level.
API
The API is available for viewing by entering CONFIG.Levels.API in the Foundry
console or in API.js (opens in a new tab).
While most APIs are developer focused, there are a few that can be used by users listed below.
Rescaling grid distance
This API can be used when changing the grid distance for the scene (for example changing each square from 5ft to 1.5m) The number passed to the function is the old grid distance.
CONFIG.Levels.API.rescaleGridDistance(5)Hooks
levelsInit(levelsConfig)
A hook that fires when levels has finished initializing, you should use this hook if you want to subclass/wrap/override the levels handlers levelsConfig.handlers. This fires before the levels Wrappers are registered, giving you a chance to wrap or change said functions.
levelsReady(levelsConfig)
A hook that fires after levels has initialized all it's classes and register wrappers and hooks.
levelsUiChangeLevel()
A hook that fires when a different level is selected in the Levels Layers Tool, you can access the Layers Tool in CONFIG.Levels.UI
levelsPerspectiveChanged(currentToken)
A hook that fires when the token that Levels is using to render the
current point of view changes. Can be null for GMs when no token is
selected.
Overrides
Levels overrides MeasuredTemplate#_refreshRulerText,
Wall#identifyInteriorState, DetectionMode#_testRange and
CanvasOcclusionMask#_identifyOccludedTiles if your module or system
overrides them as well, there could be conflicts.
If you wish to Override or Wrap the overrides you can do so in the
levelsInit(levelsConfig) hook.
Elevation updates Flag
When a token's elevation changes, Levels will prevent it if the change causes a collision with a floor (GMs will get a warning but the update will go through). If you want to perform a player side elevation update bypassing this check you need to pass a special flag to the update:
Without the flag:
tokenDocument.update({elevation: 10})With the flag:
tokenDocument.update({elevation: 10 }, {teleport: true})Troubleshooting
Token visibility behaving in unexpected ways
If you are experiencing issues with token visibility, as in, tokens that you expect to see are not visible, or tokens that you expect to not see are visible, you can try the following steps:
- Disable all modules except for Levels and it's dependencies. It's possible that another module is interfering with Levels.
- Make sure that the token you are using has vision enabled and that vision is enabled in the scene settings. If not, all tokens on all levels will be visible.
- Make sure you understand token height and that it's adjusted if needed. See the Wall Height documentation for more information.
- Levels sight works in 3D, make sure you understand that vision works also based on the angle between tokens. You can read more about this in the Vision section.
- Verify that the tiles you are using have transparency where needed. If you are using a tile that has a hole in it, that part needs to be transparent or it will block vision.
- Due to a Foundry VTT bug, animated tiles will not block vision.
- Make sure you haven't changed the default
Allow Sightoption on the tile. If you have enabled it on a tile, the tile will not block sight. - If you are using both negative and positive levels, be aware that by default, the background layer (0 elevation by default) is a solid plane that will block vision even with transparency. You can read more about this in the Background Elevation section.
- Make sure that you have not accidentally enabled
Provides Visionon one or more Lights on the scene. If you did so, any token in the range of the light will be visible from anywhere.
Weather Appearing in Basements
Sometimes weather (rain, snow, etc.) still shows up in basements even when a roof tile is set to restrict it. This happens because roofs placed above the scene’s background elevation (default 0) are automatically disabled when you are below the background elevation, and when disabled they no longer block weather.
- Adjust the Scene’s Background Elevation
- Go to Scene Settings.
- Change the Background Elevation to a very low number (e.g.,
-999). - This ensures that all roofs remain enabled, even for underground levels.
This is the simplest fix if you want roofs to work normally in basements.
or
- Use an Invisible “Underground Roof” Tile
If roofs cause problems when enabled underground, you can create a dedicated invisible tile:
- Create a new Tile that spans the full map. Make sure to assign a solid image to the tile (a white square works fine but you can reuse any image).
- Set it to restrict weather.
- Give it 0 opacity (completely invisible).
- Place it on a dedicated “Underground” Level (e.g.,
-0.9to-0.8).
Because it is invisible and slightly above the basement, it always blocks weather without interfering with gameplay or elevation changes.
Broken Vision \ Non working Walls
A rare occurence can happen where the vision completely breaks in the scene, producing "ghost" walls and\or non functional walls.
Note that his issue can happen without Levels as well, but the way we build overlapping walls with Levels makes it more likely.
If you encounter this issue, disabling Levels will show that the issue persists. It seems that the Foundry wall optimization algorithm is not working properly when the scene has a lot of stacked walls. Unfortunately this issue can only be fixed by core and cannot be fixed by Levels.
Possible Workarounds
- Make a backup of your scene
- Remove any walls around the edges of the map if you have any.
- Offset all the walls on each layer by a small amount so that their end points don't overlap with other walls on other levels.
Foundry V9 to V10 Changes
Changes
- Polygons and holes are deprecated
- Levels will now automatically handle visibility based on the tile transparency. You can leave old holes in your maps, they simply won't do anything.
- Better Roofs is no longer a required dependency
- Light masking is now better but the Perfect Vision (opens in a new tab) module is highly recommended.
- New
Allow Sightoption for tiles. If enabled on a tile, the tile will not block sight. - New
Background Elevationoption in scene configuration. The background is now a Levels entity with a default elevation of 0.- This means you can now go under the background.
- New
Weather Elevationoption in scene settings. Allows for changing the elevation of weather effects. - UI Revamp
- Scene controls no longer have buttons
- UI now has all the required buttons
- Bug button removed
- Top Elevation Collision
- Tiles will now only perform collision checks at their bottom elevation
Migration
- Tiles placed as overhead tiles inside Levels (aka tree icon) from V9
will now render on the floor.
- A macro is included to fix them, but you will need to select them and select the level they belong to. No automatic migration is possible for this issue.import macro from 'styled-jsx/macro';