Tiles
Tiles are your bread and butter when it comes to building a map in 3D, they serve as both decoration and as a way to block sight and movement. For this reason it's generally discouraged to use Walls when building 3D Maps.
While you can use 2D Tiles in 3D, it's highly suggested that you use fully 3D Tiles for the best experience. If you still wish to use 2D Tiles, check the bottom section for more information.
This page will cover many concepts, you can use this quick links to jump to the most common sections.
Placing 3D Tiles
To place a 3D Tile, open the filepicker while in 3D Mode and in the Tiles Layer. The file picker will now show 3D Files instead of 2D Images. Drag and drop a file from the filepicker to the scene to create a 3D Tile, 3D Canvas will give your tile a placeholder 2D Image as well, required for Levels to adjust visibility when needed and to make it clear that you have 3D Tiles on the map, you can change this placeholder image but it's not suggested to leave it Blank.
If you wish to see 3D Models previews in the file picker, you will need the Filepicker+ and 3D Portraits Modules.
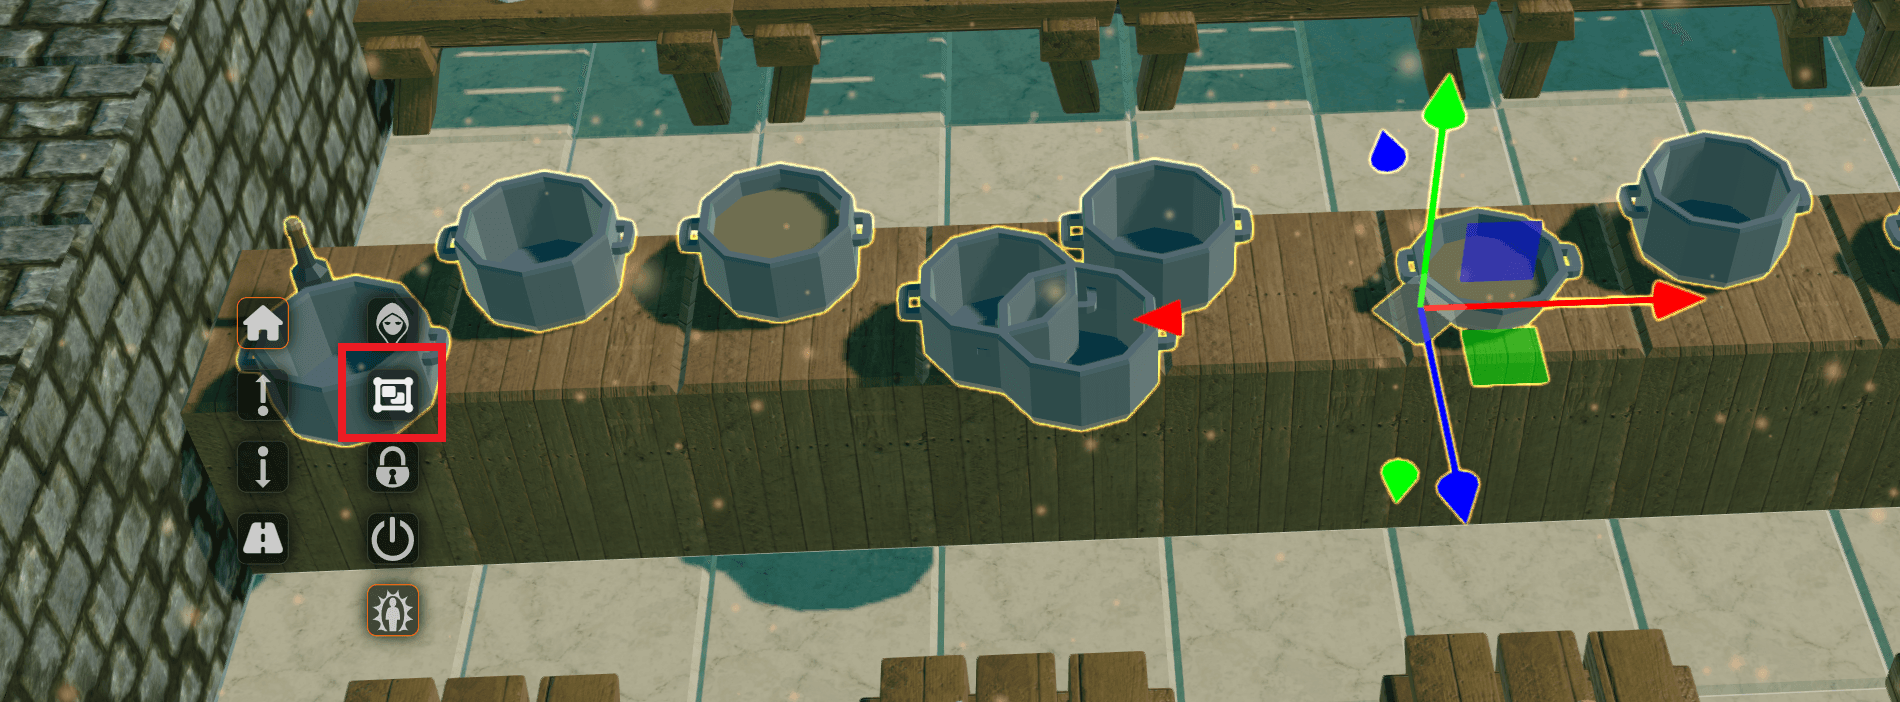
After placing a 3D Tile, you can manipulate it by selecting it and using the Gizmo controls. You can read more about them in the Tile Editor Tab in the Controls
This is the most basic usage of 3D Tiles, but exploring the options in the 3D Tab will give you a lot of power to create whatever you want.
3D Tiles Options
We will now go into a deep dive of the 3D Tab in the Tile Configuration and how to master the available tools to make a quick work of enhancing your 3D Maps. Some of the feature are quite advanced, remember that you don't need to learn everything at once, you can always come back to this page to learn more.
Before we begin, click the Show Advanced Settings button at the bottom of the 3D Tab to expand the configuration to all it's glory.
We will now explore all the options, some options will be grouped and discussed together.
3D Model
This is the most important option, it's the 3D Model that will be used for the Tile. It operates the same way as the core Foundry VTT image fields (such as the Token Image field). You can either input a URL or use the Filepicker button to select a file from your storage.
Dynamic Mesh
The Dynamic Mesh option is a very powerful tool, it allows you to generate 3D Models on the fly, depending on how you configure it.
The Dynamic Mesh Resolution option allows you to specify how complex the generated geometry will be, the higher the number, the more complex the geometry will be, but also the more performance it will take to render.
Dynamic Mesh Types
If the option is set to anything other than None (use 3d model) the 3D Model field will be ignored.
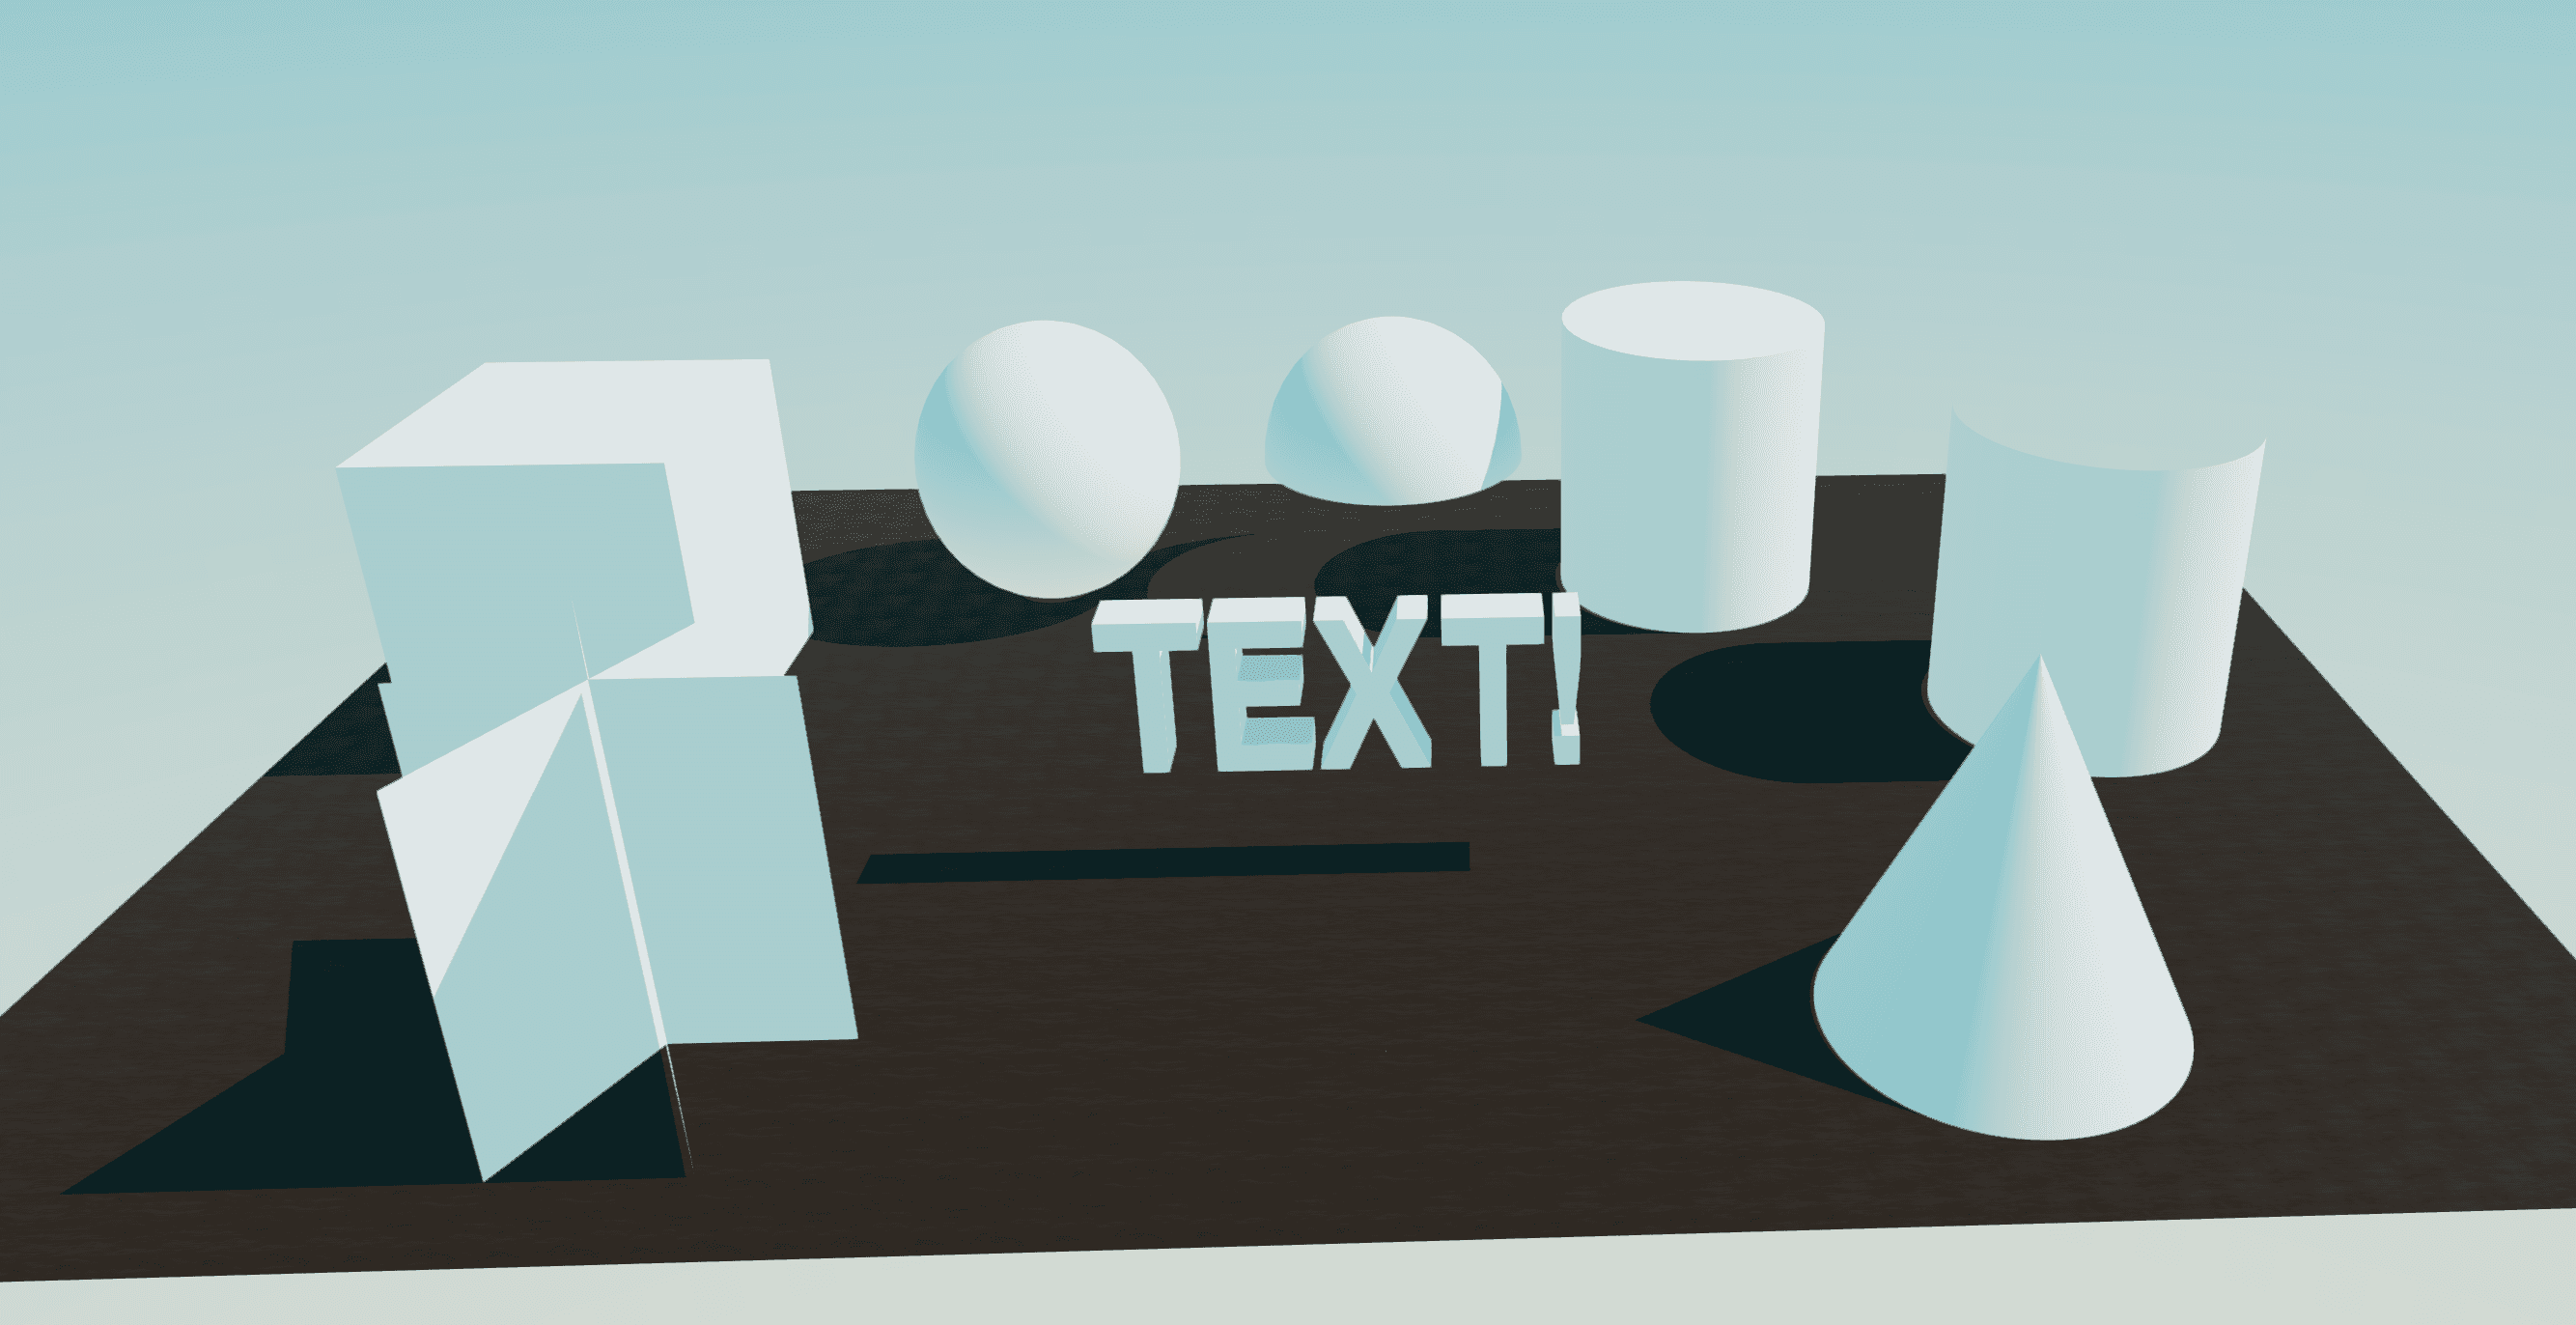
Basic shapes
These options will create basic shapes, these include Box, Sphere, Dome, Cylinder, Tube, Cone.
They all operate in the same way, as in they will create a basic shape that you can then customize with other settings.
This is the most basic usage of the Dynamic Mesh option, an example usage of this would be to create a Box, set it to a blue color (or apply a texture) and enable the Ocean Shader. In a matter of seconds you created a lake, river or ocean for your scene.
Billboard
The Billboard and Billboard (cross) options will a model which is a combination of multiple (2 or 3) planes, this is especially usefull to create vegetation that is very cheap to render. This option is often used in combination with the repeat mode (discussed below) to create a forest or a field of grass.
Text
The Text option will create a 3D Model that is a text, this is usefull to create signs or labels for your scene. After selecting the Text option, you can input your text in the 3D Model field (since the text is the 3D Model).
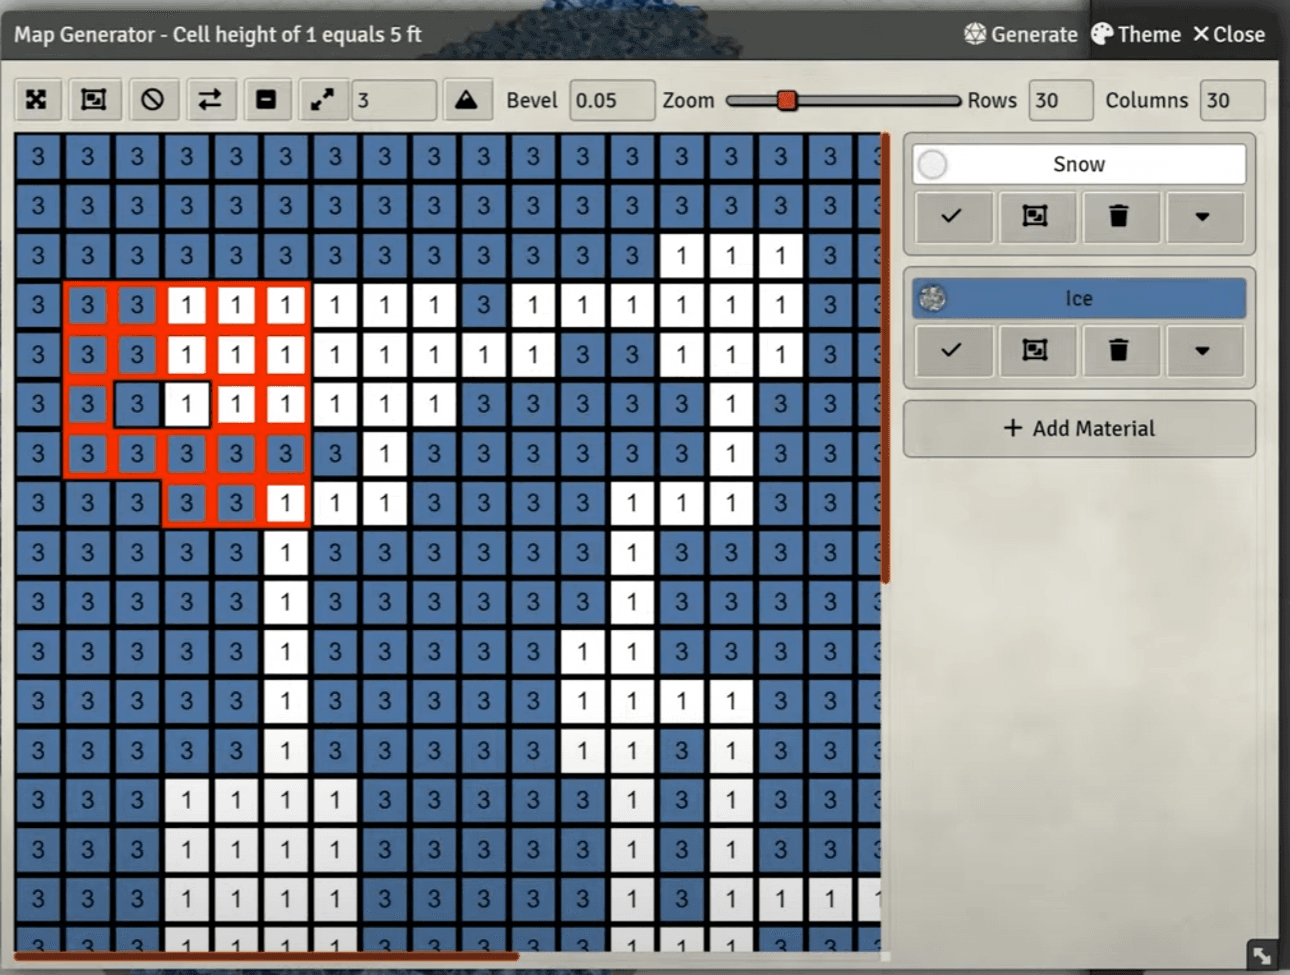
Map Generator
This is by far the most versatile option. After selecting the Map Generator option, a Cog button will appear to the right of the Dynamic Mesh dropdown, after clicking it you will be presented with a new window, this window allows you to configure the Map Generator to your liking.
Since this can be intimidating at first, you can watch a video tutorial on how to use it here (opens in a new tab) as it offers a more visual explanation.
Material Customization
This section will include all the settings that allow you to customize the material of the 3D Model and will cover the options from Texture all the way down to Sides
Texture
The Texture option allows you to apply a texture to the 3D Model, this is the most basic way to customize the material of the 3D Model.
You can ether select a single texture or a full material using the Material Browser provided by the Mapmaking Pack module.
The Texture Repeat slider allows you to set how many times the texture will repeat on the 3D Model.
The Flip Y option will flip the texture on the Y axis, this is usefull if your texture is rendered upside down but in general you can ingore this setting.
The Tint Color option allows you to set a color that will be applied to the texture, this is usefull to get more milage out of a single texture.
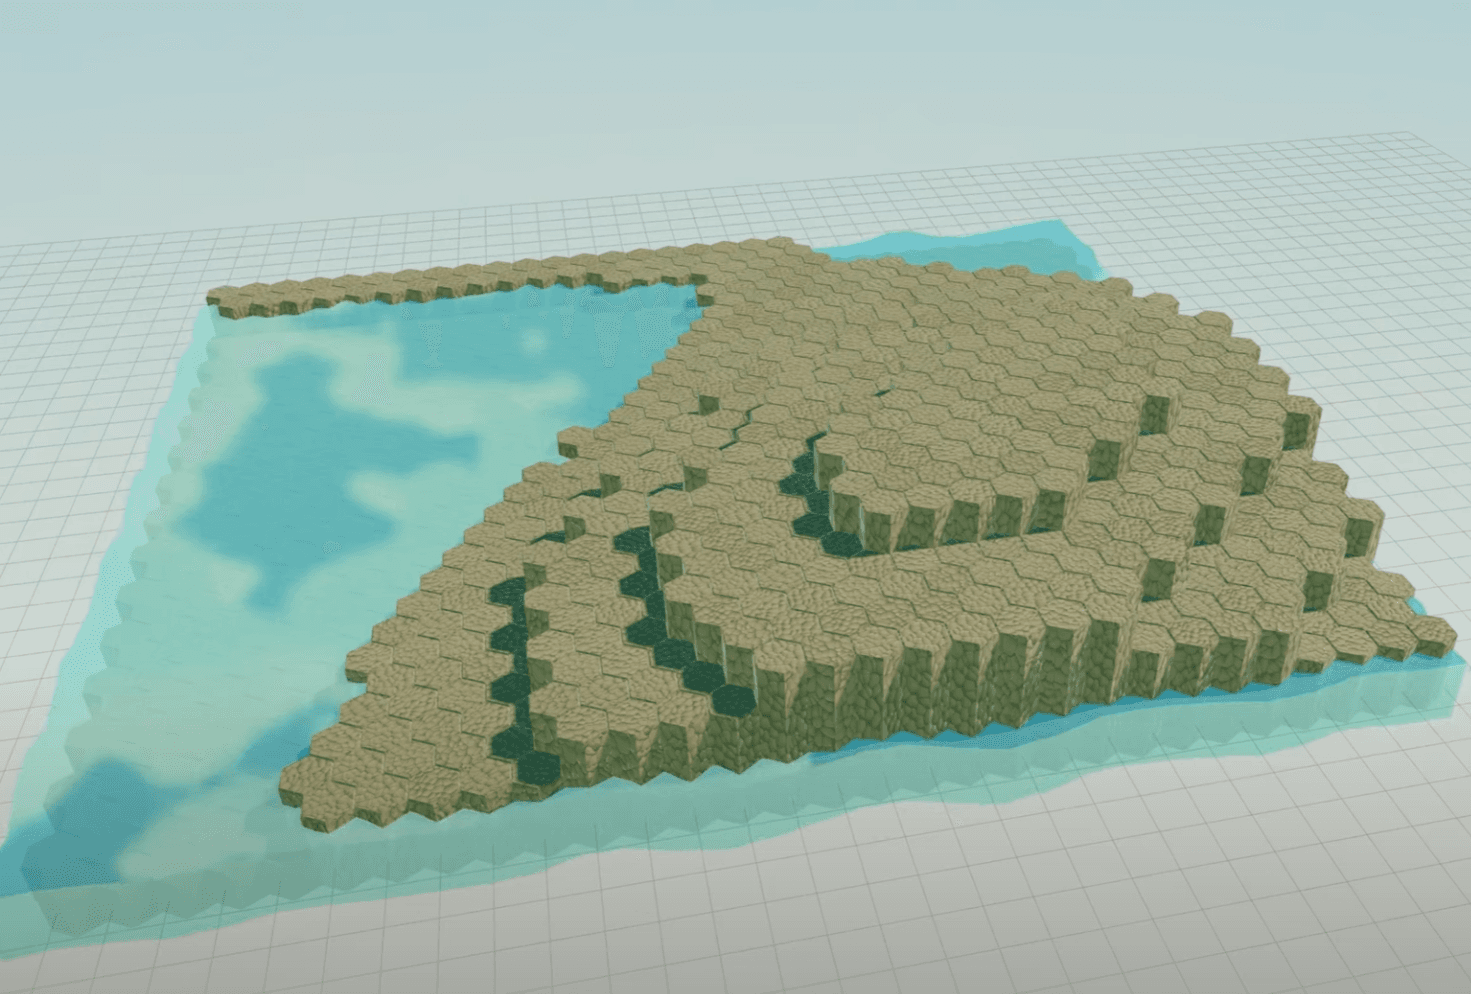
Heightmap/Heatmap
The Heightmap option allows you to apply a heightmap to the 3D Model, this will displace the geometry depending on the black\white intensity of the image.
Some heighmaps are included in the Mapmaking Pack module, but you can also use any image you want.
You can set the intensity or invert the heightmap using the Heightmap Intensity and Invert Heightmap options.
If your tile is in Repeat mode, the hightmap will be used as a Heatmap instead. A heatmap describes the density of distribution when using the Repeat mode, the darker the pixel, the more likely it is to spawn a 3D Model.
Other Material Options
The rest of the options will let you customize the appearance of the material further.
- The
Roughnessoption will set the roughness of the material, this is usefull to make the material look more or less shiny. - The
Reflectivityoption will set the metalness of the material, this is usefull to make the material look more or less reflective. - The
Opacityoption will set the opacity of the material, this is usefull to make the material look more or less transparent. - The
Shadingoption will set the shading of the material, this is usefull to make the material look more or less smooth. - The
Sidesoption will set the sides of the material, generally this should be correct by default, but if you are using (for example) a dynamesh cylinder you will not see the 3D Model when looking at it from the insde. In this situation you might want to change this option to "Double side"
Positioning
The Positioning section will allow you to customize the position of the 3D Model. You shouln't need to change any of these settings by changing them manually but they are exposed for advanced users.
The Auto Center and Auto Ground option will automatically center and ground the 3D Model, this is usefull if you are using a 3D Model that is not centered or not on the ground by default. The Auto Ground option is enabled by default.
The Tilt X and Tilt Y options will tilt the 3D Model on the X and Y axis.
The Depth option is the 3D Counterpart of the Width and Height options in the regular tile settings, it will set the depth of the 3D Model.
Animation
The Animation section will allow you to enable and select animations for the 3D Model.
The Enable Animation option will enable or disable the animation of the 3D Model.
The Animation Index option will allow you to select the animation that will be played by the 3D Model if more than one is present.
The Animation Speed option will allow you to set the speed of the animation.
The Paused option will allow you to pause the animation (this is also accessible in the Tile HUD).
Random Seed
The Random Seed option is used by the Repeat mode and the Terrain generation, you can change this value to whatever you want to re-randomize.
Vision
The Vision section will allow you to customize how the 3D Model will interact with sight and collisions.
- The
Block Movementoption will allow you to set if the 3D Model will block movement, disabling this option will let tokens pass through it. An obvious usecase would be disabling this on Grass. - The
Block Sightoption will allow you to set if the 3D Model will block sight. It's recommended to disable this option on any tile that does not requires it as it will improve performance. Things like grass, trees, or even floors don't need to block sight! - The
Camera Collideroption will allow you to set if the 3D Model will prevent the camera from going through it, this is only relevant if Game Camera is enabled. - The
is Dooroption will allow you to set if the 3D Model will be treated as a door, this will allow you to open and close it with the regular Foundry interactions (Left click to open\close, right click to Lock\Unlock). A secret door can only be opened by a GM. - The
Door Stateoption will allow you to set the initial state of the door, this is only relevant if theis Dooroption is enabled.
Tiling
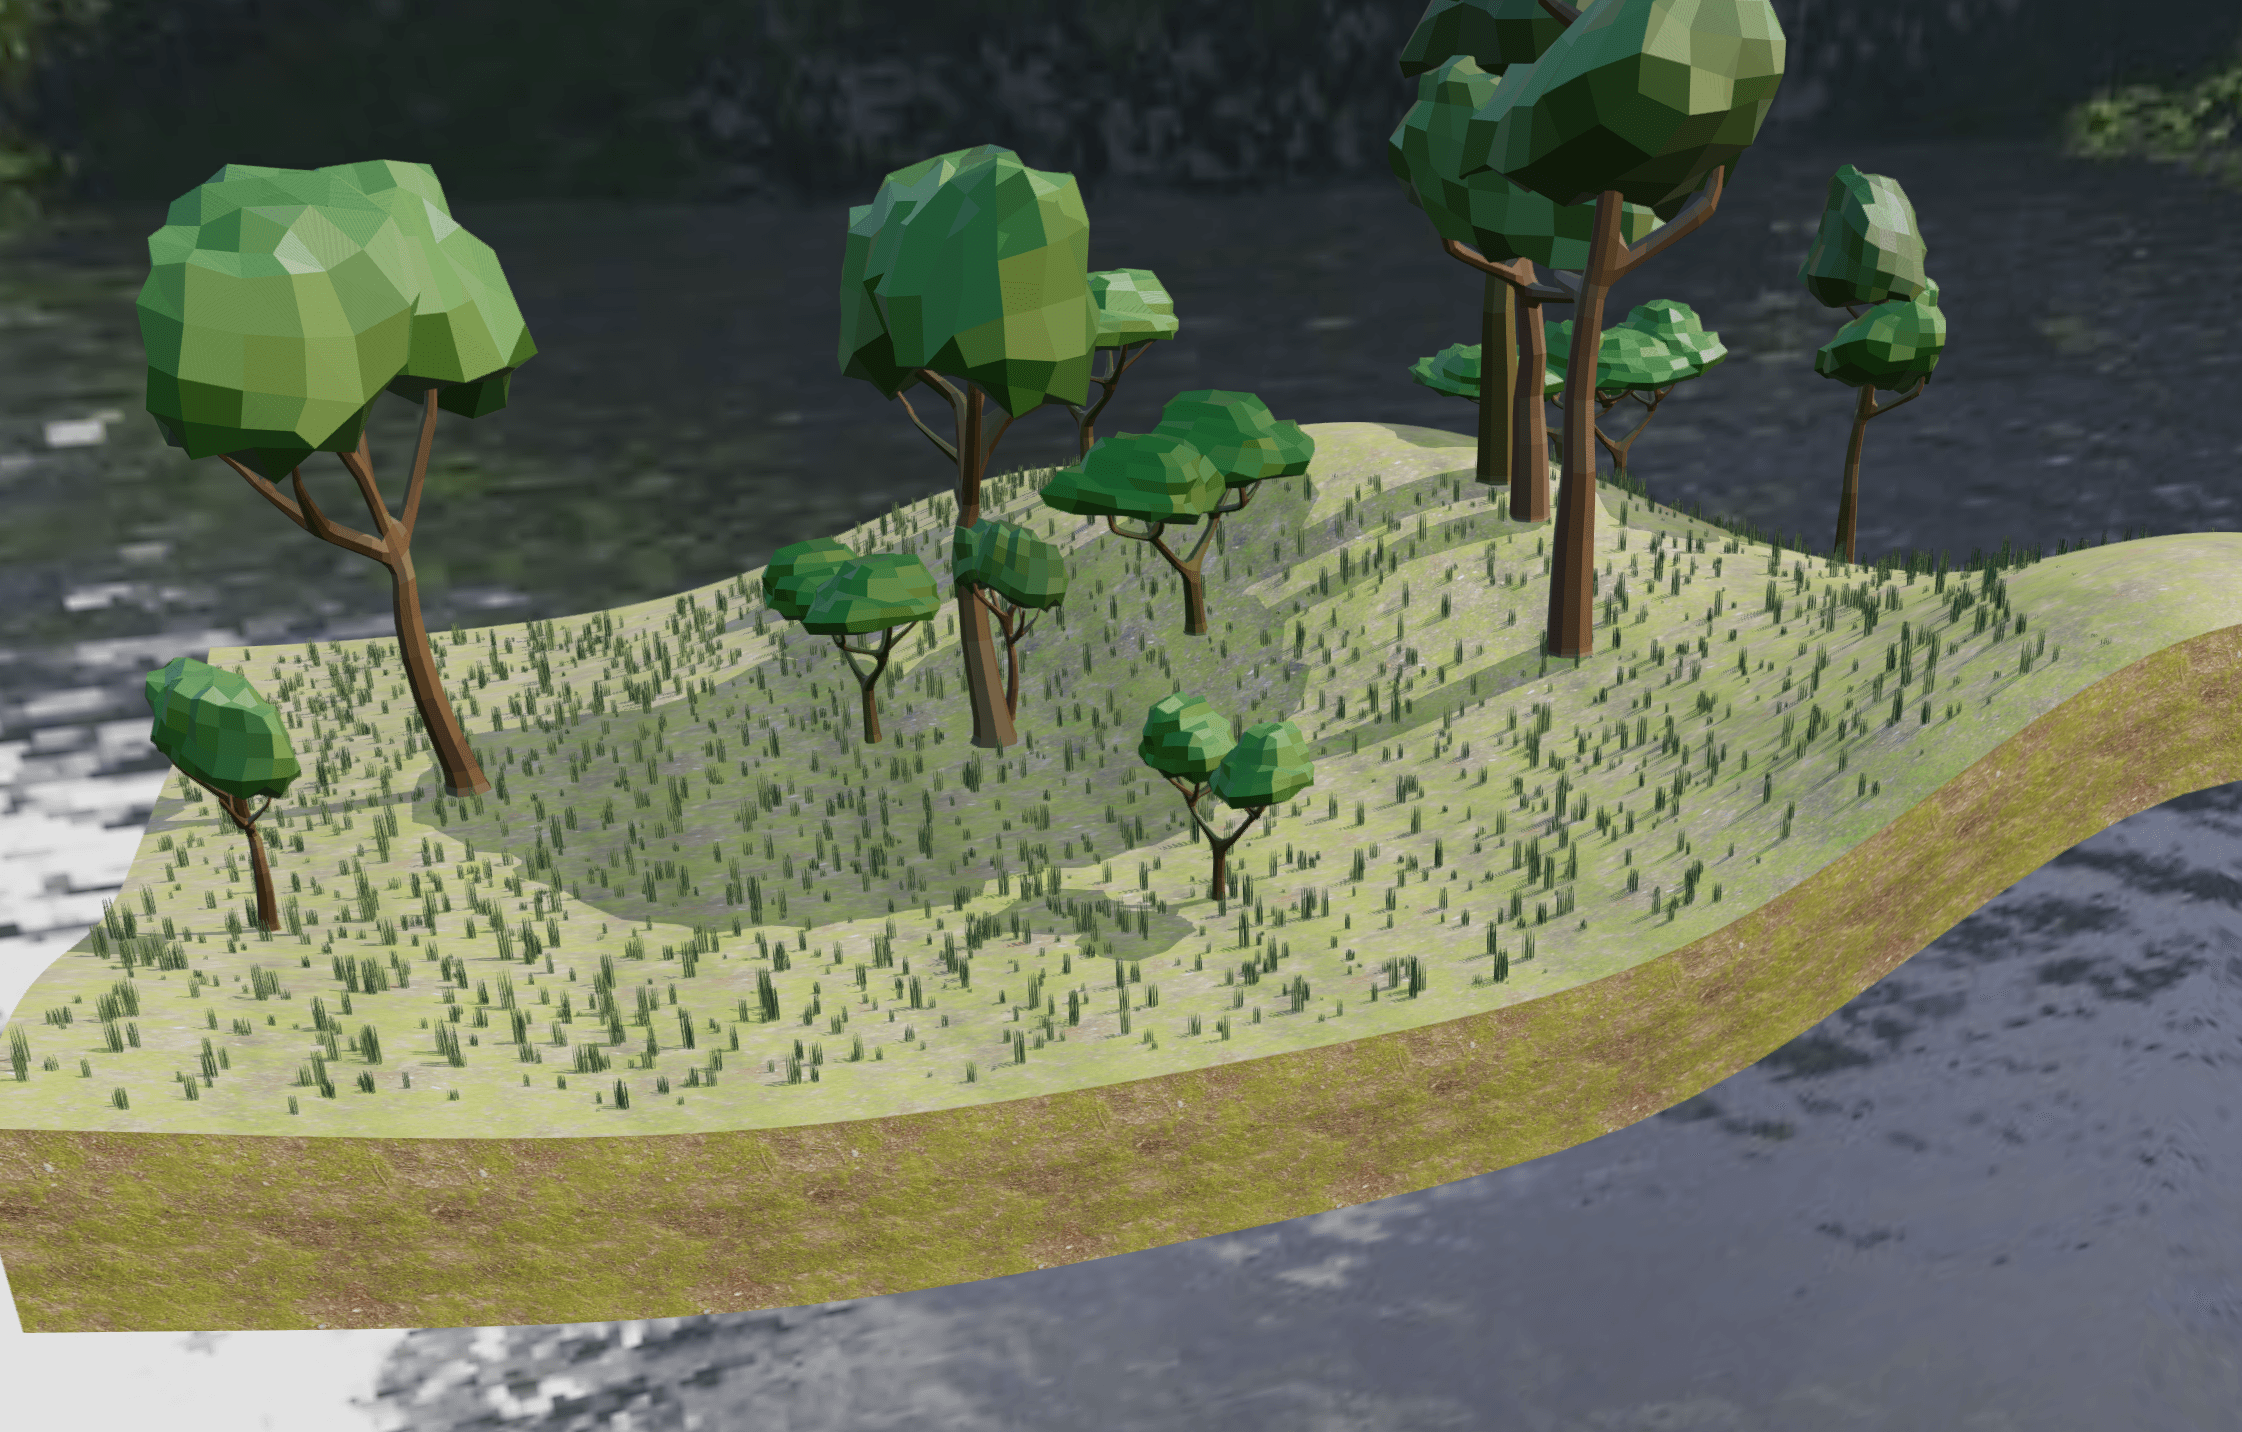
The Tiling section will allow you make multiple copies of the same 3D Model in a single tile, this is usefull for things like grass or trees.
Using the Repeat mode is a lot more efficient than copy pasting the same 3D Tile multiple times.
Once you set the Fill Type to Repeat you will be able to set the randomization options. The randomization options are self explanatory and will not be covered here.
Shaders
The Shaders section will allow you to customize special effects on the 3D Model. The shader configuration is covered in the Shaders page as it's shared between multiple entities.
Terrain
The Terrain section will allow you to generate a terrain using the 3D Model as a base. It's suggested to use a Dynamic Mesh basic shape for this.
After selecting a Noise Type you will be able to set all the options for the noise. There are many noise options and the best way to understand them is to play with them.
Animation Function
On Scenes imported from the Community Maps this option will be disabled by default from the scene setting due to the potential danger of running custom code. If you trust the map creator you can enable it from the scene settings.
Note that this is a very advanced feature and you should not need to use it unless you know what you are doing.
The Animation Function option will allow you to set a custom function that will be called every frame to animate the 3D Model. This function will be called with the following arguments:
delta: The time in milliseconds since the last frametile3d: The Tile3D object (you should not need to use this, but it's there if you need it - use only if you know what you are doing)this: The 3D Object (this is the object you will be animating)
Example
This example will rotate the 3D Model on the Y axis every frame.
this.rotation.y += delta;This example will make the 3D Model move up and down every frame.
this.position.y = Math.sin(delta / 1000) * 0.5;This example will make the 3D Model scale up and down every frame.
this.scale.y = Math.sin(delta / 1000) * 0.5;Merging 3D Tiles
It's very common to have multiple 3D Tiles that use the same model and texture that you need to manually place one by one instead of relying on the randomized Repeat mode.
As discussed above, having multiple 3D Tiles is not efficient and will slow down your game, luckly 3D Canvas will let you merge multiple 3D Tiles into a single one.
To merge 3D Tiles, select multiple 3D Tiles and click the Merge button in the 3D Tile HUD. The button can be accessed by right clicking one of the selected tiles to bring up the HUD.
3D Canvas will automatically figure out which of the selected tiles can be merged and will group them accordingly. The previously multi-copy tiles will be replaced by single merged tiles that are considerably more efficient.
To un-merge a 3D Tile, select it and click the Unmerge button in the Tile HUD.
Un-merging a tile will restore the original tiles to their previous position, rotation and scale before merging.
Auto Merging
Any bulk/automated operation can inherently be dangerous, please make sure to make a duplicate of your scene before using this feature.
3D Canvas offers a macro that will automatically optimize your scene by merging all the tiles that can be merged. This operation will skip any currently selected tile and all door tiles even if they could be merged.
You can find this macro in the 3D Canvas Macros compendium and it's named Auto Merge All Tiles.
Advanced
Making a Multilevel 3D Map
For this to work, first enable the "Mirror Levels Tile Visibility" in the 3D Tab in your Scene Configuration.
If you wish to make a multilevel 3D Map, where the 3D Objects above you are not visible, Open the Levels UI and define the amount of levels you wish, then, select a level. A Magenta colored Plane will appear, to indicate where you are building, start draging and dropping 3D Object onto that plane to build on that level, repeat for the other levels. If you now explore the map with a token selected, you will see that Objects above you will be hidden.
Tagging 3D Models with Collision and Door data (Blender)
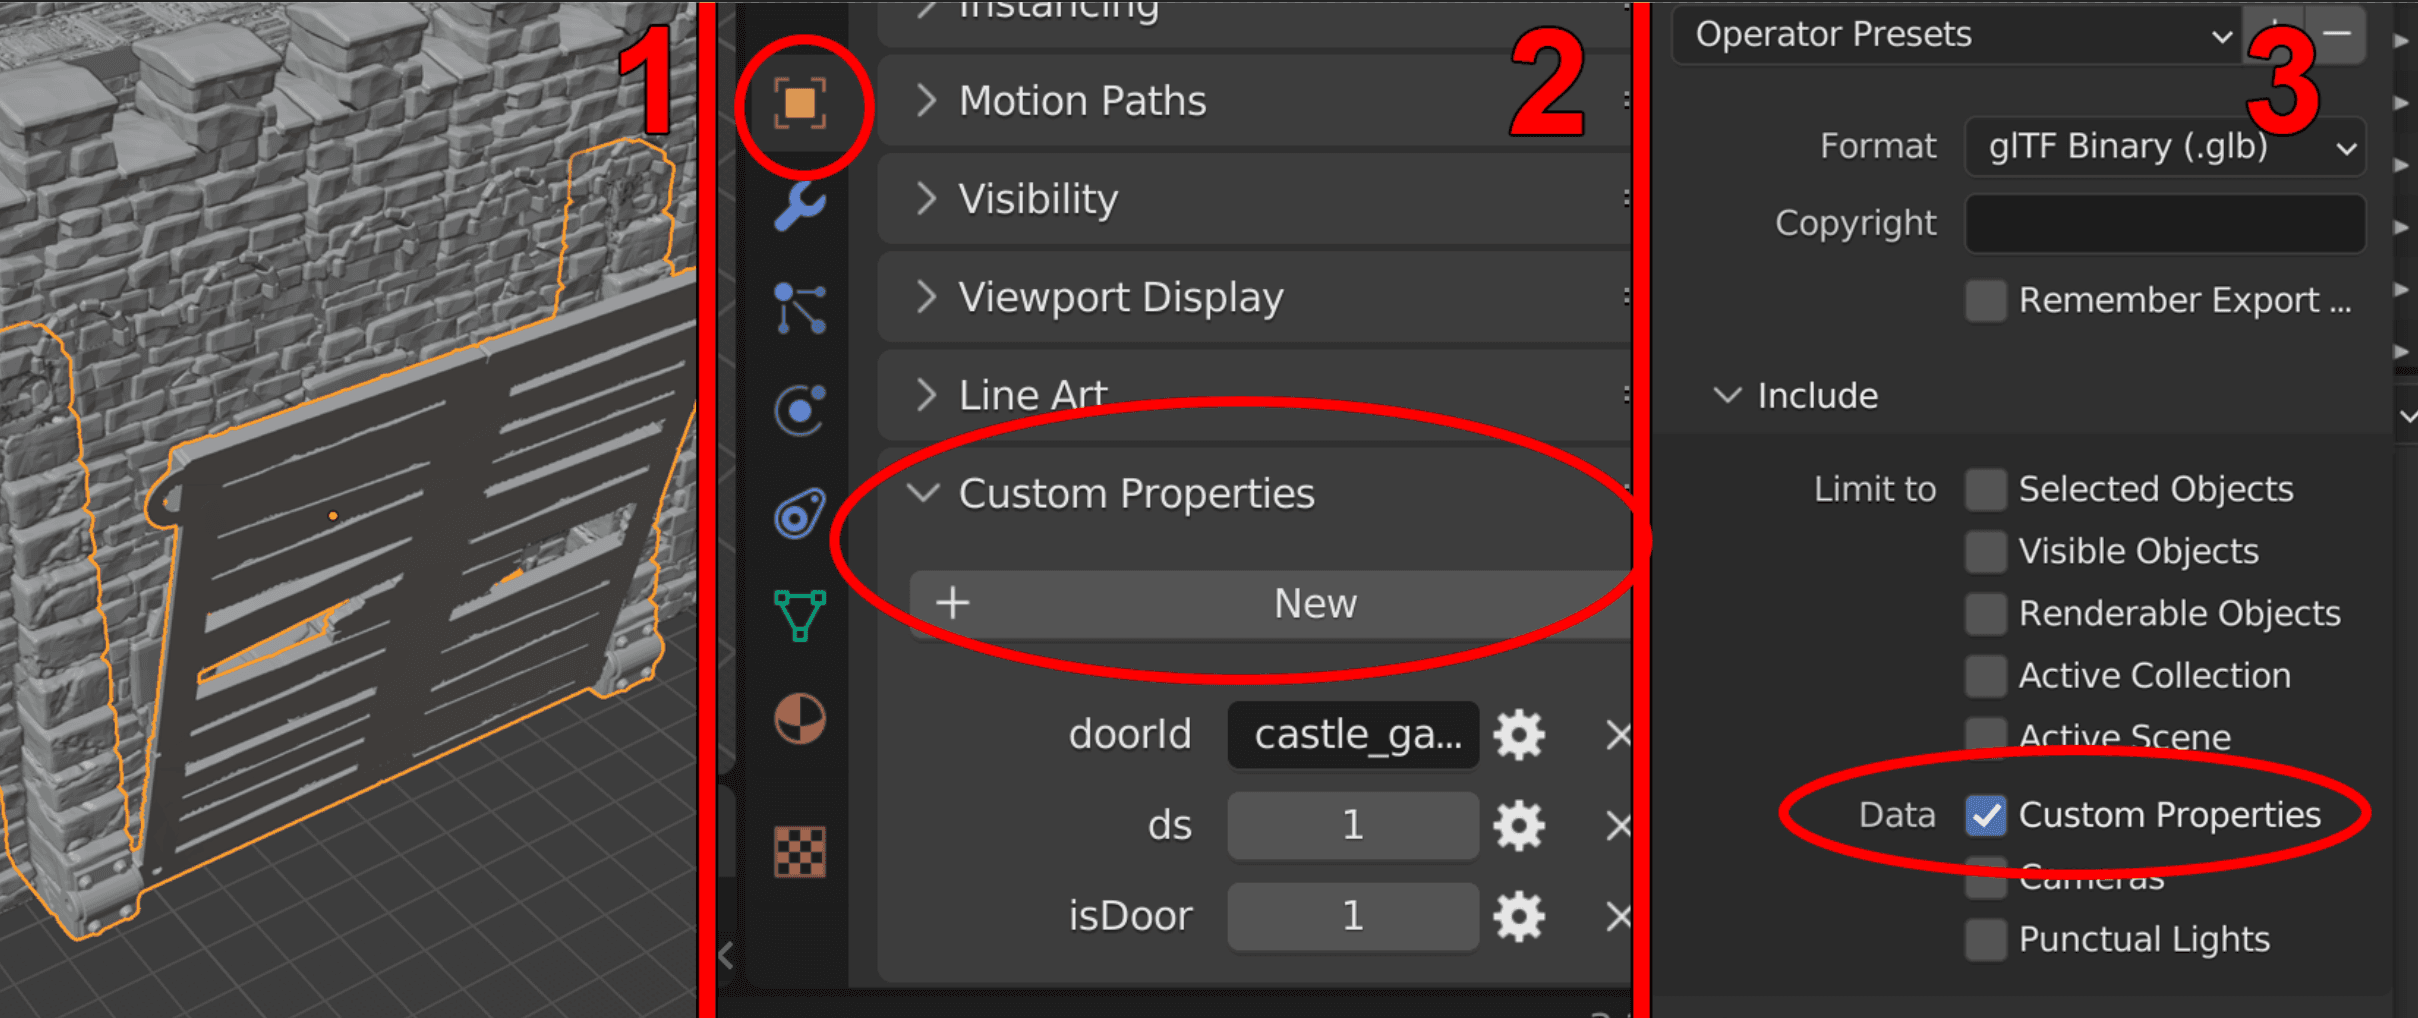
You can add metadata to your 3D Models in a way that 3D Canvas will be able to read it and automatically make parts of your Mesh Doors or set collision\sight blocking on submeshes separetly
- Select the mesh you wish to tag
- Head to the 'Object Properties' tab and scroll to the bottom, Expand 'Custom Properties' and add them as needed (list of supported properties below)
- When you are done tagging all your meshes export the file as GLTF/GLB and make sure to include the custom properties in the export
The property names are case sensitive!
| Property Name | Type | Value |
|---|---|---|
| collision | Integer | 0/1 |
| sight | Integer | 0/1 |
| isDoor | Integer | 0/1/2 |
| doorId | String | Any Unique Name |
| ds | Integer | 0/1/2 |
| doorStyle | Integer | 0/1 |
| doorAnimateAngle | Integer | Degrees |
2D Tiles
Tiles are placed at the bottom elevation set through the Levels module. While background tiles are rendered as well it's highly suggested that you instead use a single background image or you will have popping and flickering issues. The module DF Architect (opens in a new tab) has an option to merge all your background tiles and background image into a single image.